“OceanWP is a versatile WordPress theme that combines flexibility and ease of customization, making it ideal for creating diverse websites.”
Bulk Update WooCommerce Stock Quantities in Minutes (2026 Guide)
22 May 2026, 12:28 pm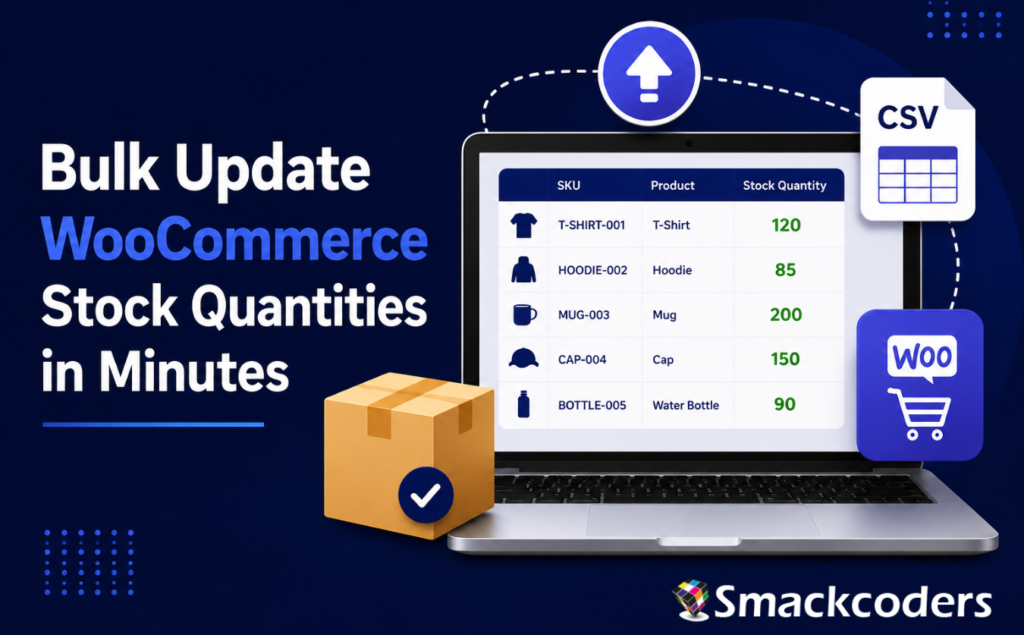
Bulk update WooCommerce stock quantities quickly using CSV imports, WooCommerce bulk editing tools, or advanced inventory management plugins. Instead of manually updating products one by one, these methods help store owners modify stock levels across hundreds or thousands of products in minutes. Managing inventory for a growing WooCommerce store becomes difficult as your catalog expands. Manual stock updates increase the risk of overselling, incorrect inventory counts, and time-consuming product management tasks. Using bulk stock update methods helps maintain accurate inventory, improves operational efficiency, and keeps product availability synchronized across your WooCommerce store.
If you’re still updating product stock one by one from your WordPress dashboard, you’re burning hours every week on a task that should take minutes. Bulk updating stock quantities prevents costly mistakes like overselling, keeps out-of-stock products off your shelves automatically, and frees your team to focus on growth instead of data entry.
This guide explains how to bulk update WooCommerce stock quantities using built-in WooCommerce tools, CSV imports, and automation plugins for stores of every size. Whether you manage 50 products or 50,000, you’ll find the right approach here. WP Ultimate CSV Importer is our top pick for medium-to-large catalogs.
Note: All methods in this guide have been tested on WooCommerce 8.x and 9.x, including stores running High Performance Order Storage (HPOS), introduced in WooCommerce 8.2+.
Key Takeaways
• Bulk updating WooCommerce stock saves hours compared to manual inventory edits.
• WooCommerce’s built-in bulk edit works best for quick updates on small catalogs.
• CSV imports provide the most flexible way to bulk update WooCommerce stock quantities at scale.
• Always use SKUs instead of product IDs for accurate stock mapping during imports.
• WP Ultimate CSV Importer simplifies complex inventory updates and variation handling.
• WP Ultimate CSV Importer’s URL and FTP scheduling automates WooCommerce stock syncing without external tools.
• Variable products require separate SKUs and stock updates for each variation.
• Common stock update issues like duplicate products and wrong stock status can be avoided with proper CSV mapping.
• Always back up your WooCommerce products before running bulk imports.
Why You Need to Bulk Update WooCommerce Stock Quantities
Manual stock updates seem manageable when you have 10 products. But once your catalog scales, the problems stack up quickly:
• Time drain: Updating hundreds of products one by one costs hours that could go toward marketing, customer service, or growth.
• Human error: Manual entry increases the risk of wrong quantities, leading to overselling or phantom availability.
• Scalability: Flash sales, supplier deliveries, and seasonal resets require fast, store-wide changes, not one-by-one edits.
• Sync issues: If your store connects to an ERP, warehouse platform, or supplier feed, your inventory data must stay consistent in real time.
5 Methods to Bulk Update WooCommerce Stock Quantities (Comparison)
Choose the method that fits your store size, technical comfort level, and update frequency:
| Method | Best For | Skill Level | Speed | Price | Best Feature |
|---|---|---|---|---|---|
| Built-in Bulk Edit | Small stores (< 50 products) | Beginner | Moderate | Free | No setup needed |
| Native CSV Import | Mid-size (50–500 products) | Intermediate | Fast | Free | No plugins needed |
| WP Ultimate CSV Importer | Large catalogs (500+) | Intermediate | Very Fast | Free/Paid | Smart Mapping |
| WP All Import | Enterprise & Automated Syncs | Advanced | Fastest (Scheduled) | Paid | Auto-scheduling |
| Stock Manager Plugin | Visual Spreadsheet View | Beginner | Fast | Free | Visual Inventory Management |
Each method below shows you exactly how to bulk update WooCommerce stock quantities based on your store size and workflow. Looking to handle catalogs of 500+ products with zero errors? WP Ultimate CSV Importer is built for exactly this. Try it free from the WordPress.org plugin directory.
Method 1: How to Bulk Update WooCommerce Stock Quantities Using the Built-in Bulk Edit Tool
The built-in WooCommerce bulk editor lets you update stock quantities for multiple products at once without any plugin, directly from your WordPress admin. Use it for quick, one-time stock changes across a small set of products, no file preparation needed.
How to Bulk Update WooCommerce Stock Using the Built-in Editor – Step by Step
1. Go to WooCommerce > Products > All Products in your WordPress admin.
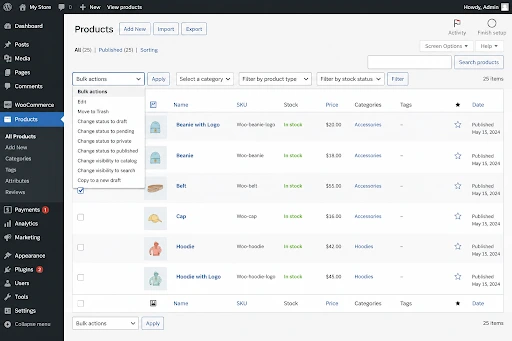
2. Use the category, product type, or stock status filters to narrow your selection.
3. Check the boxes next to the products you want to update, or use the top checkbox to select all visible products.
4. From the Bulk Actions dropdown, choose Edit and click Apply.
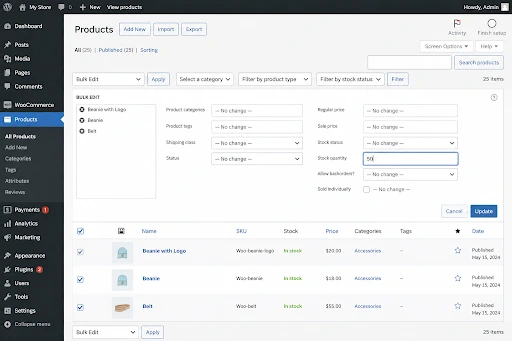
5. In the Bulk Edit panel that appears, locate the Stock Quantity field and enter your updated value.
6. Click Update. WooCommerce applies the change to all selected products instantly.
Pre-Import Checklist for WooCommerce Stock Updates
Before You Hit “Import”: The Safety Checklist
To avoid data errors or site crashes, ensure you’ve ticked these boxes:
• Full Backup: Always take a database backup using UpdraftPlus or your hosting panel.
• CSV Format: Your file must be saved in CSV UTF-8 (comma-delimited) format.
• SKU Accuracy: Ensure every product has a unique SKU; duplicates will cause mapping errors.
• Manage Stock: Set the manage_stock column to ‘1’ or ‘yes’ to enable tracking.
• Test Run: Import only 5–10 rows first to verify everything maps correctly.
Method 2: How to Bulk Update WooCommerce Stock Quantities via CSV File
The CSV method is the most reliable way to bulk update WooCommerce stock quantities across stores of any size. It lets you assign unique stock quantities to each product in a single import run; no plugins are required beyond WooCommerce core.
Step 1: Enable WooCommerce Stock Management for Your Products
Before importing, confirm that WooCommerce is actively tracking stock for each product:
• Go to WooCommerce > Products > All Products.
• Open a product and navigate to the Product Data > Inventory tab.
• Check the Manage Stock? checkbox to activate quantity tracking for that product.
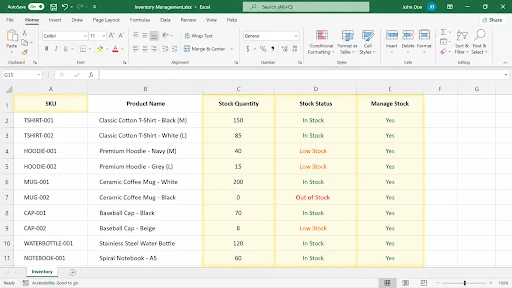
Step 2: Prepare Your WooCommerce CSV File for Stock Import
Your CSV file drives the entire update. It must include the right columns so WooCommerce can correctly identify and overwrite each product’s stock data.
Required columns:
• SKU: The unique identifier for each product. Use the SKU instead of the product ID; it stays consistent across environments and exports.
• Stock: The new quantity value to assign.
• Stock Status: Set explicitly as in stock, out of stock, or on backorder.
• Manage Stock: Set to 1 to ensure tracking is active.
WooCommerce Stock CSV – Sample Structure
| SKU | Product Name | Stock Quantity | Stock Status |
| WC-001 | Blue Cotton T-Shirt | 150 | in stock |
| WC-002 | Black Denim Jeans | 0 | out of stock |
| WC-003 | White Sneakers | 75 | in stock |
| WC-004 | Leather Wallet | 30 | in stock |
Step 3: Export Existing WooCommerce Products Before Updating
Always create a backup before making bulk changes:
1. Go to Products > All Products and click Export at the top of the page.
2. Export all products and download the CSV to your computer.
3. Save this file; it’s your rollback point if anything goes wrong.
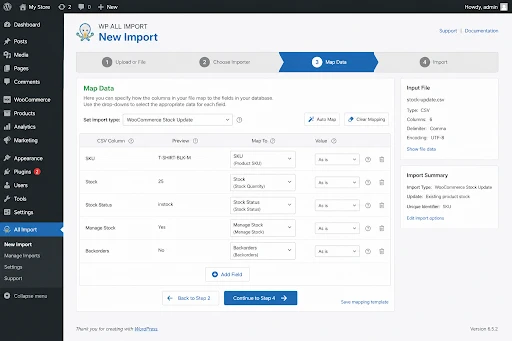
Step 4: Import and Bulk Update WooCommerce Stock via CSV
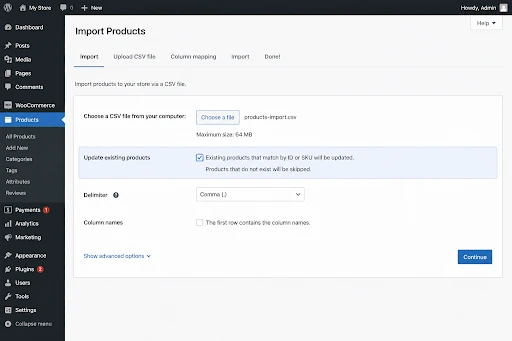
1. Go to Products > All Products and click Import.
2. Select your updated CSV file and click Continue.
3. On the Column Mapping screen, confirm that SKU maps to SKU and Stock maps to Stock Quantity.
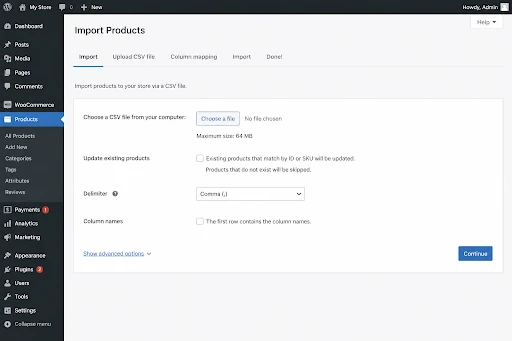
4. CRITICAL: Check the box labeled Update Existing Products. Without this, WooCommerce will create duplicate product entries instead of updating your existing ones.
5. Click Run the Importer. WooCommerce processes the file and updates stock quantities.
Method 3: Bulk Update WooCommerce Stock with WP Ultimate CSV Importer
For larger stores or more complex scenarios, including variable products, product variations, and custom field mapping, WP Ultimate CSV Importer gives you precise control over every aspect of the bulk update process.
Why WP Ultimate CSV Importer for WooCommerce Stock Updates
• Supports CSV, XML, and Excel file formats.
• Update-only mode modifies only the fields you specify all other product data stays untouched.
• Handles variable products and individual variations using their own SKUs.
• Live preview lets you catch mapping errors before running a full import.
• Detailed import logs make troubleshooting large catalogs straightforward.
• Compatible with WooCommerce 8.x / 9.x and HPOS-enabled stores.
How to Bulk Update WooCommerce Stock Quantities Using WP Ultimate CSV Importer
1. Install and activate WP Ultimate CSV Importer from the WordPress plugin directory.
2. Prepare your CSV file with SKU and stock quantity columns as described in Method 2.
3. Navigate to WP Ultimate CSV Importer > Import from your dashboard.
4. Upload your CSV and select WooCommerce Products as the import type.
5. Map your CSV columns to the correct WooCommerce stock fields.
6. Enable Update Existing Records mode so existing products are updated, not duplicated.
7. Run a preview import on 5–10 rows to validate your mapping before committing.
8. Click Run Import to apply changes across your full catalog.
WP Ultimate CSV Importer handles catalogs of 500+ products with variation-level control and update-only mode. Try it free on WordPress.org.
Method 4: Bulk Edit WooCommerce Stock Quantities with Stock Manager Plugin
Stock Manager for WooCommerce gives you a spreadsheet-style inventory dashboard where you can view and bulk edit stock quantities, prices, SKUs, and stock status directly on screen with no file preparation needed.
Stock Manager Plugin Features for WooCommerce Inventory
• Inline editing: click any cell to update values without opening individual product pages.
• Filter by category, product type, or stock status for targeted bulk edits.
• Supports both simple and variable products.
• Export and import stock data as CSV for offline editing when needed.
• 100% free; no premium version required.
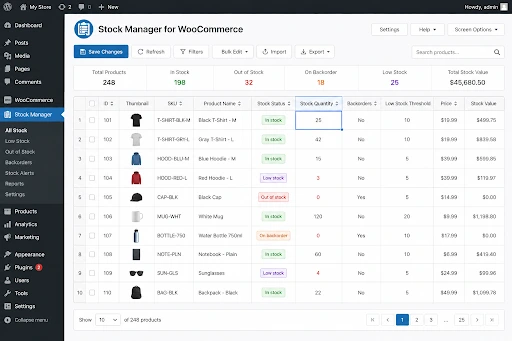
How to Bulk Update WooCommerce Stock Using the Stock Manager Plugin
1. Install and activate Stock Manager for WooCommerce from the WordPress plugin directory.
2. Navigate to WooCommerce > Stock Manager from your dashboard sidebar.
3. Use the filters at the top to narrow products by category or stock status.
4. Click any quantity cell in the table and type the updated value directly.
5. Click Save Changes to apply your edits across all modified products.
This plugin is ideal for store managers who prefer a visual interface over working with raw CSV files.
Method 5: Automate WooCommerce Stock Updates with WP All Import
For enterprise stores or operations that sync inventory from external systems, ERPs, warehouse platforms, or supplier data feeds, WP All Import offers powerful automation for WooCommerce stock updates.
Why WP All Import for Automated WooCommerce Stock Updates
• Imports stock data from CSV, XML, or Google Sheets.
• Scheduled imports automatically refresh stock at set intervals: hourly, daily, or custom.
• Match products by SKU, product ID, or title for flexible data alignment.
• Supports all product types: simple, variable, grouped, and custom.
• Connect directly to FTP servers, hosted URLs, or email attachments as data sources.
• Detailed logs and error handling built in for large-scale operations.
• Compatible with WooCommerce HPOS (8.2+) and the latest WooCommerce block-based product editor.
How to Schedule Automatic WooCommerce Stock Quantity Updates
1. Install WP All Import and the WooCommerce Add-On from the WordPress plugin directory.
2. Go to All Import > New Import and paste the URL of your hosted CSV or XML feed.
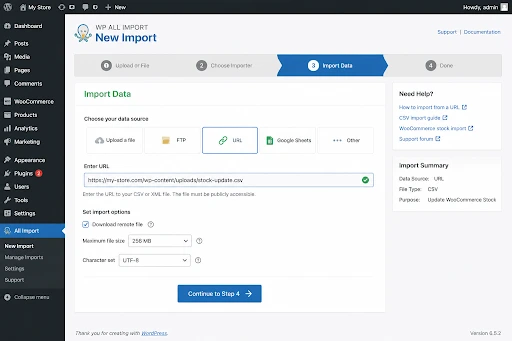
3. Select WooCommerce Products as the import type.
4. Map your data fields SKU to SKU, inventory quantity to stock, and stock status accordingly.
5. Enable the scheduling option and set your preferred sync frequency (hourly, daily, etc.).
6. Run the importer once manually to confirm data is mapping correctly, then let automation take over.
Stores using AI-powered inventory tools or platforms like Zapier, n8n, or warehouse management systems can push stock data to a hosted CSV endpoint that WP All Import polls automatically, creating a fully hands-free sync pipeline.
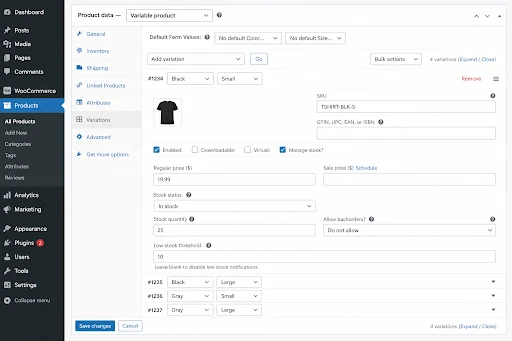
How to Bulk Update WooCommerce Stock for Variable Products
Variable products, such as a t-shirt available in multiple sizes and colors, require special handling during bulk stock updates. Each variation is treated as its own inventory unit.
WooCommerce Variable Product Stock Update – Key Rules
• Each variation has its own unique SKU. Use the variation SKU in your CSV, not the parent product SKU.
• Stock is managed at the variation level; updating the parent product will not change individual variation quantities.
• Your CSV must include a separate row for each variation.
• Use WP Ultimate CSV Importer for variation-level bulk updates. It handles this explicitly with dedicated variation SKU support.
WooCommerce Variation Stock CSV – Example Structure
| Variation SKU | Product Name | Stock Qty | Stock Status |
| WC-001-S | Blue T-Shirt (Small) | 80 | in stock |
| WC-001-M | Blue T-Shirt (Medium) | 45 | in stock |
| WC-001-L | Blue T-Shirt (Large) | 0 | out of stock |
Common WooCommerce Stock Update Errors and How to Fix Them
Most errors that occur when you bulk update WooCommerce stock quantities come down to wrong CSV mapping or missing the Update Existing Products checkbox.
Error 1: WooCommerce SKU or Product ID Not Found During Import
Problem: WooCommerce cannot match a CSV row to an existing product.
Fix: Export your current product list first and copy SKUs directly from that export into your update file. Trim extra spaces and remove any special characters.
Error 2: WooCommerce Stock Status Not Updating After Bulk Import
Problem: You set the quantity to 0, but the product still shows as In Stock on the front end.
Fix: Add an explicit Stock Status column to your CSV and set it to out-of-stock for all zero-quantity rows. Also, confirm that Manage Stock is enabled at the product level.
Error 3: Duplicate WooCommerce Products Created on Stock Import
Problem: After import, you see double entries for your products.
Fix: You skipped the Update Existing Products checkbox during import. Delete the duplicates, then re-import with that option checked.
Error 4: WooCommerce CSV Column Mapping Mismatch
Problem: Stock quantities are updating to the wrong product fields.
Fix: Always review the column mapping screen carefully before finalizing any import. Run a test import on 5 products before processing your full catalog.
Best Practices for WooCommerce Bulk Stock Quantity Updates
Following these best practices every time you bulk update WooCommerce stock quantities prevents data loss and overselling.
• Always export first. Before any bulk operation, download your current product data and keep a full site backup.
• Test with a small sample. Run your CSV on 5–10 products first to verify that field mapping and settings are correct.
• Use SKUs as identifiers. They remain stable across environments, exports, and imports, unlike product IDs.
• Always match stock status to quantity. When quantity hits 0, explicitly set stock status to “out of stock” in the same row.
• Verify after every import. Spot-check a random sample of products in your dashboard to confirm quantities are correct.
• Schedule large imports during off-peak hours. Heavy imports can slow your server; run them overnight or during low-traffic windows.
• Use update-only mode. Never do a full re-import unless absolutely necessary. Update-only mode touches only the fields you include.
• Stay compatible. If you’re running WooCommerce 8.2+, confirm your chosen plugin supports HPOS before running large imports.
Pro Tips for High-Volume Inventory
These pro tips apply whether you bulk update WooCommerce stock quantities for 500 or 50,000 products.
Expert Advice for Managing Large Catalogs
• Use Batch Processing: If you have 10,000+ products, split your CSV into smaller files (e.g., 2,000 rows each) to prevent server timeouts.
• Sync During Off-Peak Hours: Schedule large imports during late-night hours when customer traffic is lowest to ensure site stability.
• Automate Stock Status: Don’t just update the quantity. Include a stock_status column to automatically switch products to “Out of Stock” when they hit zero.
• Match by SKU, Not ID: Always use SKUs as your primary identifier. Product IDs can change if you migrate your site, but SKUs remain constant.
FAQs: How to Bulk Update WooCommerce Stock Quantities
Q1. Can I bulk update WooCommerce stock quantities without a plugin?
Yes. WooCommerce’s native CSV import tool (Products > All Products > Import) handles bulk stock updates without any third-party plugin. For variable products, scheduled syncing, or catalog sizes above a few hundred items, a dedicated plugin is the more reliable choice.
Q2. What is the best CSV format for WooCommerce stock updates?
At a minimum, your CSV needs four columns: SKU, Stock (quantity), Stock Status, and Manage Stock. Always use the SKU as your product identifier – it’s more reliable than the product ID across different environments and database states.
Q3. How do I bulk update WooCommerce stock using a CSV file?
Export your current products from Products > All Products > Export, update the Stock Quantity and Stock Status columns in your spreadsheet, then reimport using Products > Import. Check the “Update Existing Products” box to modify existing items instead of creating duplicates.
Q4. What happens if I don’t check “Update Existing Products” in WooCommerce import?
WooCommerce will create duplicate product entries for every row in your CSV instead of updating the existing ones. Always enable this option when running a stock update import.
Q5. Can I bulk update WooCommerce stock for variable products?
Yes, but each product variation needs its own SKU and a separate row in your CSV. WP Ultimate CSV Importer handles variation-level stock updates directly using variation SKUs, without affecting parent product data.
Q6. Can I bulk edit stock status in WooCommerce?
Yes. Include a stock status column in your CSV and set each row to in stock, out of stock, or on backorder as needed. You can update stock status independently of quantity or combine both changes in the same import file
Q7. How do I fix the out-of-stock status not updating in WooCommerce?
This usually happens when the Manage Stock option is disabled at the product level, or when your CSV is missing an explicit Stock Status column. Enable stock management for each affected product and include a stock status field in your import file with the correct value.
Q8. Will bulk updating stock affect other product data?
Not when you use Update Existing Products mode and include only stock-related columns in your CSV. Any product fields not included in the import file will remain completely unchanged.
Conclusion
Knowing how to bulk update WooCommerce stock quantities is a non-negotiable skill for any store owner running more than a handful of products. The method you choose should match your catalog size, update frequency, and technical setup.
Start with the built-in bulk editor for quick, small-scale changes. Move to WooCommerce’s native CSV import for medium-sized catalogs that need per-product quantities. Graduate to WP Ultimate CSV Importer when your catalog grows, your data gets complex, or you need variation-level control. And for fully automated, enterprise-grade syncing, WP Ultimate CSV Importer’s scheduled URL and FTP imports handle it without any external tools.
The habits that matter most: back up before every import, test with a small sample first, use SKUs as your identifier, and always verify your results. Build those into your workflow, and bulk stock management becomes fast, accurate, and stress-free.
Shopify Admin API Access Token: 6-Step OAuth Setup Guide
16 May 2026, 11:42 am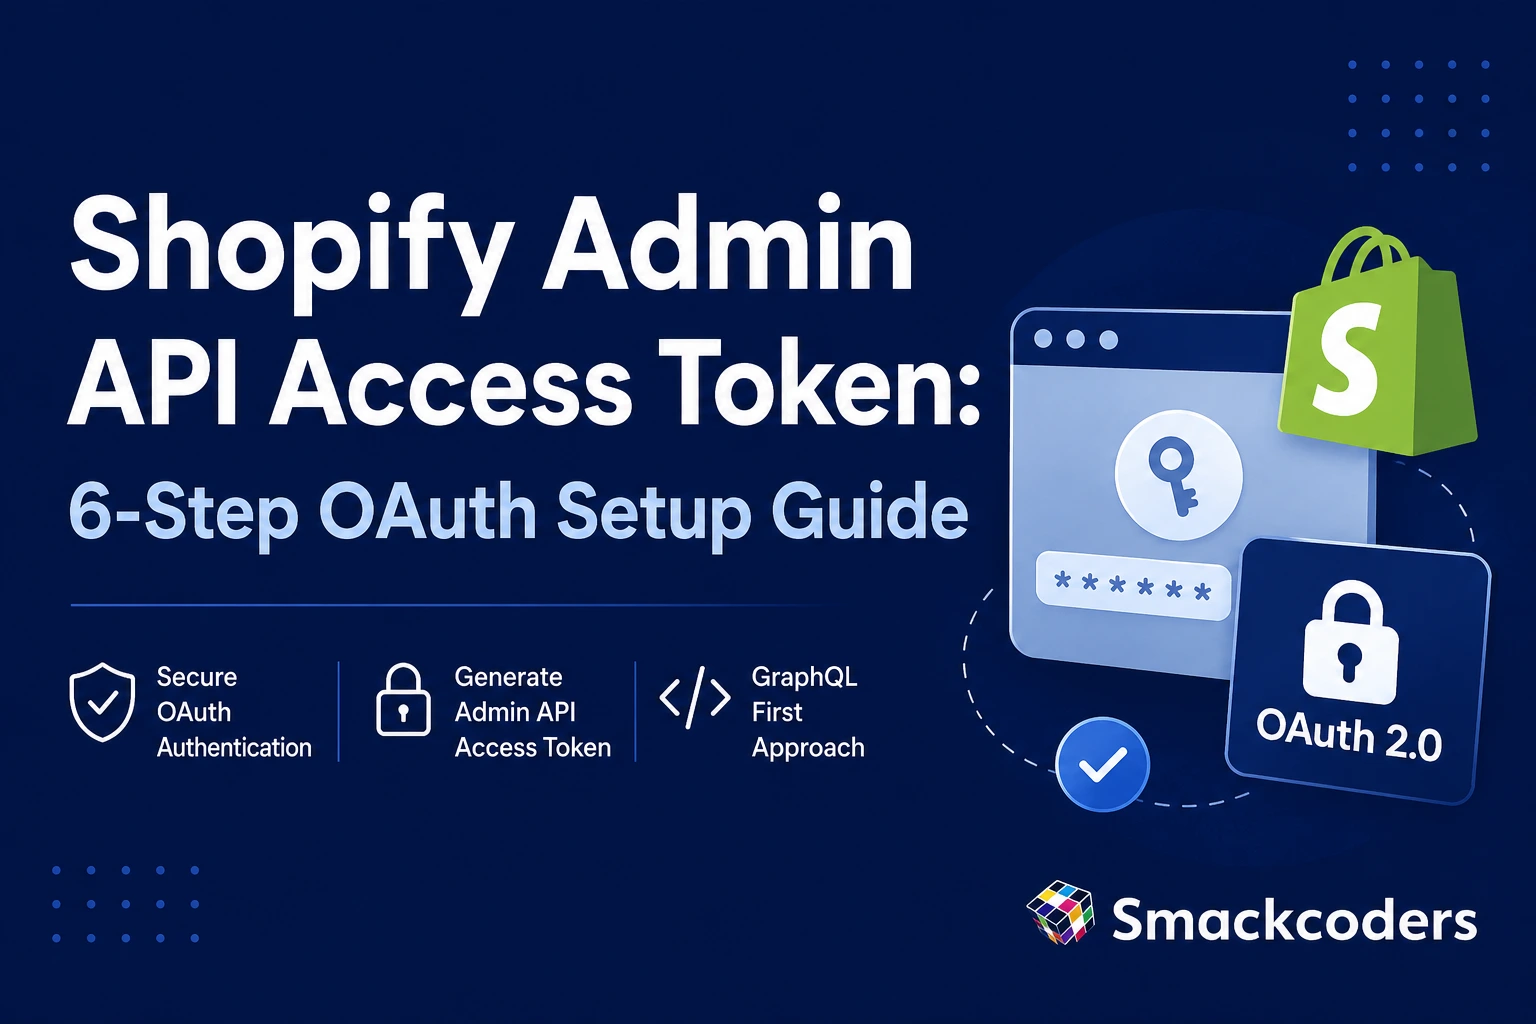
Table of Contents
If your Shopify integration stopped working or you’re setting up a new app, Shopify’s updated OAuth authentication system is likely the reason.
Shopify now requires developers to generate a Shopify Admin API access token using Shopify OAuth 2.0 authentication instead of older Shopify private app token methods.
To address these issues, Shopify has transitioned toward a more modern authentication model built around OAuth, improved token management, and centralized app development workflows. These updates are part of a broader initiative to strengthen platform security and standardize how third-party applications interact with Shopify stores. The new Shopify OAuth access token workflow improves API security and gives merchants better control over application permissions.
These changes directly affect how applications authenticate with Shopify, manage credentials, and access Admin APIs. Developers maintaining existing integrations must update their systems to comply with Shopify’s OAuth-based authentication model.
For a hands-on implementation example, explore our WooCommerce to Shopify access token integration guide that walks through connecting both stores with secure authentication.
Quick Answer
Shopify now uses OAuth authentication instead of static API tokens. Developers must create apps in the Shopify Developer Dashboard and generate Admin API access tokens through OAuth authorization.
Need to generate a Shopify Admin API access token quickly? Jump directly to the 6-step Shopify OAuth setup guide below.
Key Takeaways
- Shopify has shifted from static API tokens to OAuth-based authentication. Access tokens are now generated through a structured authorization workflow instead of being copied directly from the admin dashboard.
- App development has moved to the Shopify Developer Dashboard. Developers now create and configure applications there before installing them in stores.
- Access tokens are generated through OAuth authorization. After merchant approval, the application receives an authorization code and exchanges it for a Shopify Admin API access token.
- API permissions are now scope-based. Merchants must approve the specific data access an app requests, improving transparency and security.
- Shopify has prioritized GraphQL APIs over the legacy REST Admin API. The REST Admin API is considered legacy, and new development should prioritize the GraphQL Admin API.
Why Shopify Moved to OAuth Authentication
For many years, Shopify allowed developers to create permanent Admin API tokens through private apps or custom apps inside the store’s admin dashboard. These tokens could be copied directly and used indefinitely for API requests.
From a development standpoint, this approach was extremely convenient. Developers could generate a token once, store it in an application, and continue using it without worrying about expiration or refresh cycles.
However, this simplicity created several security concerns.
Permanent tokens meant that if credentials were exposed through misconfigured servers, leaked environment files, or compromised repositories, attackers could potentially gain unrestricted access to store data. Since these tokens did not expire automatically, revoking them required manual intervention from the store owner.
As Shopify’s ecosystem expanded to include thousands of integrations interacting with merchant stores, relying on static authentication credentials became increasingly risky.
To improve platform security and align with modern API standards, Shopify transitioned toward a more controlled authentication model that emphasizes OAuth authorization, better permission management, and structured app development workflows.
These updates aim to accomplish several objectives:
- Reduce the risk of long-term credential exposure
- Encourage secure authentication workflows using OAuth
- Provide merchants with clearer visibility into app permissions
- Enable developers to manage API access more safely within their applications
By implementing these changes, Shopify brings its authentication architecture closer to how modern platforms such as Stripe, Slack, and Google Cloud handle API security.
| Old Shopify Authentication | New Shopify Authentication |
| Static API tokens | OAuth-based authentication |
| Tokens copied manually | Tokens generated programmatically |
| Limited permission visibility | Scope-based permissions |
| REST-focused APIs | GraphQL-first APIs |
| Higher security risks | Improved API security |
Major Shopify OAuth and Admin API Changes for Developers
Shopify’s authentication changes are not a single update but a series of platform improvements that collectively reshape how developers build and maintain integrations.
Understanding these changes is essential for anyone developing Shopify apps or maintaining existing API integrations.
1. App Creation Has Moved to the Shopify Developer Dashboard
Historically, developers could create API credentials directly inside a store’s Shopify admin panel. This meant app creation and store management happened in the same interface.
The traditional workflow looked like this:
Shopify Admin
→ Apps
→ Develop Apps
→ Create App
→ Generate Admin API Token
Shopify now encourages developers to create applications through the Shopify Developer Dashboard instead of relying on older custom app workflows inside the Shopify admin.
The modern workflow typically follows this structure:
Shopify Developer Dashboard
→ Create Application
→ Configure API Scopes
→ Install the App on a Store
→ Generate OAuth Access Token
This change separates application development from store administration, providing better security, improved permission management, and centralized visibility for developers managing multiple integrations.
2. Access Tokens Are Generated Through OAuth
Another major change involves how access tokens are generated. Instead of manually copying tokens from the Shopify admin interface, applications now rely on OAuth authorization flows to obtain access credentials.
OAuth provides a structured authentication process that requires merchant approval before an application can access store data.
After merchant approval, Shopify generates a Shopify OAuth access token that applications use for authenticated Admin API requests.
The typical OAuth workflow follows these steps:
- The application requests authorization from the store.
- The merchant reviews and approves the requested permissions.
- Shopify generates an authorization code.
- The application uses the authorization code to obtain an access token from Shopify.
Once this process is completed, the application can use the generated access token to send authenticated API requests.
A typical OAuth token exchange request looks like this:
Request payload:
| POST https://{shop}.myshopify.com/admin/oauth/access_token { “client_id”: “YOUR_CLIENT_ID”, “client_secret”: “YOUR_CLIENT_SECRET”, “code”: “AUTHORIZATION_CODE” } Response: { “access_token”: “shpat_xxxxxxxxx”, “scope”: “read_products,write_products” } |
This programmatic token generation ensures credentials are issued only after proper authorization and are tied to specific application permissions.
3. OAuth Is Now the Standard Authentication Model
Shopify strongly encourages developers to adopt OAuth-based authentication for all modern applications. OAuth provides a secure mechanism for granting controlled access to store data while giving merchants full visibility into what permissions an app requests.
During installation, merchants must explicitly approve the scopes an application requests. These scopes define what resources the app can access.
For example, an inventory management tool may request scopes such as:
read_products
write_inventory
read_orders
An app that handles customer data might request additional scopes like:
read_customers
write_customers
This permission-based model improves security because applications only receive the access they truly require.
OAuth also provides better control over app revocation. If a merchant uninstalls an app, its associated access token becomes invalid immediately, preventing further API access.
OAuth is now the standard authentication method for public Shopify apps and SaaS integrations. However, certain custom apps created directly inside Shopify Admin may still use simplified token-based authentication workflows.
4. Shopify Has Shifted Toward GraphQL APIs
Alongside authentication improvements, Shopify has prioritized the GraphQL Admin API as its primary interface, while the REST Admin API is now considered legacy. Since the Shopify REST API is now considered legacy, developers should prioritize GraphQL APIs for new integrations.
In 2024, Shopify officially labeled the REST Admin API as legacy, signaling that new development should rely on GraphQL whenever possible.
GraphQL allows developers to request multiple resources in a single query, making API interactions significantly more efficient.
A typical GraphQL endpoint looks like this:
POST /admin/api/2026-01/graphql.json
Note: Replace 2026-01 with the latest supported Shopify API version listed in Shopify’s official API versioning documentation.
Example query:
| { products(first: 5) { edges { node { id title totalInventory } } } } |
Compared with REST APIs, GraphQL provides several advantages:
- Multiple resources can be fetched in a single request
- Developers retrieve only the fields they need
- API request counts are reduced
- Many new Shopify features are introduced through GraphQL first
For developers building Shopify applications today, GraphQL should be considered the primary API interface.
How to Generate a Shopify Admin API Access Token in 6 Steps
Although Shopify no longer displays Admin API access tokens directly inside the developer dashboard, developers can still generate them using Shopify’s OAuth authentication workflow. The process involves creating an application, installing it on a store, and exchanging an authorization code for an access token.
If you prefer a visual walkthrough of the process, the following tutorial explains how developers generate an Admin API access token using Shopify’s current workflow.
The steps below summarize the same process and explain how developers typically generate an access token for a Shopify integration.
For a complete, real‑world walkthrough, explore our WooCommerce to Shopify authentication guide, where we show how to generate and use Shopify access tokens with the W2S plugin.
Step 1: Create a Custom App in the Developer Dashboard
Start by creating a new application in your Shopify Developer Dashboard.
From your Shopify Admin:
- Click your profile icon in the top-right corner.
- Select Dev Dashboard.
- Click Create App.
During setup, Shopify asks for basic configuration details such as:
- App Name – A descriptive name for the integration (for example, the name of the third-party tool you are connecting).
- App URL – The location users are redirected to after installing the app. If you do not have an onboarding flow, you may temporarily use a placeholder or local development URL.
- Embedded App option – Enable this only if your app will run inside the Shopify admin interface.
Once these details are configured, save the application to continue.
Step 2: Configure API Scopes (Permissions)
After creating the app, you must define the API scopes the application requires.
API scopes determine which parts of the Shopify store the application can access. Common examples include:
- read_products
- write_products
- read_orders
- write_orders
- read_inventory
- write_inventory
Only request the permissions required for your integration. Limiting scopes reduces security risks and ensures your application only accesses the necessary store resources.
You must also define a Redirect URL, which Shopify uses during the OAuth authentication process. This URL acts as a trusted destination where Shopify sends users after the authorization process is completed.
After configuring the scopes and redirect URL, release the new app version.
Step 3: Retrieve Your Client ID and Client Secret
Once the application is created, Shopify generates two credentials required for authentication:
- Client ID – A unique identifier used to identify your application.
- Client Secret – A confidential key used to verify the identity of your application.
These credentials are available in the Settings tab of your app in the Developer Dashboard.
Together, the Client ID and Client Secret function similarly to a username and password during the OAuth authentication process. Because the Client Secret is sensitive information, it should always be stored securely on the server and never exposed publicly.
Step 4: Install the App to Start Generating a Shopify Admin API Access Token
Before an access token can be generated, the application must be installed on the Shopify store.
In the Developer Dashboard:
- Open your app configuration.
- Navigate to the Installs section.
- Click Install App.
- Select the store where the application should be installed.
Shopify will display a permission approval screen showing all the scopes requested by the application. After the store owner approves these permissions, the app becomes authorized to access the store.
Step 5: Start the OAuth Authorization Flow
After the app is installed, the OAuth authentication process must be initiated to generate your Shopify Admin API access token.
Developers start this process by constructing an authorization URL using the store’s domain and the app’s Client ID.
Example authorization URL:
| https://{shop}.myshopify.com/admin/oauth/authorize?client_id=YOUR_CLIENT_ID&redirect_uri=YOUR_REDIRECT_URL |
When this URL is opened in the browser, Shopify begins the authorization process and redirects the user to the configured redirect URL after authentication.
During this redirect, Shopify includes a temporary authorization code in the URL parameters.
Step 6: Exchange the Authorization Code for a Shopify Admin API Access Token
The authorization code received in the previous step is used to request the final Admin API access token.
To generate the token, developers send an HTTP POST request to Shopify’s OAuth endpoint:
| https://{shop}.myshopify.com/admin/oauth/access_token |
The request must include the following parameters:
- client_id
- client_secret
- code (authorization code received from Shopify)
Example request payload:
| { “client_id”: “YOUR_CLIENT_ID”, “client_secret”: “YOUR_CLIENT_SECRET”, “code”: “AUTHORIZATION_CODE” } |
If the request is valid, Shopify returns the Admin API access token in the response.
Example response:
| { “access_token”: “shpat_xxxxxxxxxxxxxxxxx”, “scope”: “write_products” } |
This access token is then used to authenticate future API requests to the Shopify Admin API.
Already building a Shopify integration? Make sure your app follows Shopify’s latest OAuth authentication and GraphQL API standards before deployment.
Important Security Note
A Shopify Admin API access token provides powerful access to store data. Developers should always store tokens securely and avoid exposing them in client-side code or public repositories. If an access token becomes compromised, the associated app should be revoked immediately to prevent unauthorized API access.
Shopify API Authentication Best Practices
As Shopify strengthens its authentication model, developers working with a Shopify Admin API access token should adopt secure credential management practices when building integrations.
In our WooCommerce to Shopify Integration documentation, you can see how these best practices are applied when configuring and storing Shopify tokens for live stores.
First, avoid embedding access tokens directly into application code. Hardcoding credentials inside source files creates serious security risks if the repository becomes exposed.
Instead, credentials should be stored in secure configuration systems such as environment variables or secret management tools.
It is also important to ensure that the client secret remains strictly on the server side. Exposing the client secret in frontend JavaScript or public repositories could allow attackers to generate unauthorized access tokens.
Applications should also maintain secure token storage mechanisms. Many teams store tokens in encrypted database fields or credential vault systems to prevent unauthorized access.
Secure Shopify Admin API authentication helps protect sensitive store and customer data from unauthorized access.
Finally, developers should always use Shopify’s versioned API endpoints when making requests. Shopify releases new API versions quarterly, and using versioned endpoints helps ensure integrations remain compatible as the platform evolves.
Common Shopify OAuth Errors and How to Fix Them
Developers upgrading older Shopify integrations often encounter OAuth authentication issues while generating or using a Shopify Admin API access token. The following errors are among the most common Shopify OAuth problems and their recommended fixes.
| Error | Cause | Solution |
| invalid_client | Wrong client secret | Verify Client ID and Client Secret |
| redirect_uri mismatch | Redirect URL does not match app settings | Update the redirect URL in Shopify Developer Dashboard |
| invalid_scope | Unsupported or incorrect API scopes | Use valid Shopify API scopes |
| invalid_request | Missing OAuth parameters | Verify all OAuth request parameters |
| expired authorization code | Authorization code expired or reused | Restart the OAuth flow |
| REST API warning | Using deprecated REST endpoints | Move to Shopify GraphQL APIs |
If you are using W2S, our Sync Pro features guide explains how to handle sync issues and optimize Shopify API usage with advanced options.
Conclusion
The Shopify Admin API access token changes introduced in recent platform updates reflect Shopify’s broader effort to modernize its developer ecosystem.
By adopting OAuth authentication, improving permission management, and transitioning toward GraphQL APIs, Shopify is creating a more secure and scalable environment for building integrations.
For developers maintaining Shopify applications, adapting to these changes is essential. Implementing OAuth correctly, securing API credentials, and gradually migrating legacy REST integrations will help ensure your applications remain compatible with Shopify’s evolving platform.
Although these updates require adjustments to existing development workflows, they ultimately provide a stronger foundation for building reliable and secure Shopify integrations.
If you are integrating WooCommerce and Shopify, explore our W2S – WooCommerce to Shopify Sync plugin to implement these OAuth, access token, and GraphQL best practices in a production‑ready workflow.
FAQ:
1.What changed in Shopify access token authentication?
Shopify now uses OAuth-based authentication instead of relying on manually generated static API tokens. Developers must create apps through the Shopify Developer Dashboard and generate access tokens using the OAuth authorization workflow.
2. How do I find my Shopify Admin API access token?
You cannot view an existing Shopify Admin API access token after it is generated – Shopify only displays it once during the OAuth flow. If you have lost your token, you will need to regenerate it by reinstalling the app or restarting the OAuth authorization process. Always store your access token securely in environment variables immediately after generation.
3. Are Shopify private apps still supported?
Existing private or custom apps may continue to work, but Shopify now encourages developers to build new integrations using custom apps and OAuth authentication through the Shopify Developer Dashboard.
4. Do Shopify Admin API access tokens expire?
No, Shopify Admin API access tokens usually do not expire automatically. The token remains valid until the merchant uninstalls the app or manually revokes access permissions. However, developers should still treat Shopify OAuth access tokens as sensitive credentials and store them securely using environment variables or secret management systems.
5. Is the Shopify REST Admin API deprecated?
Shopify has labeled the REST Admin API as legacy and recommends developers use the Shopify GraphQL Admin API for all new application development.
6. What is a Shopify OAuth access token?
A Shopify OAuth access token is a secure credential generated after a merchant approves an app through Shopify’s OAuth authentication process. This Shopify Admin API access token is used to send authenticated requests to the Shopify Admin API.
7. What is shpat_ in Shopify?
The shpat_ prefix identifies a Shopify Admin API access token generated through OAuth authentication. Developers use these tokens to send authenticated requests to Shopify Admin APIs securely.
8. Why is Shopify moving toward GraphQL APIs?
Shopify prioritizes GraphQL because it improves API efficiency, reduces request usage, and allows developers to fetch multiple resources in a single query. Many new Shopify platform features are now released through GraphQL first.

Best WordPress Security Plugins 2026: Protect & Harden Your Website
15 May 2026, 12:29 pm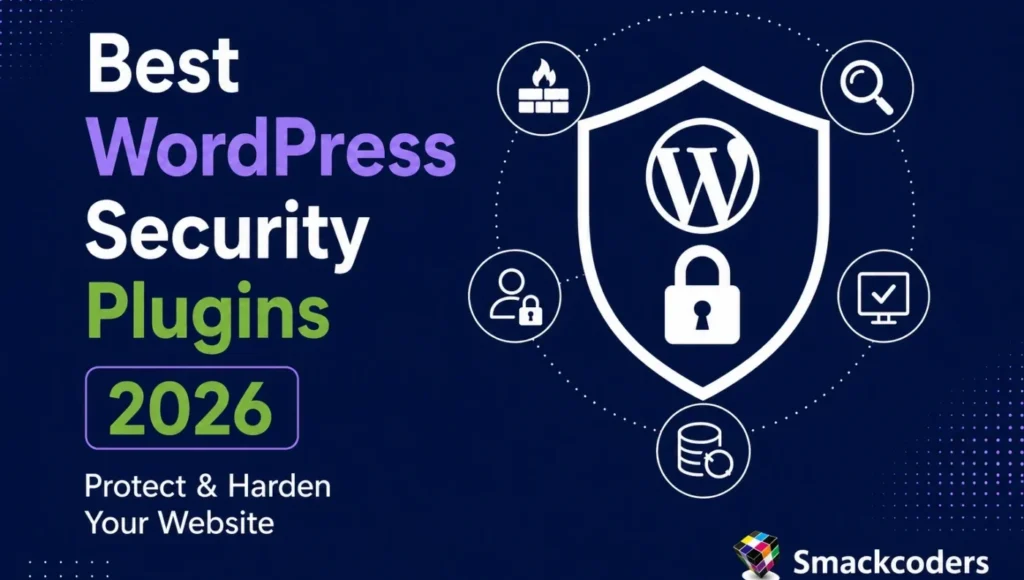
Best WordPress security plugins help protect websites from malware, brute-force attacks, login vulnerabilities, and unauthorized access. In 2026, the top WordPress security plugins worth using are Wordfence, Sucuri, Solid Security, AIOS, and MalCare. Each covers the four core protection layers: firewall protection, malware scanning, login security, and real-time threat detection.
Over 43% of all websites run on WordPress, and that popularity makes it the number one target for automated bots scanning for outdated plugins, exposed login pages, and misconfigured settings. If your site is live right now, it is actively being probed.
The reassuring part: solid protection does not demand technical expertise. It demands the right tools, configured correctly. This guide covers exactly what hardening means, which features matter, and which plugins consistently deliver results in 2026.
What Does Hardening a WordPress Site Mean?
Hardening means reducing your site’s attack surface by eliminating vulnerabilities, restricting unnecessary access, and stacking multiple defensive layers so that when one fails, the rest hold. A truly hardened WordPress site addresses six core areas:
- Server-level protection for secure hosting environments and PHP configurations
- Application-level security keeping core, themes, and plugins current
- Authentication security, strong passwords, 2FA, and login restrictions
- Traffic filtering with a WAF blocking malicious requests upstream
- Data integrity, malware scans, and file monitoring, catching unauthorized changes
- Backup and recovery, automated backups enabling fast restoration after any incident
Key Features to Look for in a WordPress Security Plugin
Firewall Protection (WAF)
A Web Application Firewall sits between your site and all incoming traffic, analyzing each request against known attack patterns, such as SQL injections, cross-site scripting (XSS), and bot floods. Look for plugins offering both cloud-based and endpoint firewalls for full coverage.
Malware Scanning and Removal
Scheduled scans check core files, themes, plugins, and the database against known malware signatures. Premium plugins typically add one-click removal. Never rely on a plugin that only supports manual scanning.
Login Security and Brute Force Protection
Bots cycle through thousands of username-password combinations automatically. Effective plugins counter this with login attempt limits, CAPTCHA, two-factor authentication (2FA), and IP-based blocking.
WordPress security plugins help prevent malware infections, brute-force login attempts, and unauthorized website access by adding multiple layers of protection to your website.
Real-Time Threat Detection
Threat intelligence must update continuously. Look for plugins that pull live data from a global threat network and push firewall rule updates automatically no manual action required.
Backup Integration
No security system is absolute. A plugin that integrates backup functionality means you can restore a clean version within minutes. For a full backup solution, see our guide on Best WordPress Backup Plugins 2026.
Best WordPress Security Plugins for Website Protection in 2026
Here is a quick comparison of the top plugins before we dive into the details:
| Plugin | Free WAF | Malware Scan | Brute Force | Price/yr | Link |
| Wordfence | Yes | Yes | Yes | $119+ | Visit → |
| Sucuri | Yes | Yes | Yes | $199+ | Visit → |
| Solid Security | Yes | Yes | Yes | $99+ | Visit → |
| AIOS | Yes | Yes | Yes | Free / $70+ | Visit →\ |
| MalCare | Yes | Yes | Yes | $99+ | Visit → |
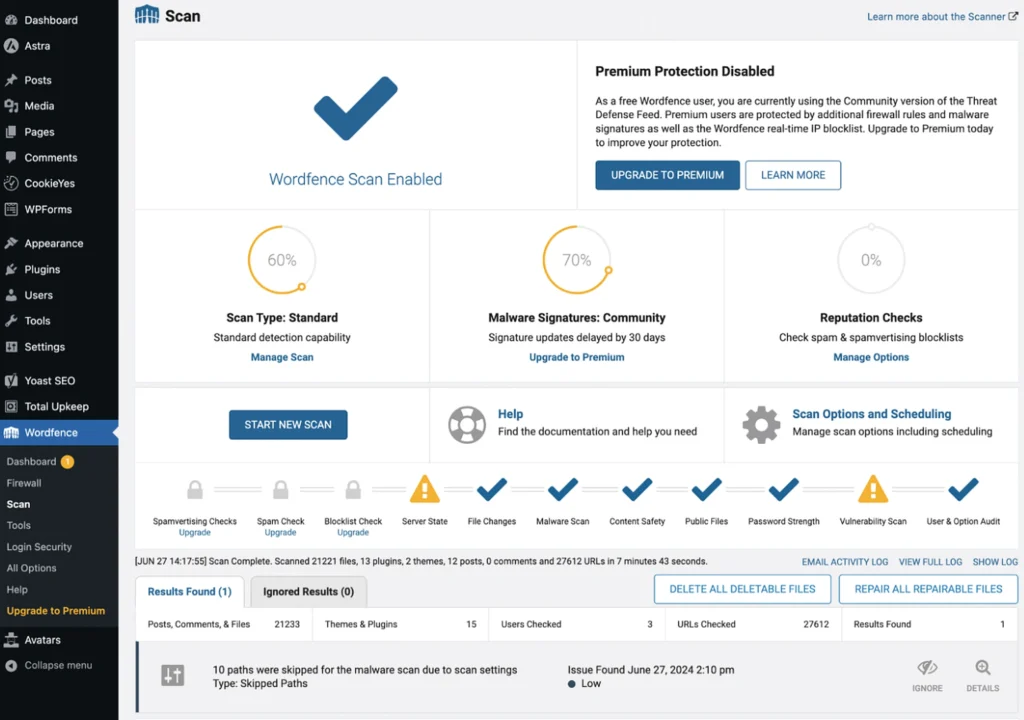
1. Wordfence Security
Official site: Wordfence Security
With more than 5 million active installs, Wordfence is the most widely trusted WordPress security plugin available.
Key Features
Its firewall and malware scanner run directly inside WordPress, giving it application-level visibility that external, cloud-only solutions cannot replicate. The free version includes real-time traffic monitoring, brute-force protection, a functional firewall, and malware scanning at zero cost.
Pricing
The premium plan ($119/year) removes the 30-day delay on firewall rule updates, adds a live IP blocklist, and enables country-level blocking advantages that become critical during active zero-day attack windows.
Best for: Mid-to-large WordPress sites needing deep, integrated protection with a capable free starting point.
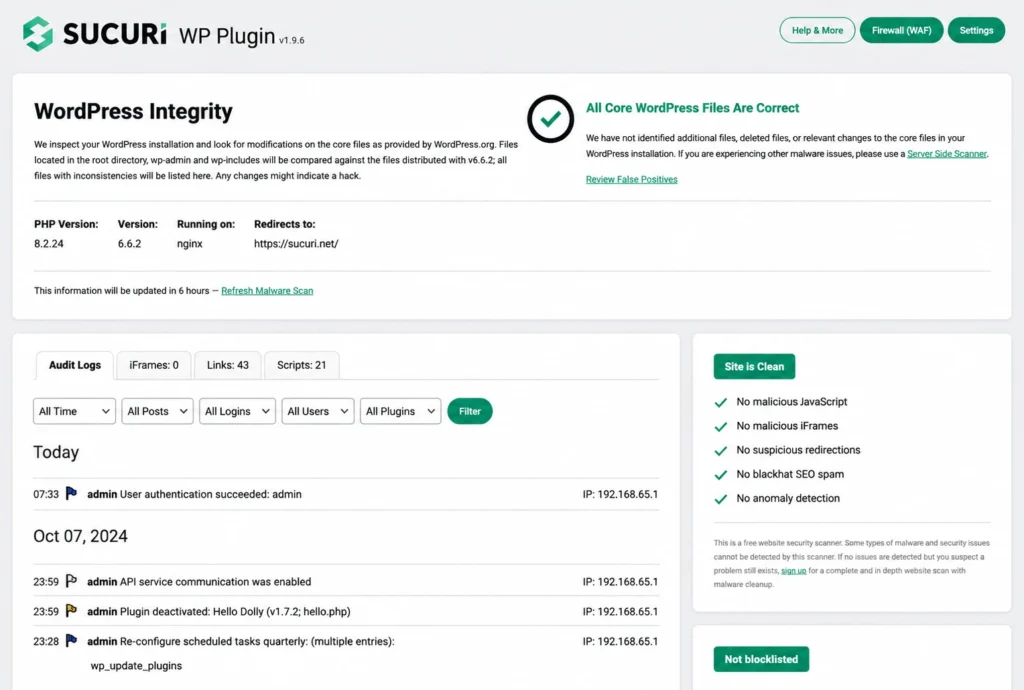
2. Sucuri Security
Official site: Sucuri Security
Sucuri’s cloud-first architecture sets it apart. Every request passes through Sucuri’s global network before reaching your server, absorbing DDoS floods and neutralizing volumetric threats at the edge – long before they touch your hosting.
Key Features
The free plugin covers file integrity monitoring, blacklist tracking, and post-hack hardening steps. Sucuri’s own security team handles cleanup if your site is ever compromised.
Pricing
Paid plans from $199/year add the full cloud WAF, CDN-driven performance improvements, and SLA-backed malware removal.
Best for: eCommerce stores and business sites requiring enterprise-grade threat absorption and guaranteed incident response.
Wordfence vs Sucuri: Which Is Better?
Wordfence runs on your server and delivers deeper WordPress-level visibility, the right choice for sites that need granular control and application-layer insight. Sucuri operates at the network edge, intercepting threats before they reach your server better suited for high-traffic stores or sites that have experienced a previous breach. Both are excellent; your hosting environment and traffic volume usually determine the stronger fit.
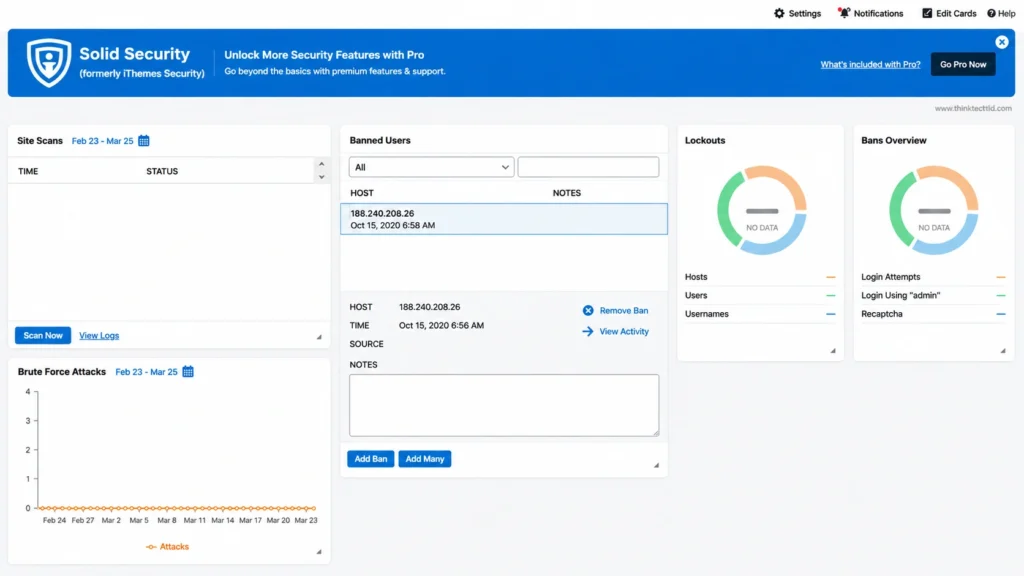
3. Solid Security (formerly iThemes Security)
Official site: Solid Security (formerly iThemes Security)
Now fully rebranded as Solid Security, this plugin was built with a single goal, making WordPress hardening accessible to everyone. Its dashboard scans your specific installation, flags vulnerabilities, and walks you through each fix in plain language – no security background required.
Key Features
Core features include two-factor authentication, shared brute-force network protection, and file change detection.
Pricing
The Pro plan ($99/year) layers on reCAPTCHA, magic link logins, password expiration enforcement, and automated scheduled scans.
Best for: Small business owners and bloggers who want a guided, beginner-friendly setup without sacrificing meaningful protection.
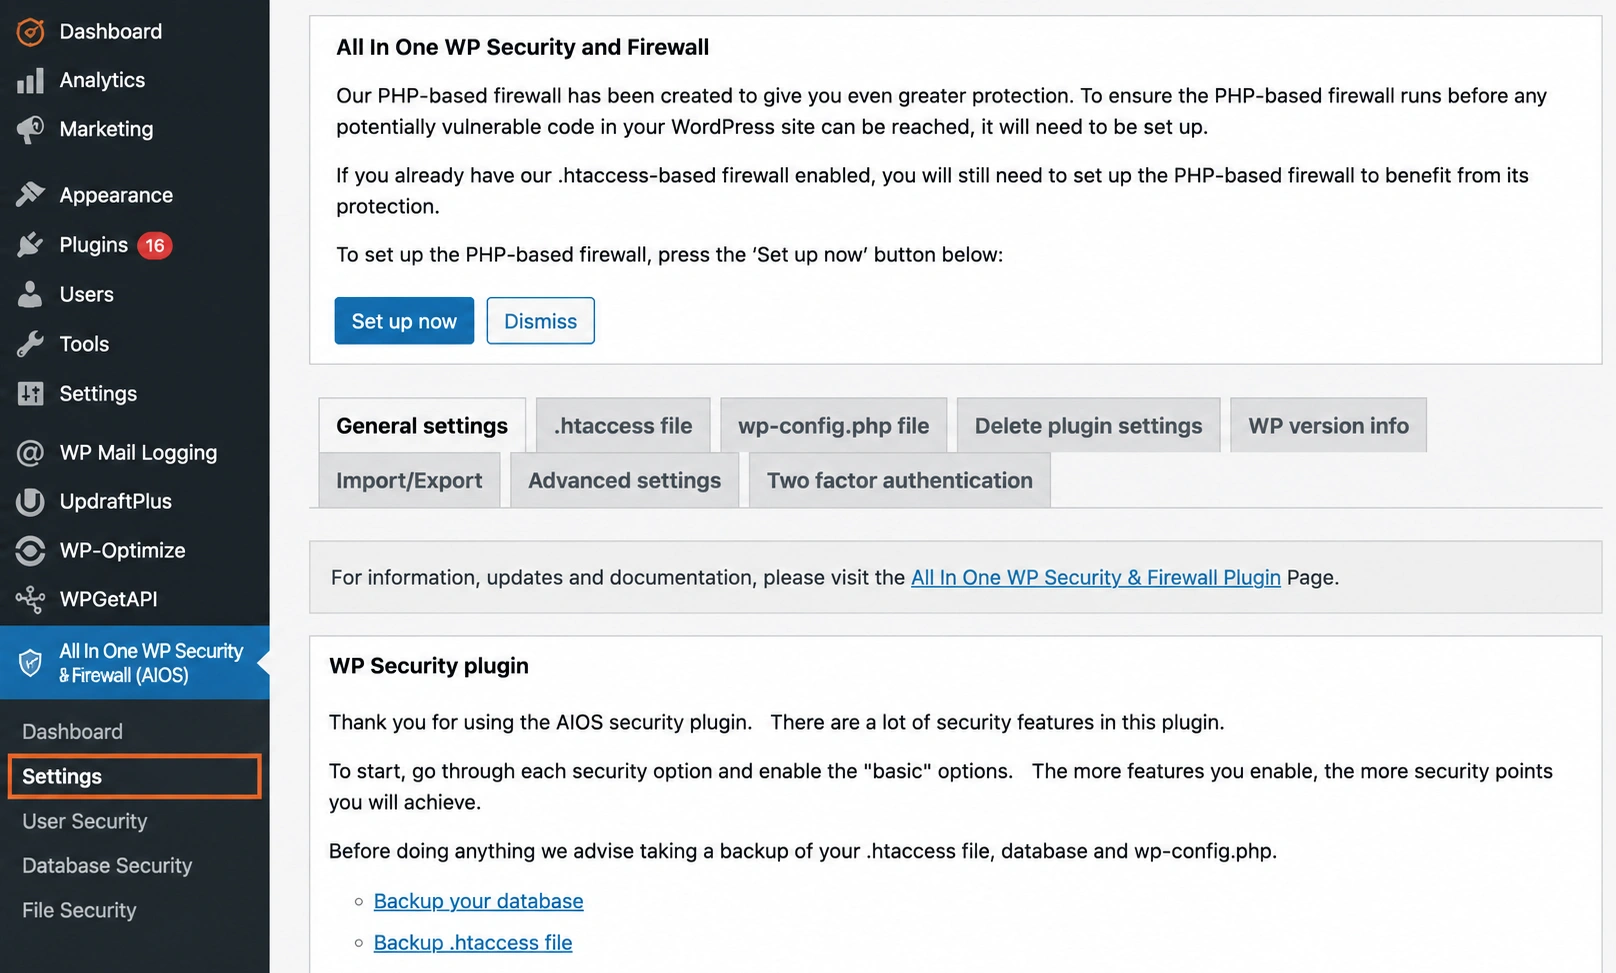
4. All In One WP Security & Firewall (AIOS)
Official site: All In One WP Security & Firewall (AIOS)
AIOS shows that strong WordPress security is achievable without spending a single dollar.
Key Features
The free version delivers login lockdown, user account auditing, database hardening, file system protection, and a basic WAF – a feature set that rivals paid entry-level plugins.The built-in security strength meter gives your site a protection score and tells you precisely what to fix next – making security tangible instead of overwhelming.
Pricing
Advanced features are unlockable through a paid add-on at $70/year.
Best for: Personal blogs, portfolios, and small sites that need solid baseline protection at no cost.
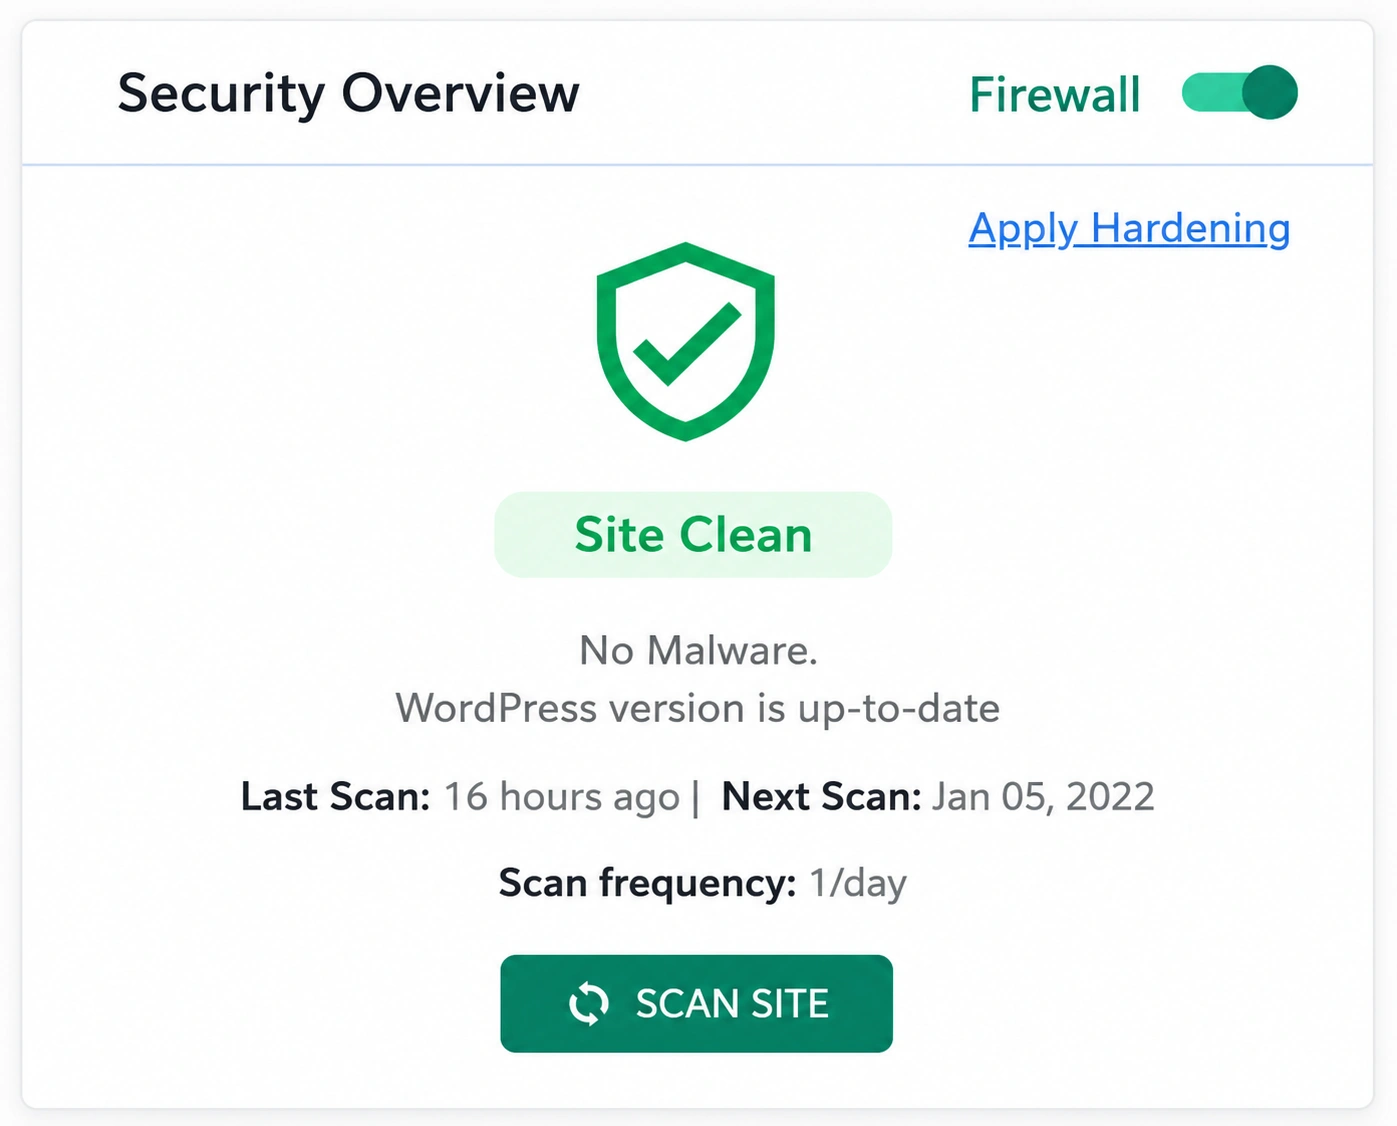
5. MalCare Security
Official site: MalCare Security
MalCare was built specifically to catch malware that traditional signature-based scanners consistently miss.
Key Features
Its cloud engine evaluates over 100 behavioral signals per file, enabling it to catch new, obfuscated, and zero-day malware variants that local scanners miss. Because all scanning runs on MalCare’s external infrastructure, your server performance stays completely unaffected.
Pricing
The free plan includes unlimited scans. Paid plans from $99/year add one-click removal, a WAF, bot protection, and multi-site management.
Best for: Sites with a history of infection, high-traffic platforms handling sensitive data, and agencies managing multiple client sites.
Free vs Premium Security Plugins
What Free Versions Deliver
Free security plugins have matured significantly. When set up correctly, a free plugin is capable of blocking most threats that target an average WordPress site. Free tiers generally include basic firewall rules, login lockdown, file integrity monitoring, hardening recommendations, and email alerts. For personal blogs, hobby projects, and low-traffic informational sites, a free plugin combined with secure hosting and regular updates is often sufficient.
Why Premium Is Worth It for Business Sites
For any site collecting customer data, processing payments, or generating revenue, upgrading is a business decision, not a luxury. Here is what premium unlocks:
- Real-time firewall rules – Wordfence Free users get rule updates 30 days behind premium subscribers. That delay is dangerous during active zero-day attack windows. That gap is critical during active zero-day windows.
- Guaranteed malware removal – Sucuri and MalCare premium plans bring in security professionals to handle cleanup directly.
- Advanced threat intelligence – global IP reputation databases identify and block known attackers before a single request gets through.
- Priority support – when your site is actively under attack, a forum response that takes days is not a viable option.
- Compliance tooling – meeting GDPR, PCI-DSS, and HIPAA standards requires detailed audit logs that free tiers simply don’t offer.
How to Choose the Right WordPress Security Plugin for Your Site Type
Choosing the best WordPress security plugins depends on your website type, traffic levels, hosting environment, and the level of protection your business requires.
Not every plugin suits every site. Here is a quick decision guide:
| Site Type | Recommended Plugin |
| Personal blog/portfolio | AIOS (free) or Solid Security |
| Small business website | Wordfence free + managed hosting |
| eCommerce (WooCommerce) | Sucuri or MalCare Premium |
| High-traffic news or media | Sucuri or Wordfence Premium |
| Agency managing multiple sites | MalCare multi-site or Wordfence Central |
Performance Impact Considerations
Some of the best WordPress security plugins can affect website speed if malware scans and live traffic monitoring run continuously on low-resource or shared hosting environments.
Endpoint scanners like Wordfence process everything on your own server, which can push CPU usage up significantly during active scans. Schedule scans during off-peak hours (2–5 AM is typical) or switch to cloud-based solutions like Sucuri or MalCare that process externally. Before pushing anything to your live site, run it through a staging environment first. Track your Core Web Vitals in Google PageSpeed Insights both before and after the installation to catch any performance drops early.
Ease of Use
Any security plugin you don’t fully understand is one you’re likely to set up wrong. Prioritize plugins with clear dashboards, guided setup wizards, and plain-language alerts. Solid Security and AIOS excel here. Wordfence and Sucuri have steeper learning curves but offer far more granular control for power users.
WordPress Site Hardening in 2026: Steps That Go Beyond Just Installing a Plugin
Keep Everything Updated
Outdated plugins and themes are the most common entry point for attackers – updating them consistently is the highest-impact habit you can build. Turn on automatic updates for minor core releases and go through your plugin list regularly to remove anything unused or abandoned. Anything abandoned or unused should be removed immediately. See our full guide on WordPress maintenance best practices.
Enforce Strong Passwords and Two-Factor Authentication
Weak passwords are still the easiest attack vector available. Use your security plugin to set strict password requirements and make 2FA mandatory for every account with admin access. Apps like Google Authenticator or Authy generate time-based one-time passwords (TOTP) that make brute-force attacks practically impossible.
Limit Login Attempts
By default, WordPress puts no cap on how many times someone can attempt to log in – which brute-force bots exploit instantly. Set a hard limit of three to five failed attempts, apply progressive lockout periods, and permanently block IPs that keep failing.
Disable the File Editor
WordPress ships with a built-in code editor for themes and plugins sitting right inside the admin panel. In the wrong hands, it becomes an instant code injection point. To shut it off completely, drop this line into your wp-config.php file:
define(‘DISALLOW_FILE_EDIT’, true);
Choose Secure Hosting
The protection your plugin provides is only as solid as the hosting environment running beneath it. Managed hosts like Kinsta, WP Engine, and SiteGround layer in server-level firewalls, built-in malware scanning, account isolation, and free SSL – all working alongside your security plugin rather than overlapping with it.
Common WordPress Security Mistakes to Avoid in 2026
- Setting “admin” as your username – it’s the very first login name every automated attack tool tries. Create a custom admin username and delete the default account.
- Ignoring security alerts and dismissing notifications without investigation is how small issues become catastrophic breaches.
- Running multiple security plugins with two active firewalls conflicts with each other, creating gaps or crashing the site. Choose one comprehensive plugin.
- Never skip backup testing because an untested backup may fail during restoration. Run quarterly restore tests to verify they work.
- Skipping the staging environment testing major updates on a live production site introduces both security and stability risks.
- Leaving the default database prefix, the default wp_ prefix is specifically targeted by SQL injection attacks. Change it during installation.
- Leaving XML-RPC turned on – switch it off completely unless you genuinely need it for remote publishing access. It is a consistent target for brute-force and DDoS amplification attacks.
Conclusion
The best WordPress security plugins combine firewall protection, malware scanning, login security, and regular updates to keep WordPress websites secure in 2026. WordPress security works best as a complete system, with multiple protection layers working together to prevent attacks and vulnerabilities. No single plugin can fully secure a website on its own, but the right combination of tools and regular maintenance can significantly improve overall website security.
| Need Expert WordPress Security Help? Not sure which plugin fits your site? The Smackcoders team handles WordPress security setup, hardening, and ongoing monitoring. Get a Free Security Consultation → Or email us directly: support@smackcoders.com |
1. Do you need multiple WordPress security plugins on one website?
Using more than one full-featured WordPress security plugin is usually not recommended. Multiple firewalls and scanning systems can conflict with each other, increase server usage, and create unnecessary complexity. Most website owners will get better results by choosing a single trusted security plugin that includes firewall protection, malware scanning, login security, and monitoring features. A separate backup plugin can still be used alongside it safely.
2. Can WordPress security plugins affect website speed?
Some security plugins may increase server resource usage, especially plugins that perform real-time scans directly on the hosting server. On high-traffic websites, scheduled scans and live traffic monitoring can temporarily impact loading speed. Cloud-based solutions such as Sucuri and MalCare reduce this issue by processing security checks on external servers instead of using local hosting resources.
3. Are free WordPress security plugins good enough for beginners?
Free WordPress security plugins can provide solid protection for personal blogs, portfolio websites, and smaller informational sites. Many free versions include important features like brute-force protection, firewall rules, malware detection, and login security. However, websites handling customer information, online payments, or sensitive business data often benefit from premium security features such as real-time threat intelligence, advanced malware cleanup, and priority support.
4. How frequently should a WordPress website be scanned for malware?
Regular malware scanning helps identify suspicious files and vulnerabilities before they become major security problems. For standard websites, running a complete scan once every week is generally recommended. Websites with heavy traffic, membership systems, or eCommerce functionality should ideally use daily automated scans and monitor security alerts continuously after updates or plugin installations.
5. Which security plugin is more suitable for WordPress websites: Wordfence or Sucuri?
Both Wordfence and Sucuri are respected WordPress security solutions, but they are designed for slightly different needs. Wordfence works directly inside WordPress and provides detailed visibility into login activity, malware scans, and firewall events. Sucuri focuses more on cloud-based protection by filtering malicious traffic before it reaches the server, making it especially useful for high-traffic websites and online stores. The better option usually depends on website size, traffic levels, and hosting setup.
6. Which of the best WordPress security plugins is suitable for beginners?
Wordfence remains one of the most widely used free WordPress security plugins because it includes firewall protection, malware scanning, brute-force defense, and traffic monitoring without requiring a paid plan. All In One WP Security & Firewall is another beginner-friendly option that simplifies website hardening with guided recommendations and visual security scoring.
7. Does WordPress include built-in security protection?
WordPress itself includes several core security measures, including password management, user role permissions, and regular software updates. However, it does not include advanced features such as malware scanning, web application firewalls, or two-factor authentication by default. Installing a dedicated WordPress security plugin adds additional protection layers that help defend websites against modern threats and automated attacks.
How to Map CSV Columns to WordPress Fields (2026 Guide)
15 May 2026, 11:41 am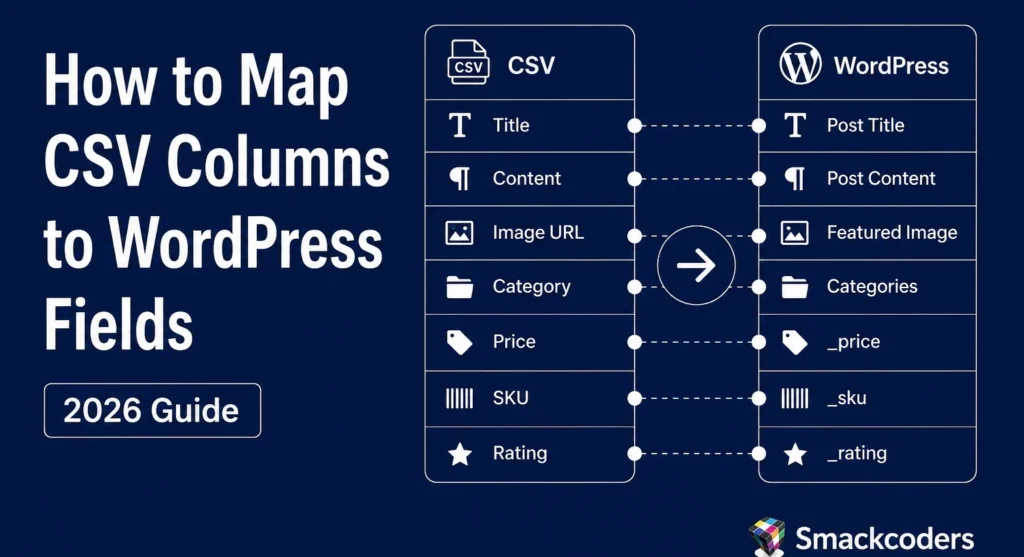
Introduction
To map CSV columns to WordPress fields, install WP Ultimate CSV Importer, upload your CSV file, and use the drag-and-drop mapping interface to match each column to the correct WordPress field – for example, “Title” → Post Title, “Image URL” → Featured Image, and “Price” → _price for WooCommerce. Always preview your import before running the full dataset to avoid data landing in the wrong fields.
CSV imports in WordPress break silently, and wrong column mapping is the #1 reason. One mismatched field and your post title lands in the body, images vanish, and categories disappear across hundreds of posts. Imagine importing 500 WooCommerce products only to find all your SKUs landed in the excerpt field – that’s exactly what this guide prevents.
Whether you’re importing blog posts, WooCommerce products, featured images, or ACF custom fields, this step-by-step tutorial covers the entire WordPress CSV import process using WP Ultimate CSV Importer, WP All Import, and manual methods.
WordPress Fields Supported in CSV Import
WordPress stores content in specific database fields. To map CSV columns to WordPress fields correctly, each column in your file needs a matching WordPress field – whether you’re importing posts, pages, WooCommerce products, or ACF custom fields.- whether you’re importing posts, pages, WooCommerce products, or ACF custom fields:
- Post Title – name of your post or page
- Post Content – main body text
- Post Excerpt – summary
- Post Status – published, draft, or pending
- Categories & Tags – how content is organized
- Featured Image – thumbnail image
- Custom Fields – extra data like price, rating, or location
Why CSV Column Mapping Matters (And What Goes Wrong)
Skip this step, or get it wrong, and your import breaks silently. Imagine importing 300 blog posts and finding every post title sitting in the content area, all featured images missing, and categories completely unassigned. You won’t even notice until you check your live site. When you correctly map CSV columns to WordPress fields, every piece of data goes to the right place – saving you hours of manual cleanup and keeping your site clean and accurate.
How to Map CSV Columns in WordPress Using a Plugin
The easiest way to map CSV columns to WordPress fields is with a dedicated plugin. WP Ultimate CSV Importer and WP All Import are the two most popular, and both offer a visual column mapping interface that’s straightforward even for beginners.
Step 1: Install a CSV import plugin.
- Open your WordPress dashboard and navigate to Plugins → Add New
- Search for WP Ultimate CSV Importer or WP All Import
- Click Install Now, then Activate
WP Ultimate CSV Importer is beginner-friendly and supports direct import from Google Sheets. WP All Import is well-suited to complex imports with large datasets.
Step 2: Upload Your CSV File
- Open the plugin and click “New Import” or “Import Content.”
- Choose “Upload a file” and select your CSV (Excel/XLSX and TSV also supported)
- Click Continue or Next Step
Ensure your CSV has clear headers and consistent data across every row before uploading.
Step 3: Start the column mapping process.
After uploading, the plugin makes it easy to map CSV columns to WordPress fields – your CSV columns appear on one side and WordPress fields on the other. Drag or select each column and match it to the correct WordPress field. At this stage, you’re defining exactly which CSV column connects to which WordPress field.
- Map the basics first:
| CSV Column | WordPress Field |
| Title | Post Title |
| Content | Post Content |
| Excerpt | Post Excerpt |
| Date | Post Date |
| Status | Post Status (publish / draft) |
Take your time here. One wrong match can send your data to the wrong field across every single imported post.
Step 4: Map Images, Categories, and Tags
These three fields need a little extra attention during the mapping process.
Featured Images:
- Your CSV should contain either an image URL or a file path
- Map that column to the Featured Image field
- Make sure the image URLs are publicly accessible; the plugin fetches them during import
Categories:
- Map your category column to the Post Category field
- If the category doesn’t exist yet, most plugins will create it automatically
Tags:
- Map your tags column to the Post Tags field
- For multiple tags in one cell, separate them with a comma: WordPress, Tutorial, Beginner
Step 5: Map Custom Fields (Advanced)
If your WordPress site uses custom fields through plugins like ACF (Advanced Custom Fields) or Meta Box, you can map those too.
- Scroll down to the Custom Fields section in the mapping screen
- Enter the exact custom field key (e.g., _price, rating, location)
- Match it to the corresponding CSV column
| CSV Column | WordPress Custom Field Key |
| Price | price |
| Rating | rating |
| Location | location |
The field key must match exactly what’s stored in your WordPress database. If you’re unsure, check your ACF settings or use a tool like Query Monitor to inspect your field names.
Pro Tip: You can also use column mapping to update existing WordPress posts – not just create new ones. Enable “Update Existing” mode in WP Ultimate CSV Importer, map your post ID or slug as the unique identifier, and only the columns you map will be updated. All other post data stays untouched.
Advanced CSV Column Mapping in WordPress
Mapping Multiple Categories
List categories in your CSV cell separated by a pipe or comma (News | Technology | WordPress), then map that column to the Post Category field – the plugin assigns all of them automatically.
Mapping Multiple Images
List all image URLs in one cell separated by a comma or pipe, then map that column to the appropriate gallery or attachment field in the plugin.
Mapping Custom Post Types
If importing into a custom post type like “Portfolio” or “Properties”:
- Select your custom post type from the import settings before mapping
- The plugin displays fields specific to that post type
- Map your CSV columns to those fields just like standard posts
Mapping WooCommerce Product Fields
Both plugins support WooCommerce CSV imports – you can map columns directly to product fields like price, SKU, stock status, description, and images, even for large catalogs.
Mapping SEO Fields (RankMath / Yoast)
WP All Import’s RankMath add-on lets you map SEO titles, meta descriptions, and focus keywords directly from your CSV – ideal for programmatic SEO workflows generating pages at scale.
Preview Checklist Before Running Your WordPress CSV Import
Once you map CSV columns to WordPress fields, always use the Preview or Dry Run option before running the full import. Verify:
- Titles → Post Title
- Content → Post Content
- Categories and tags are assigned correctly
- Featured images loading from URLs
- Custom fields are saving to the correct keys
If anything looks off, fix the mapping before proceeding. Once complete, review the summary report to catch any rows that failed to import.
Ready to import? WP Ultimate CSV Importer auto-maps common column headers, supports Google Sheets direct import, previews your data before going live, and handles WooCommerce + ACF fields in one place.
How to Import CSV to WordPress Without a Plugin
For small datasets or one-time migrations, you don’t need a plugin. Here are two methods that work.
Method 1: Convert CSV to WXR Format
WXR (WordPress eXtended RSS) is WordPress’s native XML-based import format. To convert your CSV:
- Open your CSV in Google Sheets or Excel
- Organize columns – Title, Content, Excerpt, Date, Categories, Tags
- Use a free tool like csvtowxr.com or a Python/PHP script to generate the WXR file
- Save it with a .xml extension
Method 2: Import Using the WordPress Import Tool
Once you have your WXR file:
- Go to Dashboard → Tools → Import
- Click WordPress from the importer list
- Install the WordPress Importer plugin if prompted (free and official)
- Click Choose File and upload your WXR file
- Assign content to an existing author or create a new one
- If your file includes images, check the option to download and import file attachments
- Click Submit
It’s free, requires no extra plugins, and works reliably – as long as your WXR file is properly formatted.
Method 3: Use Custom PHP Scripts for CSV Import
For developers or advanced users, writing a custom PHP script gives you full control over how CSV data is imported into WordPress.
| <?php// Load WordPress environmentrequire_once(‘wp-load.php’); // Open and read the CSV fileif (($handle = fopen(“your-file.csv”, “r”)) !== FALSE) { // Skip the header row fgetcsv($handle); while (($data = fgetcsv($handle, 1000, “,”)) !== FALSE) { // Map CSV columns to WordPress post fields $post = array( ‘post_title’ => sanitize_text_field($data[0]), // Column 1 = Title ‘post_content’ => wp_kses_post($data[1]), // Column 2 = Content ‘post_excerpt’ => sanitize_text_field($data[2]), // Column 3 = Excerpt ‘post_status’ => ‘publish’, ‘post_type’ => ‘post’, ); // Insert post into WordPress $post_id = wp_insert_post($post); // Add custom field if needed if ($post_id) { update_post_meta($post_id, ‘your_custom_field’, sanitize_text_field($data[3])); } } fclose($handle);}?> |
When to use this method:
- You need to import into custom post types with complex field structures
- You want to run automated or scheduled imports
- You’re building a custom migration tool for a client site
Important: Always sanitize your data before inserting it into the database. Use WordPress built-in functions like sanitize_text_field() and wp_insert_post() to keep your site secure.
Quick Reference: CSV Column Mapping Cheat Sheet
Not sure how to map CSV columns to WordPress fields correctly? Here are the most common mapping examples to guide you.
Mapping Post Title, Content, and Excerpt
| CSV Column | WordPress Field |
| Title | Post Title |
| Content | Post Content |
| Excerpt | Post Excerpt |
| Date | Post Date |
| Status | Post Status (publish/draft) |
Mapping Featured Images
| CSV Column | WordPress Field |
| Image URL | Featured Image |
Example URL format: https://yoursite.com/wp-content/uploads/image.jpg
Make sure every image URL is publicly accessible before importing; broken links mean missing images after import.
Mapping Custom Fields (ACF / Meta Fields)
| CSV Column | WordPress Custom Field Key |
| Price | _price |
| Rating | rating |
| Location | location |
The custom field key must match exactly what’s in your WordPress database, including underscores and lowercase letters.
Common Errors in CSV Mapping and How to Fix Them
The most common errors when you map CSV columns to WordPress fields fall into three categories – images, column recognition, and wrong field placement.
Images Not Importing
Problem: Featured images don’t appear after import.
Fix:
- Verify that image URLs in your CSV are publicly accessible
- Confirm the URL column is mapped to the Featured Image field
- Turn on the media download option inside the plugin’s import settings to fetch images automatically
- For local paths, ensure files are already in your WordPress media library
Columns Not Recognized
Problem: The plugin can’t detect your CSV columns or shows blank field options.
Fix:
- Open your CSV and make sure the first row contains column headers, not data
- Remove any special characters or extra spaces from header names
- Save the file in UTF-8 encoding; this fixes most recognition issues (In Excel: File → Save As → CSV UTF-8)
Data Landing in the Wrong Fields
Problem: Data lands in the wrong WordPress field after import.
Fix:
- Go back to the mapping screen and double-check that every field matches
- Never skip the Preview step; it catches wrong mappings before they cause damage
- Run a test import with 2–3 rows before importing your full dataset
Best Practices for Accurate CSV Mapping
Following these best practices every time you map CSV columns to WordPress fields will prevent most import errors before they happen.
Clean Your CSV First:
Remove empty rows, duplicates, and inconsistent formatting. Ensure every cell has the correct data type: no numbers in text fields, no broken URLs in image columns.
Use Consistent Column Headers:
Keep headers simple and uniform, like “Title,” “Content,” and “Image URL.” Avoid spaces, special characters, or all-caps to speed up field mapping and reduce recognition errors.
Test With a Small Batch First:
Never import your full dataset on the first try. Start with 5–10 rows, verify the data lands correctly, then run the full import.
Back Up Your Site Before Importing:
Always take a full site backup before importing. If anything goes wrong, you can restore it in minutes rather than fixing it manually.
Best WordPress CSV Import Plugin in 2026: WP Ultimate CSV Importer vs WP All Import
Both plugins handle CSV imports well, but when it comes to map CSV columns to WordPress fields accurately, they serve different needs and user types. Here’s a quick breakdown.
| Feature | WP Ultimate CSV Importer | WP All Import |
| Ease of Use | Beginner-friendly | Intermediate |
| Drag & Drop Mapping | Yes | Yes |
| Google Sheets Import | Yes | No |
| WooCommerce Support | Yes | Yes |
| AI-Assisted Import | Yes (ChatGPT, Gemini, Claude) | No |
| Custom Post Types | Yes | Yes |
| Scheduled Imports | Yes | Yes |
| RankMath / Yoast SEO | Yes | Yes (add-on) |
| Free Version | Available | Available |
| Best For | Beginners & bloggers | Developers & large imports |
| Winner | Best for most users | Best for large/complex data |
Which One Should You Choose?
Choose WP Ultimate CSV Importer if:
- You’re a beginner or non-technical user
- You need a fast, clean import without complex setup
- You want to import directly from Google Sheets
- You’re importing blog posts, pages, or WooCommerce products
Choose WP All Import if:
- You’re handling large or complex datasets (100k+ rows)
- You need advanced filtering or data transformation during import
- You’re a developer building custom migration workflows
- Your import requires XSLT-level control or conditional logic
When Should You Use a Plugin vs No Plugin?
| Use a Plugin If… | Skip the Plugin If… |
| Importing 50+ rows | Doing a one-time import of under 20 rows |
| Your CSV includes images, categories, or custom fields | Your data is simple titles and content only |
| You need to schedule or repeat imports | You’re a developer comfortable with PHP or WXR |
| Importing into WooCommerce or custom post types | You want to minimize plugins for performance |
| You want visual mapping with error checking | You prefer full code control |
Conclusion
Knowing how to map CSV columns to WordPress fields correctly is the difference between a clean 10-minute import and hours of manual cleanup. Always preview before running the full import, and take a site backup first – no exceptions.
For most users, WP Ultimate CSV Importer is the fastest path to a error-free WordPress CSV import in 2026 – with Google Sheets support, AI-assisted mapping, and built-in WooCommerce and ACF compatibility. For large or complex datasets, WP All Import gives you the extra control you need.
Stop fixing broken imports manually. Get started free →
1. How do I map CSV columns to WordPress fields?
Install WP Ultimate CSV Importer or WP All Import, upload your CSV, and map CSV columns to WordPress fields using the visual mapping interface – for example, “Title” → Post Title and “Content” → Post Content. Always run the preview before the full import to catch wrong mappings early.
2. How do I fix CSV column mapping errors in WordPress?
The most common fixes:
Columns not recognized – Save your CSV in UTF-8 encoding with headers in row 1 only
Data in wrong fields – Run a 2–3 row test import before the full dataset
Images not loading – Make sure all image URLs are publicly accessible
Categories missing – Map to Post Category field, not a custom field
3. What format should my CSV be in before importing to WordPress?
Your CSV must have headers in row 1, UTF-8 encoding (Excel: File → Save As → CSV UTF-8), full public image URLs, and comma-separated values for categories or tags. No empty rows or merged cells. A clean, correctly formatted CSV prevents most import mapping errors.
4. Can I map CSV columns to ACF custom fields in WordPress?
Yes. Both WP Ultimate CSV Importer and WP All Import support ACF custom field mapping. During import, enter the exact field key – like rating, location, or _price – and match it to your CSV column. Keys must be exact, including underscores and lowercase letters.
5. Can I map CSV columns to WooCommerce product fields in WordPress?
Yes. WP Ultimate CSV Importer supports WooCommerce CSV imports natively. Select WooCommerce Product as the post type, then map your columns – Price → _price, SKU → _sku, Stock → _stock, and Product Image → Featured Image. Works for simple and variable products at any catalog size.
6. Can I update existing WordPress posts using a CSV import?
Yes. In WP Ultimate CSV Importer, enable Update Existing mode and map your post ID or slug as the unique identifier. Only the columns you map will be updated – all other post data stays untouched. Useful for bulk-updating prices, images, or meta fields without recreating posts.
WPML vs Polylang : Which WordPress Multilingual Plugin Ranks Better?
14 May 2026, 11:55 am
Choosing the right WordPress multilingual plugin can directly impact how well your site ranks in international search results. Whether you are comparing WPML vs Polylang for the first time or revisiting your WPML vs Polylang setup in 2026, this guide covers everything, including pricing, SEO, WooCommerce compatibility, and real performance numbers.
Key Takeaways
• WPML is best for enterprise websites and WooCommerce stores needing automated translation workflows.
• Polylang is best for beginners, bloggers, and budget-conscious sites. It offers a solid free tier.
• Both support hreflang tags, multiple URL structures, and major SEO plugins.
• Choose based on site complexity, team size, and translation volume, not brand loyalty.
Why Multilingual Websites Matter for SEO and Global Reach
Research consistently shows most internet users prefer browsing in their native language – a 2020 CSA Research study found this applies to over 76% of consumers across 29 countries. Google prioritizes localized results, meaning a properly configured multilingual site can dramatically expand organic reach across regions. Brands that invest in multilingual SEO consistently report higher click-through rates and lower bounce rates from international traffic.
Key Benefits of Translation Plugins in WordPress
• Serve global audiences without building separate websites
• Strengthen international SEO through hreflang tags and localized URLs
• Manage all translations from a single, centralized dashboard
• Improve conversions by communicating in users’ native language
• Maintain consistent branding and structure across all language versions
WPML vs Polylang: Quick Comparison
| Feature | WPML | Polylang | Notes |
| Pricing | From €39/year | Free / Pro from €99/year | WPML is cheaper for WooCommerce |
| Translation | Manual + Auto (DeepL, Google, Azure) | Manual (Auto via Pro only) | WPML wins on automation |
| WooCommerce | ✓ Built-in (free) | Paid add-on €99/year | WPML more cost-effective |
| Setup | Moderate | Easy | Polylang is faster to launch |
| hreflang | ✓ Yes | ✓ Yes | Both generate automatically |
| URL Structures | Directory, Subdomain, Domain | Directory, Subdomain, Domain | Identical support |
| SEO Plugins | Yoast, Rank Math | Yoast, Rank Math | Full integration of both |
| DB queries/page | ~16 queries | ~4 queries | Polylang is lighter |
| Page weight | < 85 KB added | < 85 KB added | Negligible difference |
| FSE / Block Theme | Partial (improving) | Better native support | Important for WP 6.x |
| Best For | Enterprise, eCommerce | Blogs, Startups, Small Sites | — |
Overview of WPML: The Leading WordPress Multilingual Plugin
WPML (WordPress Multilingual Plugin) launched in 2008 and now powers over 1.5 million active websites across industries, from small business blogs to large-scale WooCommerce stores and enterprise content platforms. It creates linked translated copies of posts, pages, and custom post types, all managed from a central translation dashboard. WPML handles URL routing, language switching, and string translation without requiring separate WordPress installations.
Real-world usage: agencies managing 10+ language sites, global eCommerce brands running multilingual WooCommerce stores, and enterprise content teams requiring structured translation workflows with approval steps all commonly rely on WPML for its depth and reliability.
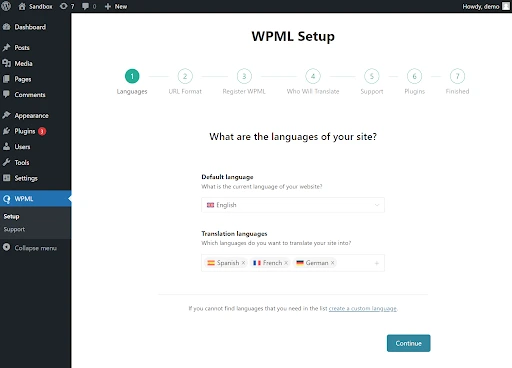
Core Features of WPML
• Automatic translation via DeepL, Google Translate, and Microsoft Azure
• Full WooCommerce Multilingual support for products, checkout, emails, and currencies
• String Translation module for themes and plugins
• Translation Management Dashboard for team collaboration
• Compatible with Elementor, Divi, Gutenberg, and most premium page builders
• Per-language XML sitemaps and automatic hreflang tag generation
• Partial Full-Site Editing (FSE) support improves with each WordPress 6.x release
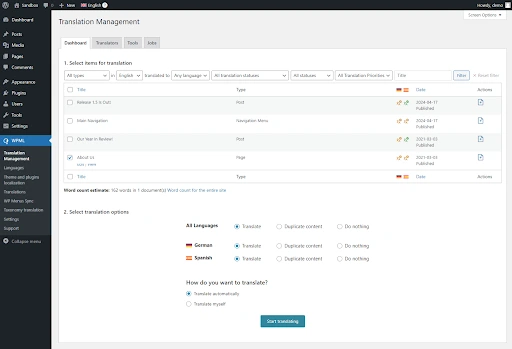
WPML Pros and Cons
Pros: Mature plugin with 17+ years of development; excellent WooCommerce support; robust automatic translation via DeepL/Google/Azure; wide theme and plugin compatibility; 1.5M+ active installs; strong agency and enterprise adoption.
Cons: Fully premium with no meaningful free tier; steeper learning curve than Polylang; ~16 database queries per page load; FSE block theme support still catching up compared to classic themes.
Overview of Polylang
Developed by WP SYNTEX, Polylang is a freemium multilingual plugin with over 700,000 active installations. It stores translations as linked posts using WordPress’s native language taxonomy, making it lightweight and architecturally clean. Its ease of use has made it the go-to free multilingual option for independent publishers, NGOs, and startups alike.
Real-world usage: bloggers managing 2–3 language versions, startups testing multilingual viability before committing to a paid solution, and developers building headless WordPress sites via the REST API frequently choose Polylang for its minimal footprint and clean architecture.
Core Features of Polylang
• Unlimited language support with no per-language fees
• Manual translation with content linked between language versions
• Full support for custom post types, taxonomies, menus, and widgets
• DeepL automatic translation available via Polylang Pro
• hreflang tag generation and flexible URL structure options
• Compatible with Gutenberg, classic editor, and WordPress 6.x Full-Site Editing block themes
Polylang Pros and Cons
Pros: Genuinely usable free tier; only ~4 DB queries per page load; easy to configure; strong community support; excellent FSE/block theme compatibility in 2026.
Cons: Automatic translation locked behind Pro; WooCommerce requires a separate paid add-on (€99/year); less suited for enterprise-scale workflows with large translation teams.
Feature-by-Feature Comparison: WPML vs Polylang
Ease of Use and Setup
Polylang’s setup is minimal install, choose your languages, and begin translating. WPML’s setup wizard is thorough but longer, covering string translation, WooCommerce, and language switcher placement. For teams that need to go live quickly, Polylang is the faster starting point.
Translation Methods and AI Quality in 2026
WPML supports automatic translation natively through DeepL, Google Translate, and Microsoft Translator, all managed directly within the plugin. Polylang’s free version is manual-only; DeepL integration is a Pro feature.
In 2026, AI-assisted translation quality has improved; both plugins leverage DeepL’s neural models, which produce near-human output for many European languages. However, content governance matters: WPML’s Translation Management Dashboard includes review queues and translator assignment, making it easier to enforce a human post-editing step before publishing. Polylang Pro does not yet have a built-in review workflow, so teams using it for high-stakes content should establish an external review process. Unreviewed machine translation still increases bounce rates on high-traffic pages, especially for nuanced marketing copy.
WPML vs Polylang WooCommerce Multilingual Support
WPML bundles WooCommerce Multilingual as a free companion plugin covering product translation, multilingual checkout, shipping zones, and currency switching. Polylang requires a separate ‘Polylang for WooCommerce’ add-on (€99/year). For online stores, WPML delivers a more complete solution at a lower total cost.
WPML vs Polylang Performance and Site Speed
Polylang adds approximately 4 database queries per page load, compared to WPML’s ~16. Both plugins stay under 85 KB of additional page weight. With quality caching (WP Rocket or LiteSpeed Cache), the difference becomes negligible for most sites. On high-traffic pages without caching, Polylang’s lighter footprint is a measurable advantage.
WordPress 6.x Full-Site Editing (FSE) Compatibility
With WordPress 6.x making Full-Site Editing and block themes mainstream in 2026, FSE compatibility is now a key selection criterion. Polylang has invested more in native FSE support and integrates cleanly with block themes, translating template parts and global styles more reliably. WPML’s FSE support is improving rapidly but still has edge cases with complex block theme setups. If your 2026 build is block-theme-first, Polylang currently has the edge here.
Theme and Plugin Compatibility
WPML ships with dedicated compatibility packs for hundreds of themes and plugins. Its String Translation module handles content that lives outside the post editor. Polylang is broadly compatible but may require manual string handling for niche or custom-built themes.
WPML vs Polylang SEO: Multilingual hreflang and URL Structure
URL Structure and hreflang
Both plugins support three URL structures: subdirectory (example.com/fr/), subdomain (fr.example.com), and dedicated domain (example.fr). Both generate hreflang attributes automatically, a critical ranking signal for international SEO that tells search engines which language version to present to which audience.
Common Mistake: Define your URL strategy before launching. Mixing subdirectory and subdomain structures across languages sends conflicting signals to search engines and creates duplicate content issues that are very difficult to resolve post-launch.
Integration with SEO Plugins
WPML integrates directly with Yoast SEO and Rank Math, enabling per-language meta titles, descriptions, and focus keywords from within the familiar SEO plugin interface. Polylang Pro offers the same depth; the free version requires more manual configuration and may not expose all SEO fields without additional setup.
WPML vs Polylang Sitemaps, Indexing, and Canonicals
WPML generates an individual XML sitemap for each language, ensuring all translated pages are discoverable by search engine crawlers. Polylang achieves similar results when paired with Yoast SEO. Both plugins manage canonical tags correctly, reducing duplicate content risk, a common pitfall for multilingual sites.
WPML vs Polylang Pricing Breakdown
| WPML Blog | WPML CMS | Polylang Free | Polylang Pro + WC |
| €39/year | €99/year | €0 | €198/year |
| Posts, pages, menus. No auto translation. | Custom post types + 2,000 auto translation credits/month. | Posts, pages, menus, CPTs, hreflang. | Pro €99 + WooCommerce add-on €99. DeepL included. |
WPML Credit System Explained
Active WPML licenses (CMS plan and above) include 2,000 free automatic translation credits per month. Additional credits are available at €0.75 per 1,000 characters after the monthly free allowance. For high-volume operations, monitor your credit usage from the WPML dashboard to avoid unexpected costs.
WPML vs Polylang vs TranslatePress vs Weglot: Full Comparison
TranslatePress suits non-technical users who prefer editing translations visually on the front end. Weglot is the fastest to set up but becomes expensive at scale due to word-count pricing.
WPML vs Polylang Use Cases: Which Plugin Should You Choose
| Choose WPML if… | Choose Polylang if… |
| You need WooCommerce multilingual | Budget is a concern, or you want a free tier |
| High-volume content with auto translation | 1–3 languages, manageable content volume |
| Team of translators to manage | Fastest setup time needed |
| 10+ languages planned | Headless WordPress or REST API setup |
| Complex Elementor or Divi setups | Blog, NGO, startup, or small business |
| WordPress 6.x classic themes | Full-site editing (FSE) / block themes |
Best for Developers and Customization Needs
Both plugins offer developer-friendly APIs and action/filter hooks. Polylang’s lighter footprint makes it easier to work with in headless WordPress or REST API-driven setups. WPML provides more comprehensive documentation for complex custom integrations. For custom theme development, WPML’s String Translation module is the more complete solution.
Common Mistakes to Avoid When Using Multilingual Plugins
Here are the most common mistakes to avoid when setting up WPML vs Polylang on a live site.
Incorrect URL Structure and Duplicate Content Issues
Define your URL strategy before launching. Switching from subdirectory to subdomain post-launch triggers a full URL migration one of the most disruptive SEO events for a live site.
Ignoring hreflang Implementation
Missing or malformed hreflang tags cause the wrong language version to appear in search results. Always validate using Google Search Console’s International Targeting report immediately after going live.
Poor Translation Quality and Its SEO Impact
Unreviewed machine translations that read unnaturally increase bounce rates and damage user experience signals. In 2026, both WPML and Polylang use DeepL’s neural models for AI translation. The output quality is generally high for major European languages, but nuanced marketing copy, legal text, and culturally specific content still require a human post-editing step. Always have native speakers review auto-translated content on high-traffic pages before publishing.
Final Verdict: WPML vs Polylang Which One Wins in 2026?
The WPML vs Polylang decision comes down to what your site actually needs. Go with WPML if your priority is a fully translated WooCommerce store, high-volume automated content, or managing a distributed team of translators across languages.
Go with Polylang if you’re launching a blog, nonprofit, or lean startup site particularly if you’re building on a WordPress 6.x block theme or keeping costs tight.
Whichever direction you choose, nail down your URL structure on day one. Changing it later is one of the most painful SEO migrations you can put a live site through.
Running a multilingual WooCommerce store? Manually updating translated product data across language versions adds up fast. WP Ultimate CSV Importer Pro lets you handle bulk multilingual product imports in a single CSV upload.
1. Which is better: WPML or Polylang?
It depends on what your site actually needs. Large WooCommerce stores and content teams with multiple translators will get more out of WPML’s structured workflows. Smaller sites, bloggers, and budget-conscious builders will find Polylang’s free tier more than sufficient.
2. Is WPML worth it in 2026?
For stores and enterprise sites, yes. WPML’s WooCommerce companion plugin comes at no extra cost, its AI translation pipeline is the most fully developed among WordPress multilingual tools, and the built-in reviewer assignment system saves teams significant coordination time. Solo publishers or early-stage startups should start with Polylang and upgrade only when volume demands it.
3. Is Polylang really free?
The core plugin costs nothing and is available directly from the WordPress plugin directory. DeepL-powered auto-translation and WooCommerce store support are gated behind paid upgrades.
4. Does Polylang affect SEO?
Not negatively when set up correctly, it actively helps. Polylang handles hreflang tag generation automatically, works across all three URL structures, and connects cleanly with both Yoast SEO and Rank Math. Search engines receive clear language signals, which supports stronger international rankings
5. Can I use Polylang with Elementor?
Yes. Standard Elementor pages translate without issues. If you’re using Elementor Pro’s Theme Builder or dynamic content features, you may need to do some additional configuration in Polylang’s string translation settings to cover all content areas.
6. What is the best free multilingual plugin for WordPress?
Polylang is the strongest free option available today. Without spending anything, you get support for unlimited languages, automatic hreflang output, all three URL formats, and full custom post type coverage enough for most blogs, nonprofits, and small business sites to go fully multilingual.
7. Does WPML slow down your website?
It generates around 16 database queries per page, compared to roughly 4 for Polylang. In practice, a good caching layer eliminates any noticeable difference for most visitors. The gap only becomes meaningful on very high-traffic pages served without caching.
8. Can I switch between WPML and Polylang later?
Switching is technically possible but genuinely disruptive. The two plugins store translation data differently and use separate URL structures, so migrating mid-project risks broken links and lost SEO equity. Lock in your choice before launch.
WordPress CSV Import for Agencies – 5 Powerful Tips
14 May 2026, 10:47 am
WordPress CSV import for agencies is one of thefaster way to manage client data at scale – without manual entry, migration errors, or repetitive updates. This guide covers how agencies use it to reduce manual work, speed up migrations, and manage client data at scale.
Key Takeaways
- WordPress agencies manage bulk data faster using CSV import plugins
- WP Ultimate CSV Importer covers posts, products, users, and custom fields across every client site you manage.
- Scheduled imports reduce manual work for WooCommerce and LMS sites
- Smart field mapping prevents errors during large-scale WordPress migrations
- CSV workflows improve agency delivery speed across multiple client websites
What is a WordPress CSV Import Plugin – and Why Do Agencies Need One?
WordPress CSV import for agencies starts with the right plugin – WP Ultimate CSV Importer lets you bring in posts, products, users, and custom fields across client sites using CSV or XML files. No coding needed, no manual entry, and no risk of data getting misplaced during the process.
Instead of manually entering or editing content, agencies can prepare a CSV file and import thousands of records in just a few clicks. It also helps maintain data consistency during migrations or ongoing updates. Agencies use it to reduce project turnaround time and eliminate data entry errors across client sites.
Key Challenges Agencies Face with Manual WordPress Data Management
Managing data manually across multiple WordPress websites creates several operational challenges for agencies:
- Repetitive manual updates
- Data inconsistency
- Import errors
- Slow migration workflows
- Higher project delivery time
- Difficulty managing WooCommerce catalogs at scale
This is why WordPress CSV import for agencies has become the standard approach for automation and bulk data handling.
| Without CSV Import | With WP Ultimate CSV Importer |
| Time-consuming updates | Faster bulk imports |
| Higher risk of errors | Structured field mapping |
| Manual product uploads | Automated WooCommerce imports |
| Difficult recurring updates | Scheduled imports |
| Slower migrations | Streamlined data migration |
| No import logs | Detailed error tracking & logs |
Why Agencies Rely on WordPress CSV Import Tools
Bulk Import Thousands of WordPress Records at Once
Agencies often need to import thousands of records, such as blog posts, products, or user details. CSV import allows them to upload large datasets in a single action, saving hours of manual effort and reducing errors.
Supports Custom Post Types and ACF Fields
Many client websites use custom post types and advanced custom fields. This tool supports both, making it easier for agencies to manage complex site structures without custom coding or plugins.
Automates Repetitive Tasks Across Multiple Client Sites
By automating repetitive data tasks, agencies can focus more on design, development, and strategy. It also speeds up website migrations, updates, and content rollouts, improving overall project delivery time.
New in 2026: Advanced WordPress CSV Import Features Agencies Are Using Now
Modern WordPress agencies are no longer relying on manual CSV uploads alone. In 2026, automation and AI-assisted workflows are becoming essential for managing multiple client websites efficiently.
WP Ultimate CSV Importer now supports advanced features that help agencies streamline large-scale data operations with less manual effort.
Smart Auto Field Mapping
The plugin can automatically suggest matching fields between CSV columns and WordPress fields, reducing manual mapping time. Significantly reduces setup time on large imports. Especially useful when onboarding new clients with non-standard data structures.
Google Sheets Integration
Agencies can sync live spreadsheet data directly into WordPress without exporting files repeatedly. Agencies managing live inventory or content calendars can sync data directly – no manual exports needed.
Scheduled Imports
Recurring imports can be automated for WooCommerce inventory updates, directory listings, and ongoing content synchronization. Set recurring imports for WooCommerce stock updates or directory refreshes – runs automatically without manual triggers.
Import Logs with Error Tracking
Detailed import logs help agencies quickly identify skipped records, formatting problems, and failed media imports. Pinpoints failed rows, broken image URLs, and field mismatches in real time so nothing slips through.
Top WordPress CSV Import Use Cases: Migration, WooCommerce & User Data
WordPress CSV import for agencies covers a variety of real-world projects where bulk data handling is essential. It simplifies complex operations like migrations, product uploads, and user management.
WordPress Website Migration Made Easy
When moving a website from one hosting environment to another or from a staging site to live, agencies use CSV import to transfer posts, pages, and media in bulk. This reduces downtime and ensures data consistency across environments.
WooCommerce Product Import
For e-commerce projects, importing products manually is not practical. Agencies use CSV files to upload product details such as price, descriptions, categories, and images in one go, making store setup and updates much faster.
User Data Import for Membership and LMS Sites
Client websites often require importing large user databases, especially for membership or LMS platforms. CSV import allows agencies to efficiently migrate or update user profiles without manual entry.
Example
For LMS sites, agencies typically import user profiles, course assignments, and access levels in a single CSV run — covering in minutes what manual entry would take days.
How Agencies Use WP Ultimate CSV Importer: Step-by-Step
Agencies that rely on WordPress CSV import for agencies follow a structured workflow when using the importer to ensure accurate and efficient data imports. This step-by-step process helps avoid errors and ensures smooth data handling across client websites.
Step 1: Prepare Your WordPress CSV File
The first step is organizing the data into a clean CSV format. Agencies map each column carefully (like title, content, price, email, etc.) to match WordPress fields. Proper formatting at this stage is critical to avoid import issues later.
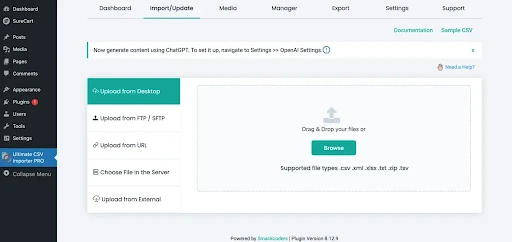
Step 2: Upload CSV and Map WordPress Fields
Next, the CSV file is uploaded into the plugin. The tool allows users to map CSV columns to WordPress fields such as posts, custom fields, or WooCommerce attributes. This ensures that each piece of data goes to the correct location.
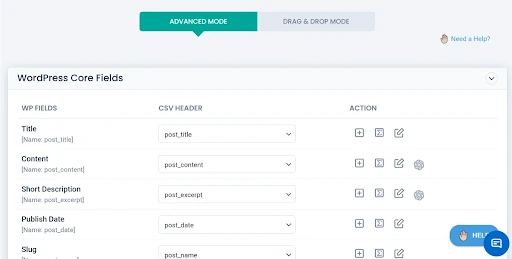
Step 3: Run the WordPress Import and Validate Data
Once mapping is complete, the import process is executed. Agencies then validate the imported data by checking sample entries, ensuring images, fields, and relationships are correctly imported without duplication or errors.
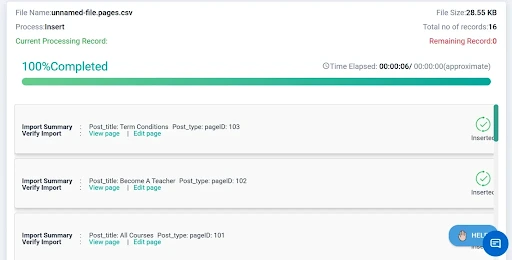
Step 4: Schedule Recurring WordPress Imports
For recurring updates, agencies can schedule automated imports to sync client website data regularly. This is especially useful for WooCommerce inventory updates, directory websites, and large content-driven platforms.
Step 5: Review Logs and Fix Import Errors
After the import is completed, agencies review import logs to identify skipped records, formatting issues, or failed image imports. This helps maintain data accuracy and ensures smoother future imports.
Best Practices for WordPress CSV Import for Agencies
- Always validate the CSV file before importing – check column headers, formatting, and data types
- Run a small test import of 5–10 rows before processing the full dataset
- Back up the WordPress site before every large import
- Use a staging environment before importing into live client sites, especially for WooCommerce stores
- Document field mapping templates per client niche – LMS, e-commerce, directory – and reuse them across similar projects
- Always define a unique identifier like SKU or email before running update imports to avoid duplicate records
Common Mistakes to Avoid When Importing CSV in WordPress
Even experienced agencies can run into issues during CSV imports. One common mistake is using incorrect column headers, which causes mapping failures. Another is importing large files without testing smaller batches first, leading to timeout issues.
Broken image URLs are another frequent problem, especially during WooCommerce imports. Many agencies also forget to back up the site before importing, which creates unnecessary risk.
Running a test import, validating field mapping, and checking server limits before large imports can prevent most of these problems.
Conclusion
The agencies that get the most out of WordPress CSV imports are the ones that treat it as a system, not a one-off task. Build your field mapping templates once per client niche, schedule the recurring imports, and review the logs after every run. That’s when the time savings compound across every project you take on. Start managing client WordPress data more efficiently with WP Ultimate CSV Importer. [Try Free →]
1. What is the best WordPress CSV import plugin for agencies?
WP Ultimate CSV Importer is the best WordPress CSV import for agencies tool because it supports bulk imports, WooCommerce products, custom post types, users, and scheduled automations.
2. Can I import CSV files into WordPress without coding?
Yes. WP Ultimate CSV Importer requires no coding. Agencies can import posts, WooCommerce products, users, and custom fields using a simple upload and field mapping interface.
3. How do agencies use WordPress CSV import tools for client data management?
Agencies use WordPress CSV import for agencies to manage bulk client data such as blog posts, WooCommerce products, customer records, and user profiles. These tools help automate migrations, reduce manual work, and improve workflow efficiency across multiple client websites.
4. Does WP Ultimate CSV Importer support WooCommerce product imports?
Yes, WP Ultimate CSV Importer supports WooCommerce product imports using CSV or XML files. Agencies can import product names, SKUs, prices, categories, images, and inventory data in bulk, making WooCommerce store management much faster.
5. What is the fastest way to migrate WordPress data using CSV?
The fastest way is to export existing data as CSV, clean and map it to WordPress fields, then use WP Ultimate CSV Importer to bulk-upload everything in one run – including posts, users, products, and custom fields.
6. Does WP Ultimate CSV Importer support scheduled automatic imports?
Yes. Agencies can set up scheduled imports to automatically sync WooCommerce inventory, directory listings, or recurring content updates without manual intervention.
WP Ultimate CSV Importer Pro Gets a Major Architecture Upgrade: Free Plugin Now Required Across All Pro Packages
13 May 2026, 3:52 pm
If you have been using WP Ultimate CSV Importer Pro for a while, you already know how much ground this plugin covers. From migrating thousands of posts and WooCommerce products to handling custom fields, multilingual content, and complex taxonomies, it has long been one of the more reliable import-export solutions in the WordPress ecosystem. With the latest round of releases, we are making a foundational change to how the plugin suite is structured, and we want to take the time to explain exactly what that means for you.
Starting with WP Ultimate CSV Importer Premium 8.15, Custom Fields Import Pro 8.3, and WPML Import Pro 6.2, all three Pro packages now require the free version of WP Ultimate CSV Importer to be installed and activated on your site. This is not a licensing restriction or a paywall, but rather a deliberate architectural decision that makes the entire plugin suite faster, more stable, and significantly easier to maintain and extend going forward.
TL;DR: What You Need to Know Right Now
- CSV Importer Pro 8.15, CF Pro 8.3, and WPML Pro 6.2 now require the free WP Ultimate CSV Importer plugin as a dependency.
- If the free plugin is not active, the Pro packages will auto-deactivate and show an admin notice guiding you through the setup.
- This change consolidates the plugin core, eliminates redundant code, and prepares the architecture for faster feature development.
- Several significant features also ship with this release, including AI-powered import with cost estimation, WPBakery migration support, Google Sheets transport with cron retry, and expanded WooCommerce handling.
- Updating takes a few minutes. Install and activate the free plugin, then reactivate your Pro package. Everything else stays the same.
Why This Architectural Shift Actually Matters
Plugin architecture is not the most exciting topic for most WordPress users, and that is fair. But this particular change has a direct and practical impact on how reliably the tool works, how quickly issues get fixed, and how smoothly new features get built. Understanding the reasoning here will help you appreciate why this update is a step forward, not a step backward.
Until now, the CSV Importer Pro, CF Pro, and WPML Pro add-ons each carried their own copies of shared core logic. That meant three separate code paths handling the same fundamental operations: file parsing, data validation, admin bootstrapping, database connections, and more. Every time a change was needed in that shared logic, it had to be replicated across three separate packages. Bugs introduced in one place sometimes appeared in others because the copies drifted out of sync over time. Compatibility issues with a WordPress update or a popular plugin could surface differently in each package, making diagnosis slower than it needed to be.
The free plugin now serves as that single shared foundation. All three Pro packages load their core dependencies from one trusted source. This consolidation eliminates the duplication, dramatically reduces the surface area for bugs, and means that a fix applied to the shared core benefits every package simultaneously.
The changelog entries behind this change tell the story clearly. The Pro core now establishes a “shared architectural foundation for CSV Pro, CF Pro, and WPML Pro addons.” The free plugin received a new Smackcoders\UCI\Core namespace and a restructured bootstrap architecture, alongside improvements to file loading, performance, and third-party compatibility. These are not cosmetic changes, and they reflect a serious engineering investment in making the plugin suite work as a coherent system rather than a collection of loosely related tools.
The Free Version Requirement: What It Means and How It Works
To be clear about what this means in practice: the free WP Ultimate CSV Importer plugin from the WordPress.org repository must be installed and active on any site running a Pro package. The Pro extension then layers its premium functionality on top of that shared base.
If the free plugin is not detected, the Pro package will automatically deactivate itself and display a clear admin notice in the WordPress dashboard explaining what needs to be done. There is no silent failure, no cryptic error, and no guesswork. The notice walks you through exactly what is missing and how to fix it.
This dependency validation flow has been implemented across all three Pro packages and is covered in the changelog for each one. For CF Pro, the same logic also handles the deactivation of duplicate Free UI elements when the Pro package is active, so you do not end up with redundant admin panels cluttering your dashboard. The shared backend loaders continue operating correctly behind the scenes, which means your existing import configurations and saved mappings are not affected.
What Changed in Each Pro Package
CSV Importer Pro 8.15: AI Imports, WPBakery Migration, and Google Sheets Transport
Version 8.15 is one of the more feature-dense releases in recent history. The headline additions center on three distinct areas: AI-powered importing, WPBakery page builder migration, and Google Sheets integration.
The AI Natural Language Import feature has been substantially improved. One of the most practical additions is client-side AI token estimation, which gives you a pre-import prediction of usage costs before you run a large import job. For teams managing budgets or running imports at scale, knowing the likely cost in advance removes a meaningful source of uncertainty. The AI prompt-context processing has also been refined, with manual override handling removed in favour of a cleaner, more consistent experience.
WooCommerce users working with AI-assisted product imports now have validation support across 18 specific mapping rules, which helps catch configuration errors before they result in bad data. The AI Import interface has been redesigned with a premium rounded UI and branded teal-themed components, making it more pleasant to work with during complex mapping sessions.
For sites built with WPBakery, this release introduces dedicated migration support. Three new modules handle WPBakery export, import, and extension functionality. A Media Manifest system manages asset migration and attachment URL rewriting, while vc_templates migration brings its own custom mapping fields. If you have ever tried to migrate a WPBakery-heavy site manually, you will understand why having this handled automatically inside the import process is genuinely useful.
The Google Sheets transport module adds another meaningful integration. Imports sourced from Google Sheets now benefit from a dedicated HTTP transport layer with cron-based retry and automatic rescheduling when a request fails. This makes Google Sheets a more dependable import source for teams running scheduled or recurring imports.
On the bug fix side, several longstanding issues have been resolved. WooCommerce product SKU updates during CSV imports now work correctly. A JetEngine custom post type export bug has been fixed. User login sessions no longer break after CSV-based user imports, which was a particularly disruptive issue that affected sites running user onboarding or bulk account creation workflows. Multisite users will also notice that subsite user exports now return accurate results rather than zero rows.

WP Ultimate CSV Importer Pro
Get Ultimate CSV/XML Importer to import data on WordPress faster, quicker and safer.
CF Pro 8.3: Meta Box Support, XML Formula Recursion, and Stability Improvements
Ultimate CF Pro handles custom field imports and exports, and version 8.3 extends its compatibility in two notable directions while also addressing some serious stability issues.
Meta Box users can now import block editor fields and URL fields, filling gaps that were previously frustrating for agencies working with Meta Box-heavy configurations. The update also expands XML formula support to handle nested functions with recursive transformation logic, a technical improvement with real-world implications for anyone processing complex, formula-driven data structures during import.
Fourteen language files have been updated with missing translation keys, which is a welcome improvement for plugin users working in languages other than English. This kind of localization maintenance often gets overlooked in release notes, but it matters for international teams and multilingual site operators.
On the stability side, fatal initialization crashes in the plugin bootstrap have been resolved. A namespace mismatch between the CRON scheduler callbacks for CFCSV and CustomFieldsPro has been fixed, as this was causing scheduled imports to fail silently in some configurations. The backupindex.php file no longer shows up as a phantom plugin in the WordPress Plugins dashboard, which was a confusing cosmetic issue for site administrators. Project-wide code style normalization across 42 files rounds out the release, improving long-term maintainability.
WPML Pro 6.2: Dependency Validation Added
The WPML Pro 6.2 release is focused and intentional. The primary change mirrors what was introduced in CF Pro: a dependency validation flow with Pro auto-deactivation and clear admin notices when the free plugin is not present. This brings WPML Pro into alignment with the new architecture shared across the entire suite.
Real Benefits for Your Daily Workflow
It is worth spelling out what this architectural change actually delivers in practical terms, because the benefits extend well beyond a cleaner codebase.
Fewer conflicts and fatal errors.
By eliminating duplicate class loading and conflicting namespaces across packages, the risk of fatal activation errors drops significantly. This has been a source of support tickets and site downtime for some users, and it is now addressed at the foundation level.
Faster updates and fixes.
When a bug is identified in shared logic, it gets fixed once in the core and that fix propagates to every Pro package. Previously, fixes sometimes needed to be applied in three separate places, which introduced delays and the possibility of incomplete repairs.
Easier plugin management for agencies and developers.
Managing plugin dependencies is a standard pattern in professional WordPress development. Tools like Composer and plugin dependency management plugins are built around this model. Having a clearly declared dependency makes the suite easier to deploy, document, and manage across multiple client sites.
Better scalability for future features.
New capabilities like the AI import engine, Google Sheets transport, and WPBakery migration support are being built on this shared foundation. As the product roadmap expands, the shared core means that new integrations and features benefit all packages simultaneously without needing to be rebuilt for each one.
Who Is Affected by This Update?
This change affects every site currently running CSV Importer Pro, CF Pro, or WPML Pro without the free version installed alongside it. If the free plugin is already active on your site, you will not notice any disruption after updating.
Users most likely to need action are those who purchased a Pro package directly and never installed the free plugin, since they had no reason to before. This is a common scenario, as many users come to the Pro version without going through the free version first. If that describes your setup, the upgrade path is straightforward and takes only a few minutes.
WooCommerce store owners, agencies managing client sites, developers running multisite installations, and content teams handling bulk imports are all affected if the free plugin is not already present. Anyone running automated or scheduled imports should prioritise this update to avoid import jobs failing after the Pro package auto-deactivates.
What You Need to Do Right Now
The steps are simple. Here is the full process:
Step 1: Check Whether the Free Plugin Is Already Installed
Go to Plugins in your WordPress dashboard and search for “WP Ultimate CSV Importer.” If you see the free version listed as active, you are already in good shape. Proceed to update your Pro packages and you are done.
Step 2: Install the Free Plugin If It Is Not Present
Navigate to Plugins > Add New and search for “WP Ultimate CSV Importer.” Install and activate it. The free plugin is available on WordPress.org at no cost and has no impact on your existing Pro license.
Step 3: Update Your Pro Packages
With the free plugin active, update CSV Importer Pro to 8.15, CF Pro to 8.3, and WPML Pro to 6.2 from your account area or via the plugin update mechanism on your site. If you update the Pro plugin before installing the free version, you will see an admin notice. Follow the instructions in that notice, and the Pro package will reactivate automatically once the dependency is satisfied.
Step 4: Verify Your Import Configurations
After updating, run a test import using an existing template to confirm everything is working as expected. Your saved mapping configurations and import history are not affected by this update. This verification step is a precaution, particularly for sites with scheduled imports running in the background.
Frequently Asked Questions
Does installing the free plugin affect my Pro license or features?
No. Installing the free plugin does not alter your Pro license in any way. The free version serves as a shared foundation. All Pro features remain exclusive to the Pro packages and are not replaced or limited by having the free plugin installed.
What happens if I update the Pro plugin without installing the free version first?
The Pro package will automatically deactivate and display a clear admin notice in your WordPress dashboard. Your import data and configurations will not be lost. Once you install and activate the free plugin, the Pro package can be reactivated and everything will return to normal.
Will this break my existing import configurations or saved mappings?
No. Your saved import templates, column mappings, and import history are stored in your database and are not affected by the architectural changes in this update. The update is a structural change to how the plugin loads, not a change to how it stores or processes your data.
Is this change relevant for multisite installations?
Yes. On a multisite network, the free plugin should be network-activated to ensure it is available across all subsites where a Pro package is running. This also resolves the multisite subsite user export issue fixed in 8.15, where exports were returning zero results.
What does the AI token estimation feature actually do?
Before you run an AI-assisted import, the client-side estimation tool analyses your CSV file and predicts how many AI tokens will be consumed during the import process. This gives you a cost estimate upfront, which is particularly useful when running large imports or managing budgets on shared API accounts.
Does the free plugin add any UI elements to my dashboard?
When both the free plugin and a Pro package are active, CF Pro automatically suppresses the duplicate Free UI elements to prevent clutter. The shared backend loaders continue working, but you only see the Pro interface. This coexistence improvement was specifically addressed in CF Pro 8.3.
Final Thoughts: A Stronger Foundation for What Comes Next
There are two types of plugin updates. The first kind adds shiny features to the surface while leaving the underlying structure intact. The second kind does the harder work of improving the foundation so that everything built on top of it performs better and lasts longer. This release is firmly in the second category.
Requiring the free plugin as a shared dependency is a well-established pattern in mature plugin ecosystems. WooCommerce itself works this way, where extensions require a core installation, and that dependency model is precisely what makes the ecosystem coherent and scalable. WP Ultimate CSV Importer is moving in the same direction.
The features shipping alongside this architectural change, including AI import with cost prediction, WPBakery migration support, improved Google Sheets transport, Meta Box block editor compatibility, and expanded XML formula handling, demonstrate that the investment in structure is already paying dividends. These are the kinds of integrations that become much faster to build when the foundation is solid.
If you have been running WP Ultimate CSV Importer Pro for any length of time, updating to these latest versions is worth doing sooner rather than later. The setup change is minimal, the bug fixes are meaningful, and the new features are genuinely useful. Head over to your account area or the Smackcoders website to grab the latest versions and get your site up to date.
Download the latest versions from your Smackcoders account and try today.
EmDash vs WordPress: Which Blogging Platform is Best in 2026
13 May 2026, 10:25 am
When comparing EmDash vs WordPress, choosing the right blogging platform isn’t just about getting your content online. Your platform affects your website’s speed, scalability, SEO performance, and overall user experience. In 2026, many bloggers and businesses are moving toward faster, lightweight publishing platforms built on modern frameworks like Astro and TypeScript. As static site generators and headless CMS platforms continue gaining popularity, WordPress is now being compared against a new generation of speed-focused alternatives like EmDash.
WordPress has long been the industry standard, known for its flexibility and massive ecosystem. In contrast, newer platforms like EmDash focus on performance, simplicity, and modern web architecture, offering a faster and more streamlined blogging experience. EmDash is currently in v0.1 preview, so while it is promising, its ecosystem is still much smaller than WordPress’s. The real question is, do you need full control, or do you want something that just works efficiently out of the box?
| Note: EmDash is currently in v0.1 preview. Features, integrations, and availability may evolve over time. This comparison reflects EmDash’s current capabilities and positioning as of 2026. |
Key Takeaways
- WordPress offers unmatched flexibility but requires ongoing maintenance
- EmDash focuses on speed, simplicity, and built-in performance
- Choosing between EmDash vs WordPress depends on whether you value customization or efficiency
What is EmDash? A Modern Speed-First Blogging Platform
EmDash is a lightweight, static-first blogging platform built for speed, simplicity, and minimal maintenance.

High-Performance for Modern Writers
EmDash is built with a clear focus on speed and simplicity. Unlike traditional CMS platforms that depend on databases and multiple plugins, EmDash follows a lightweight approach that delivers faster load times and a smoother user experience.
For writers, this means less time dealing with technical issues and more time creating content. There’s no need to manage plugin updates, security fixes, or performance tweaks; everything is optimized by default. In practice, this makes EmDash a strong choice for bloggers and creators who want a clean, hassle-free publishing workflow without sacrificing performance.
How EmDash Works: Astro + TypeScript Architecture
At its core, EmDash uses modern technologies like Astro and TypeScript. Astro helps generate static pages with minimal JavaScript, which significantly improves loading speed. TypeScript adds an extra layer of reliability, helping make the platform more stable, scalable, and easier to maintain as it grows. Instead of building pages dynamically for every visitor, EmDash serves pre-built pages. This approach reduces server load and enhances both speed and security, making it well-suited for today’s performance-driven web.
What is WordPress? The World’s Most Popular CMS
WordPress is an open-source CMS powering 43% of all websites, known for its flexibility and massive plugin ecosystem.
The Open-Source CMS That Powers 43% of Websites
According to W3Techs, WordPress powers over 43% of all websites worldwide, making it the most widely used CMS today. Its popularity comes from one key strength: flexibility. Whether you’re building a simple blog, a business website, or a full-scale eCommerce store, WordPress can handle it.
WordPress is free to use, open-source, and maintained by a large global community of developers worldwide. This means thousands of themes, plugins, and tutorials are available, making it accessible even for beginners. At the same time, developers can customize almost every aspect of a WordPress site, giving it unmatched versatility. Explore our WordPress plugins overview.
WordPress Plugin Ecosystem: 60,000+ Extensions
What truly sets WordPress apart is its ability to do almost anything. With access to over 60,000 plugins, you can add features like SEO optimization, payment gateways, membership systems, and more without building everything from scratch.
However, this flexibility comes with responsibility. Managing plugins, updates, and security can become time-consuming, especially as your site grows. Performance can also vary depending on how well the site is optimized.
In 2026, WordPress continues evolving through Full Site Editing (FSE), block themes, and WooCommerce performance improvements, helping it remain competitive despite the rise of modern static and headless CMS platforms.
WordPress also benefits from a mature ecosystem built around tools like Gutenberg, the native block editor, WooCommerce for eCommerce, and popular builders like Elementor. These features make WordPress a flexible platform for businesses, publishers, and eCommerce websites. Managing large amounts of WordPress content or products? WP Ultimate CSV Importer helps growing WordPress websites handle bulk imports, content updates, and data migrations without manual effort.
EmDash vs WordPress: Feature-by-Feature Comparison
EmDash wins on speed and simplicity, while WordPress leads in customization, scalability, and plugin support.
The EmDash vs WordPress discussion also reflects the broader static site generator vs CMS debate happening across the modern web ecosystem.
Customization: Fixed Speed vs. Infinite Freedom
This is where the difference becomes clear. EmDash follows a structured approach, offering limited but optimized customization to maintain speed and stability. You get clean design options and essential features without the risk of breaking performance.
WordPress, in contrast, offers almost unlimited customization. From themes to custom code, you can build virtually any type of website. However, this freedom can sometimes lead to bloated setups if not managed carefully.
Plugin Ecosystem: Cloudflare Workers Sandbox vs. 60,000+ Plugins
EmDash keeps things minimal by avoiding a traditional plugin ecosystem. Instead, it relies on built-in features and controlled integrations (often through environments like Cloudflare), reducing dependency risks.
WordPress thrives on its massive plugin library, over 60,000+ plugins. Need SEO tools, analytics, or eCommerce functionality? There’s likely a plugin for it. The downside is that too many plugins can slow down your site or create compatibility issues. Explore our guide on the best SEO plugins to learn more about them.
Security: Addressing the “Plugin Vulnerability” Gap
Security is another major differentiator. EmDash reduces risk by limiting third-party dependencies and using a modern architecture that minimizes common vulnerabilities.
WordPress, while secure at its core, can become vulnerable if plugins or themes are outdated. Since it’s widely used, it’s also a common target for attacks. Regular updates and security plugins are essential for keeping a WordPress site secure, protected from vulnerabilities, and running smoothly over time. Read the full blog on WordPress 7.0 security features.
Performance Comparison: Evaluating Speed, Core Web Vitals, and Page Load Times
EmDash is built with a performance-focused architecture that uses static page generation and lightweight JavaScript delivery.
WordPress performance depends heavily on how it’s configured. With the right hosting, caching, and optimization plugins, it can be fast, but it usually requires manual tuning.
This shift has also contributed to the growing WordPress vs headless CMS conversation among developers and publishers focused on performance.
In simple terms, EmDash gives you speed out of the box, while WordPress gives you the tools to achieve it if you know how to use them.
| Feature | EmDash | WordPress |
| Performance | Fast by default | Depends on optimization |
| Ease of Use | Simple, minimal setup | Moderate learning curve |
| Customization | Limited | Highly flexible |
| Maintenance | Low | High |
| Security | High (fewer third-party risks) | Depends on plugins/updates |
| Cost (Ongoing) | Low (minimal hosting) | Varies ($5–$50/month depending on hosting and plugins) |
| Best For | Bloggers, simple sites | Businesses, complex websites |
Pros and Cons: EmDash vs WordPress
EmDash offers performance with fewer features, while WordPress offers full control with more maintenance overhead.
The EmDash vs WordPress comparison becomes easier when you look at their strengths side by side
EmDash
Pros
- Fast performance by default with minimal setup
- Low maintenance, no plugin updates or constant fixes
- Better security due to fewer third-party dependencies
- Clean, distraction-free writing experience
Cons
- Limited customization compared to traditional CMS platforms
- Smaller ecosystem with fewer integrations
- Not ideal for complex websites or advanced features
WordPress
Pros
- Fully adaptable for blogs, business sites, eCommerce stores, and complex web platforms
- Massive plugin and theme ecosystem
- Strong SEO capabilities with the right tools
- Scalable for blogs, business sites, and e-commerce
Cons
- Requires regular maintenance (updates, backups, security checks)
- Performance depends on hosting and optimization
- Plugin conflicts and vulnerabilities can occur
- Can become complex as the site grows
EmDash vs WordPress: Which Platform Is Right for You?
Choose EmDash for fast, simple blogging. Choose WordPress for scalable, feature-rich websites.
In the EmDash vs WordPress decision, your priority determines the winner.
Pick EmDash for Fast, Secure, and Hassle-Free Blogging
If you want a fast and secure platform that just works, EmDash is a good fit. It’s ideal for bloggers, indie creators, and developers who don’t want to spend time managing plugins, fixing performance issues, or handling security updates.
If your primary goal is to publish content quickly with excellent load times and minimal maintenance, EmDash offers a streamlined experience. It works especially well for personal blogs, portfolios, and content-focused sites where simplicity and performance matter most.
Choose WordPress If You Need Scalability, SEO Power, and Business Tools
WordPress makes more sense if your website is part of a larger plan, like growing a business, running an online store, or building a feature-rich platform. Its flexibility allows you to add anything from advanced SEO tools to membership systems and eCommerce functionality.
If you’re willing to manage updates and optimize performance, WordPress gives you the freedom to scale without limitations. It’s best suited for business websites, agencies, and content-heavy platforms that need long-term growth and customization.
Conclusion
The EmDash vs WordPress decision comes down to what you need most from your platform.
If you prefer a fast, low-maintenance, and modern blogging experience, EmDash is a strong choice that lets you focus on content without technical distractions. But if you’re looking for flexibility, scalability, and advanced features, WordPress remains the better option for long-term growth and customization.Already on WordPress? Manage bulk imports, updates, and migrations with WP Ultimate CSV Importer. [Try Free →]
1. What is the key difference between EmDash and WordPress?
The key difference between EmDash and WordPress lies in how they handle website management and performance. EmDash focuses on speed, simplicity, and minimal maintenance with a static-first architecture, while WordPress offers extensive customization through themes, plugins, and a large ecosystem.
2. Which platform is easier for beginners: EmDash or WordPress?
EmDash is easier for beginners – no plugins, no hosting configuration, no maintenance required. WordPress gives you more control and features but takes more time to learn and configure.
3. Is EmDash faster than WordPress?
EmDash uses static page generation and minimal JavaScript for faster load times by default. WordPress can match it with proper caching and hosting but requires manual optimization.
4. Does EmDash support SEO optimization?
Yes. EmDash’s static-first architecture improves page speed and Core Web Vitals, both key SEO ranking factors.
5. Can I migrate from WordPress to EmDash?
Not fully yet. EmDash is in v0.1 preview and migration tools are limited. Manual transfer is possible for small sites only.
You’ve Been Syncing WooCommerce and Shopify in the Dark. This Update Changes That.
13 May 2026, 3:00 am
A practical look at what is new in the latest W2S release, and why it finally gives multi-platform store operators the visibility and control they have been missing.
If you run WooCommerce and Shopify side by side, you already know the drill. An order syncs across. You check Shopify. Something looks off: maybe the fulfillment provider is wrong, maybe a line item is missing, maybe the order total does not match what you expected. So you dig in.
You check the plugin logs. They tell you the sync ran. They do not tell you what was actually sent to Shopify. You check WooCommerce, compare fields manually, and eventually make your best guess about where things went wrong.
That guesswork has always been the hidden cost of running a two-platform operation. And when fulfillment also gets assigned to the wrong provider, or not assigned at all, and someone on your team ends up fixing it by hand in Shopify after every sync run.
The latest W2S update addresses both of these problems directly. Two new Pro features, the JSON Audit Log Viewer and Dynamic Fulfillment Service Mapping, tackle the two most common points of failure in WooCommerce-Shopify order sync: not being able to see what was sent, and not having control over where it goes.
Here is what changed, how it works, and who should care most.
Feature 1: JSON Audit Log Viewer: Finally See Exactly What Was Sent to Shopify
The Audit Log in W2S has always shown you that a sync happened: timestamp, entity type, action taken, and a status. What it could not show you was the actual data payload: the raw JSON object that was constructed and pushed to Shopify’s API for each order.
That gap matters more than it sounds. When a sync appears to succeed but the order in Shopify looks wrong, the problem is almost never the sync engine itself. It is the data: a field that did not transfer cleanly, a value that got dropped, a mapping that went sideways somewhere. Without seeing the payload, you are diagnosing blind.
How It Works
The Audit Log tab now includes a Payload column in its table. By default, this column is present but empty. The View button only becomes active once you enable debug logging.
To turn it on: go to the Audit tab and check the ‘Enable Debug Logging’ checkbox at the top of the page, then click Save. The description beneath the checkbox is explicit about what this does: W2S will store the raw Shopify order JSON sent for each sync attempt, subject to size limits.
Once enabled, every subsequent order sync will log its full payload. The Payload column will show a blue View button for each logged record. Click it and you get direct access to the complete JSON object that was sent to Shopify for that order.
| Where to find it:Woo-Shopify plugin > Audit tab > check ‘Enable Debug Logging’ > Save. The Payload column will populate with a View button for each order sync that runs after logging is enabled. |
What the Payload Shows You
Clicking View opens a modal titled ‘JSON payload’, a scrollable, dark-background panel showing the complete JSON object W2S sent to Shopify for that order. It is read-only: you can scroll through it and that is it. No editing, no field highlighting, no filtering. Just the raw data, exactly as it was sent.
What you see inside covers everything W2S assembled for that sync: line_items with title, quantity, price, SKU, variant_id, and fulfillment_service per item; financial_status; the note field (which shows ‘Synced from WooCommerce Order #[number]’ by default); tags such as ‘woocommerce-sync’; total_price, subtotal_price, and total_tax. The modal scrolls, so longer payloads with more line items are all visible.
The only action available is the Copy button in the modal header. One click copies the entire JSON to your clipboard. From there you can paste it into a JSON viewer, share it with your developer, or compare it directly against what Shopify shows on its end.
The Real Workflow Benefit
Before this feature, debugging a sync issue looked like this: pull the WooCommerce order, write down the key fields, open Shopify, find the corresponding order, compare fields manually, guess at the discrepancy, attempt a re-sync, and repeat until it looks right.
Now it looks like this: open the Audit Log, find the order, click View in the Payload column, see exactly what W2S sent to Shopify, and identify the problem in seconds.
For store operators running daily or scheduled syncs, this is especially useful after overnight runs. Instead of opening every order in Shopify to check for issues, you can scan the Audit Log and zero in on anything that looks off.
For developers managing the integration on behalf of clients, it removes an entire category of back-and-forth. Instead of asking ‘what did the plugin actually send?’, the answer is one click away.
| Important note:Debug logging only captures payloads from syncs that run after it is enabled. Existing log entries will still show in the Audit Log, but their Payload cells will not have data unless they were synced while logging was active. Turn it on before your next scheduled sync to start capturing. |
Feature 2: Dynamic Fulfillment Service Mapping: Route Orders to the Right Provider Automatically
Even when order data syncs across to Shopify correctly, there has always been a second failure point for stores using third-party logistics: Shopify receives the order but does not know which fulfillment service should handle it.
If you use a 3PL provider, whether that is Amazon MCF, ShipBob, a print-on-demand service like Contrado, or a custom logistics operation, Shopify needs to know who is responsible for fulfilling each order. Without this, orders land in Shopify in a limbo state: synced, but not routed. Someone has to manually assign the fulfillment provider after every sync.
At low volume, this is an annoyance. At scale, it is a real operational cost, and a risk, because manual steps get missed.
How It Works
The fulfillment mapping is configured inside the Orders Filters modal, which you access by clicking the Advanced Sync button on the Orders card in the main sync configuration screen.
Inside the Orders Filters modal, below the date and status filters, there is a Fulfillment Settings section. The UI is clear about what this does: ‘Woo to Shopify: sets fulfillment_service on line items and requested_fulfillment_service_id on shipping lines.’
You select your fulfillment provider from the Fulfillment service dropdown. The available options are:
| Option | What It Means | When to Use It |
| manual | No automated fulfillment assignment | If you fulfill orders yourself or manage routing separately in Shopify |
| shopify | Assigns to Shopify’s own fulfillment network | If you use Shopify Fulfillment Network (SFN) |
| contrado | Routes to Contrado (print-on-demand provider) | If you use Contrado for product fulfillment |
| Custom | Enter your own fulfillment service handle | For any 3PL or custom provider registered in Shopify |
The Custom Handle Option
The Custom option is the most flexible, and the most important for stores using their own 3PL or a provider not listed in the dropdown. When you select Custom, a ‘Custom handle’ text field appears where you enter the handle of your fulfillment service as it is registered in Shopify.
Once your selection is saved using the ‘Save fulfillment settings’ button, W2S will automatically apply that fulfillment service assignment during every subsequent order sync from WooCommerce to Shopify, setting it at the line item level via fulfillment_service and on the shipping line via requested_fulfillment_service_id.
| Where to find it:Woo-Shopify plugin > Config tab > Orders module > Advanced Sync button > Orders Filters modal > Fulfillment Settings section. Select your provider, enter a custom handle if needed, and click Save fulfillment settings. |
What This Eliminates
The manual step of opening each synced order in Shopify and assigning it to the right provider is gone. Configure it once in W2S and it applies on every sync, automatically, for every order. If you run hourly or daily sync schedules, the compounding time savings are significant.
More importantly, it closes the gap where orders could sit unassigned in Shopify, unnoticed, until a customer complained about a delay. The assignment now happens at the moment of sync, not as a separate manual task afterward.
What These Features Look Like in Practice
Scenario A: The sync ran, but something is wrong with the order in Shopify
A customer contacts support: their order arrived with wrong quantities. WooCommerce shows the correct items. Shopify shows something different. Your team would normally spend 30 minutes comparing fields across two platforms, hoping to spot the mismatch.
With the JSON Audit Log enabled, the investigation takes two minutes: open the Audit Log, find the order entry, click View in the Payload column, and read exactly what W2S sent. The discrepancy is visible immediately. Was a variant ID incorrect? Did a product weight override the line item? The payload shows it.
Scenario B: A new 3PL integration and orders are not reaching the fulfillment queue
You have onboarded a new third-party logistics provider and registered them as a fulfillment service in Shopify. Orders from WooCommerce are syncing across correctly, but the 3PL’s queue in Shopify is empty. The orders exist, they just have no fulfillment assignment.
You open the Orders Filters modal in W2S, select Custom under Fulfillment service, enter your 3PL’s Shopify handle, and save. The next sync run assigns the provider at the line item and shipping line level. Orders go directly into the 3PL’s queue. No manual step. No lag.
Scenario C: Daily syncs, dozens of orders, zero time to audit each one
You run a daily sync that processes 40 to 60 WooCommerce orders overnight. In the morning, you check the Audit Log and notice one order has an unusual message in the log. Before this update, you would need to open that order in both platforms to understand what happened.
With debug logging active, you click View on that entry, scan the JSON, and identify the issue immediately. Everything else looks clean. You move on. The whole check takes five minutes instead of thirty.
Frequently Asked Questions
What does the JSON Audit Log Viewer in W2S Sync show me?
Clicking View opens a read-only modal titled ‘JSON payload’. It shows the complete JSON object W2S sent to Shopify for that order, scrollable, with a dark background for readability. The fields visible include line_items (title, quantity, price, SKU, variant_id, fulfillment_service per item), financial_status, note, tags, total_price, subtotal_price, and total_tax. The only action available is the Copy button in the modal header, which copies the full JSON to your clipboard in one click.
How do I enable the View button in the Payload column?
Go to the Audit tab in W2S Sync and check the ‘Enable Debug Logging’ checkbox at the top of the page, then click Save. Once enabled, W2S will capture and store the full JSON payload for every subsequent order sync. The View button will appear in the Payload column for each logged record. Note: this only captures syncs that run after logging is enabled and does not backfill existing log entries.
Is the JSON payload viewer available in the free version?
No. The JSON Audit Log Viewer with payload capture and the View button is a Pro feature. The free version of W2S includes basic Audit Log visibility, but full payload inspection requires a Pro license.
What fulfillment services does the Dynamic Fulfillment Mapping support?
The dropdown includes manual, shopify (Shopify Fulfillment Network), and contrado (print-on-demand) as built-in options. The Custom option lets you enter any fulfillment service handle registered in your Shopify account, which means it works with any 3PL provider, warehouse system, or custom fulfillment service you have set up in Shopify.
Where exactly do I configure the fulfillment service in W2S?
Go to the Orders module in the main W2S configuration screen and click the Advanced Sync button. This opens the Orders Filters modal. Scroll to the Fulfillment Settings section at the bottom of the modal. Select your fulfillment provider from the dropdown, enter a custom handle if you selected Custom, and click ‘Save fulfillment settings’ before closing the modal.
What Shopify fields does the fulfillment mapping actually set?
W2S sets two fields during the order sync: fulfillment_service on each line item, and requested_fulfillment_service_id on the shipping line. These are the fields Shopify uses to route orders to specific fulfillment providers and locations. This is noted directly in the UI description inside the Orders Filters modal.
Will the fulfillment mapping apply to all future syncs automatically?
Yes. Once you configure and save the fulfillment settings in the Orders Filters modal, W2S applies that configuration to every subsequent order sync from WooCommerce to Shopify, whether triggered manually, on save, or on your scheduled sync interval. You configure it once and it runs automatically from that point forward.
The Bottom Line
Syncing orders between WooCommerce and Shopify has never been the hard part. If you have ever opened Shopify after a sync run and thought ‘that does not look right’, then spent the next hour figuring out why, you know exactly what this release is fixing.
The JSON payload modal gives you a direct, readable window into exactly what was sent to Shopify for every order. The Dynamic Fulfillment Service Mapping, including custom handle support, removes the manual fulfillment assignment step for anyone running a 3PL or non-standard provider setup.
Neither feature is flashy. Both save real time and remove real errors from a workflow that, until now, required too much guesswork.
If you are on W2S Pro, update to the latest version and turn on debug logging before your next sync. If you are still on the free version and hitting the limits of basic log visibility, this is a good moment to look at what Pro actually includes.
| Ready to stop guessing what your sync is sending? Upgrade to W2S Sync Pro and get full JSON payload visibility, automatic fulfillment routing with custom provider support, and priority support for your WooCommerce-Shopify integration. [Replace with link to W2S Pro plugin page] |
Unlocking Value: Every Smackcoders Product Now Comes with 5 Free Hours of Custom Development Support
8 May 2026, 12:26 pm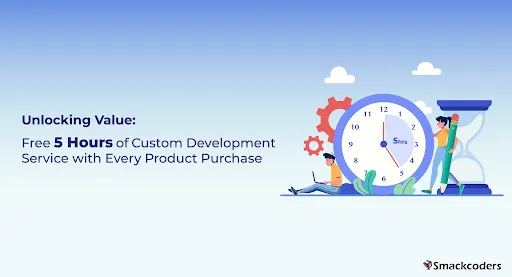
Buying a Plugin Should Be the Beginning, Not a Dead End
You find the right WordPress plugin. It solves most of your problem. You purchase it, install it, and then, somewhere between your workflow, your WooCommerce store setup, and the way your business actually operates, you hit a wall.
Maybe the import columns do not map exactly to your custom post type. Maybe the CRM integration needs a small field adjustment. Maybe you need a specific automation trigger that is just slightly outside what the plugin does out of the box. None of these are dealbreakers, but they are friction. And friction kills momentum.
This is one of the most common, and least talked about, realities of buying WordPress plugins.
We have been building products for WordPress and WooCommerce users for years, and we hear this pattern constantly not in the form of complaints, but in the form of support tickets, pre-sale questions, and conversations that go: “This plugin does 90% of what I need. Can it do this one extra thing?”
The honest answer has always been: yes, it usually can it just needs a bit of configuration or customization to get there.
So we decided to make that easier.
What We Are Announcing
As part of an active campaign, every product purchased from the Smackcoders website includes 5 free hours of custom development support from our technical team. We have launched this as a campaign offer, and we want as many customers as possible to take advantage of it while it is active.
That is not a discount code. That is not a generic support ticket. That is hands-on development time from the team that built the products applied directly to your use case.
If you buy any plugin or product from smackcoders.com, you can request up to 5 hours of customization work at no additional charge. No upsell. No waiting for a paid consultation. Just practical help getting the product to work the way your business needs it to.
Why Customization Is Almost Always Part of the Journey
Here is something the WordPress ecosystem does not say often enough: most plugins are built to cover the broadest possible use case. That is not a flaw it is the only way a product can work for thousands of different customers across different industries, hosting environments, and workflows.
But your setup is specific.
Your WooCommerce store has a checkout flow built around how your customers buy. Your import process has field names that match your internal database schema. Your CRM has been configured over the past two years to match how your sales team operates. None of that is generic, and a plugin that works well for a digital product seller in Germany may need a small adjustment to work perfectly for a subscription box business in the US.
This gap between what a plugin does and what a specific business needs is where most customers get stuck. Sometimes it is a one-hour fix. Sometimes it is a configuration that requires a developer’s eye. Either way, it is solvable. But not without someone who understands both the plugin and the technical context.
That is exactly what these 5 hours are for whether the fix lives inside one of our products or somewhere else in your WordPress setup.
What Can You Use the 5 Hours For?
The free development support covers two categories of work:
Category 1 — Plugin Customizations: Any configuration, adjustment, integration, or fix directly involving a Smackcoders product.
Category 2 — General WordPress Customizations: Any WordPress or WooCommerce development task submitted by a customer who has purchased from Smackcoders.
For both categories, the first 5 hours are completely free. If the work exceeds that window, you will be notified upfront and additional charges will apply nothing moves forward beyond the free scope without your agreement.
Here is a more specific breakdown of what falls under each:
Workflow Customizations
Need a plugin to behave differently based on user role, product category, or order status? We can adjust the logic to match your workflow rather than forcing your workflow to match the tool.
Import and Export Adjustments
Working with WP Ultimate CSV Importer or any of our data migration tools? We can help with custom field mapping, conditional imports, scheduled import configurations, or handling edge cases in your data format.
WooCommerce-Specific Tweaks
WooCommerce stores are rarely standard. Whether it is order data handling, product attribute mapping, custom checkout fields, or integration with a specific payment gateway, we can make the connection work cleanly.
Third-Party Integrations
Need your setup to talk to a CRM, ERP, email marketing platform, or external API? We can build the bridge connecting your WordPress or WooCommerce environment with your existing stack.
General WordPress Customizations
Beyond our products, if your site needs a custom post type configuration, a template adjustment, a hook or filter implementation, or a tweak to how your theme handles a specific page we can handle that too. The 5 hours are not limited to plugin work alone.
Minor Feature Enhancements
Sometimes you need a small capability that does not exist yet in your current setup. If it is within scope and does not require a full build, our team can add it for your installation.
Automation Requirements
Cron-based triggers, event-driven imports, scheduled exports, conditional logic — if you are trying to automate a process within your WordPress environment, these hours can be used to set that up.
Compatibility Fixes
Running a configuration that conflicts with your theme, a third-party plugin, or your hosting environment? We can investigate and resolve compatibility issues specific to your setup.
Custom Field Mapping and CRM Integration Adjustments
For customers connecting WordPress or WooCommerce with HubSpot, Salesforce, Zoho, or similar platforms, we can fine-tune how data flows between systems field by field if needed.
If your need does not fit neatly into one of these categories, just ask. The technical team will review your request and let you know what is feasible within the 5-hour window.
Real Scenarios Where This Makes a Difference
Sometimes abstract benefit lists do not land until you see them in context. Here are a few realistic situations where these 5 hours would be genuinely useful:
Scenario 1 — The WooCommerce Store Owner
You purchase WP Ultimate CSV Importer Pro to bulk-import your product catalog. Your spreadsheet uses column names like product_variant and stock_unit that do not map automatically to WooCommerce fields. Instead of spending hours figuring out the mapping configuration or hiring a developer on Upwork, you submit a customization request. Within the 5 hours, the team configures the import template for your specific format and tests it against your file.
Scenario 2 — The Agency Building for a Client
You are building a WooCommerce-based membership site for a client. The client uses a CRM your team has not worked with before. You purchase one of our integration or export plugins and use the free hours to have our team set up the data sync between WooCommerce orders and the client’s CRM — saving you a full day of debugging.
Scenario 3 — The Growing Small Business
You run a growing e-commerce store and need daily automated exports of order data to a fulfillment partner. You purchase the relevant plugin but are not sure how to set up scheduled exports with the right field format. The team handles the automation configuration during the free hours, and it runs in the background from that point forward.
Scenario 4 — The Developer Managing Multiple Sites
You manage WordPress sites for several clients and purchase a plugin license that covers multiple installations. You use the free development hours across two of those installs one needing a compatibility fix with a custom theme, another needing a minor workflow adjustment.
Who Gets the Most Value from This Offer?
While this offer is available to every customer who purchases from Smackcoders, there are a few groups who will find it particularly useful:
Small Business Owners who do not have a developer on staff but need the plugin to work in a precise way without paying consulting rates.
WooCommerce Store Owners whose stores have evolved beyond standard configurations and need integrations, export logic, or import templates that match their actual setup.
Agencies and Freelancers who purchase plugins for client projects and need a quick, reliable way to handle edge-case customizations without pulling developer hours from the main project budget.
Developers Evaluating Our Products who want to see how extensible our plugins are before committing to them for a complex project.
Existing Customers who have been using our products but never quite resolved that one workflow issue they kept pushing aside.
How to Claim Your 5 Free Development Hours
The process is straightforward:
- Purchase any product from the Smackcoders website.
- Submit your customization request through our support or contact channel, referencing your purchase.
- Describe what you need — the more specific, the better. Include your WordPress version, WooCommerce setup (if relevant), what the current behavior is, and what you need it to do instead.
- Our technical team reviews your request and confirms scope and feasibility within the 5-hour limit.
- We get to work. You will be kept updated throughout, and the final result will be tested against your described requirements.
A few honest notes on scope: the 5 free hours apply to both plugin customizations and general WordPress or WooCommerce development tasks. If your request is going to exceed 5 hours whether it is a large-scale integration, a full feature build, or a complex site-level project our team will let you know before starting, provide a clear estimate, and additional charges will apply for any work beyond the free window. Nothing gets started beyond the free scope without your agreement.
The 5 free hours are designed for real, practical customizations not large-scale builds. But you would be surprised how much ground a focused 5 hours can cover when the team already knows the product inside and out.
Why This Creates Better Long-Term Value for Everyone
This offer is not just about reducing friction at the point of purchase. It is about something more fundamental: what happens after a customer buys a product determines whether they stay, grow, and recommend it to others.
When a plugin works exactly the way a customer needs it to, the result is not just a satisfied customer it is a customer who builds their workflow around that tool. Who upgrades when a new version releases. Who recommends it to a colleague running a similar stack. Who leaves a review that reflects a real, working experience rather than a frustrated half-implementation.
We built this offer because we want our products to work not just install. And we want customers to experience the full capability of what they purchased, not a limited version of it constrained by whatever they could configure themselves.
From a practical standpoint, this also means our team gets direct exposure to how different customers are using our products in the real world. That feedback loop makes our products better. It surfaces edge cases we had not considered. It informs the next version of features. Everyone benefits.
Common Questions About This Offer
1.Is this offer permanent?
No. This is a campaign offer running for a limited period. We have not announced a specific end date, but it will not be available indefinitely. If you are considering a purchase and have a customization need in mind, we would not wait too long.
2.Does this apply to all Smackcoders products?
Yes. Any product purchased from the Smackcoders website qualifies for the free 5 hours during this campaign. The support covers both plugin-specific customizations and general WordPress or WooCommerce development tasks.
3.How long after purchase can I claim the hours?
We recommend submitting your customization request within a reasonable period after purchase. Contact our team for specific details based on your situation.
4.What if my project needs more than 5 hours?
For both categories, the first 5 hours are free. If the work exceeds that, our team will pause, give you a clear estimate for the remaining scope, and additional charges will apply. You decide whether to proceed nothing beyond the free hours gets started without your approval.
5. Is this actual development work or just setup guidance?
This is hands-on development. Our team will write code, configure settings, adjust logic, and test the result not just point you to documentation.
6.Can agencies use the hours across multiple client projects?
This is something to discuss with our team directly, as it depends on the nature of the license and the request. We are flexible and practical about how we apply this offer.
7.What information should I have ready when submitting a request?
Your order details, the product version you are using, your WordPress and WooCommerce versions, a clear description of your current setup, and exactly what behavior or outcome you need.
This Is How Software Companies Should Work
There is a version of this industry where you buy a product, hit a wall, and either spend hours in support forums or pay someone else to figure it out. We have never been comfortable with that version.
Smackcoders products are built to solve real problems data migration, WooCommerce management, import and export workflows, integrations. But the people who use them are running full WordPress sites, not just individual plugins. They do not have time to treat every customization as a separate project, whether it sits inside a plugin or somewhere else on the site.
The 5 free hours of custom development support with every product purchase is our way of saying: we are not done when you check out. We are invested in the outcome and that includes your WordPress environment as a whole.
This offer is part of an active campaign and will not run indefinitely. If you have been evaluating one of our products and this is the detail that makes the decision easier now is the right time to move forward. And if you are already a customer with an outstanding customization need that you have kept pushing aside, this is your opening to finally get it done.
Ready to Get Started?
Purchase any product from the Smackcoders website and reach out to our team to discuss your customization needs. Tell us what you are trying to accomplish, and we will take it from there. This campaign offer is available now — we would not leave it on the table.
Browse Smackcoders Products and Claim Your Free Development Hours
Morbi lectus risus, iaculis vel, suscipit quis, luctus non, massa. Fusce ac turpis quis ligula lacinia aliquet. Mauris ipsum. Nulla metus metus, ullamcorper vel, tincidunt sed, euismod in, nibh.
Proin quam. Etiam ultrices. Suspendisse in justo eu magna luctus suscipit. Sed lectus. Integer euismod lacus luctus magna.
Nulla facilisi. Ut fringilla. Suspendisse potenti. Nunc feugiat mi a tellus consequat imperdiet. Vestibulum sapien. Proin quam. Etiam ultrices. Suspendisse in justo eu magna luctus suscipit. Sed lectus. Integer euismod lacus luctus magna.