
“OceanWP is a versatile WordPress theme that combines flexibility and ease of customization, making it ideal for creating diverse websites.”
WooCommerce CSV Import: Bulk Update Products & Orders (2026)
12 Mar 2026, 8:30 am
Table of Contents
WooCommerce CSV import is the fastest way to bulk manage products, orders, and inventory at scale. To get started, install WP Ultimate CSV Importer Pro, upload your CSV with SKU as the unique identifier, map columns to WooCommerce fields, and run the import. Use selective field mapping to update only price or stock without touching other product data.
If you’re still editing WooCommerce products one by one in 2026, you’re losing hours your competitors are spending on growth. This guide covers every data type – products, orders, customers, and coupons – and shows exactly how to automate it.
Key Takeaways
- Use SKU or Product ID as the matching identifier to prevent duplicates on every bulk update.
- Bulk import products, customers, orders, coupons, and reviews from one interface.
- Update price and stock without touching any other product data using selective field mapping.
- Export WooCommerce data for backup, reporting, and platform migration.
- Schedule automated imports via cron – no manual uploads, no daily manual work.
- Always test with 5–10 rows before scaling to thousands of records.
Why WooCommerce Stores Use CSV for Bulk Data Management
WooCommerce includes a basic built-in CSV importer for products, but it does not cover orders, customers, coupons, or reviews natively. Stores running without a WooCommerce CSV import plugin are stuck making product updates, order migrations, and inventory changes one dashboard entry at a time.
CSV solves that at every level:
- Speed – Update thousands of SKUs in minutes, not days.
- Accuracy – Unique identifiers like SKU or Product ID eliminate duplicates automatically.
- Scalability – Works for catalogs of 50 products or 50,000.
- Control – Selective field updates let you change only price or stock without overwriting descriptions, images, or SEO fields. A proper WooCommerce CSV import setup eliminates all of this manual work entirely.
WooCommerce Native CSV Importer vs a Dedicated Plugin
WooCommerce ships with a built-in product importer at Products → All Products → Import. It handles simple products – name, SKU, price, stock, and categories without any plugin. It works fine for small one-off uploads.
Where it falls short:
- No order, customer, or coupon import support
- No scheduling or automation
- No rollback if something goes wrong
- No AI-assisted field mapping for supplier files
A dedicated plugin like WP Ultimate CSV Importer Pro fills every gap – covering all WooCommerce data types with automation, rollback, and selective field updates.
WooCommerce’s native importer works for simple one-off product uploads. For anything more – orders, automation, or rollback – a plugin is essential.
What Is WP Ultimate CSV Importer Pro and How Does It Handle WooCommerce CSV Import?
WP Ultimate CSV Importer Pro is a WordPress plugin that maps CSV or XML columns directly to WooCommerce database fields – preserving product relationships, order linkages, and customer associations throughout every import cycle. It covers products, orders, customers, coupons, and reviews all from one interface.
The five-step WooCommerce CSV import workflow:
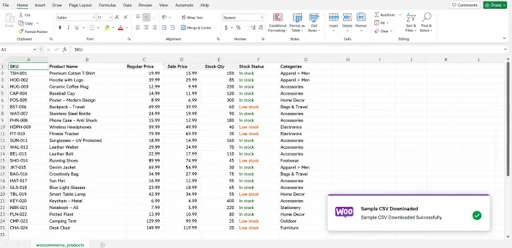
- Prepare your CSV or XML file. Use the free sample CSV files as a structural reference for any data type.
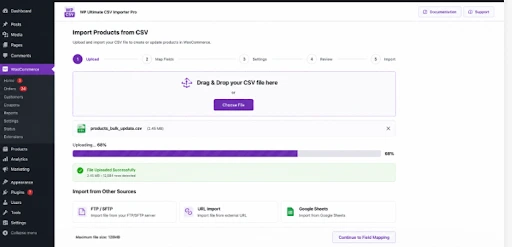
- Upload via Desktop, FTP/SFTP, URL, or Google Sheets.
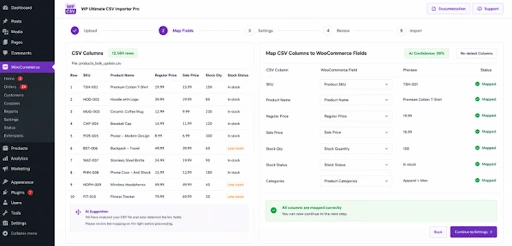
- Assign each CSV column to the right WooCommerce field – or switch on AI-assisted mapping and let the plugin detect the correct matches for you.
- Choose behavior: create new records, update existing ones by SKU or ID, or skip duplicates.
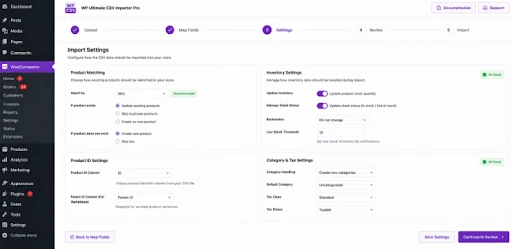
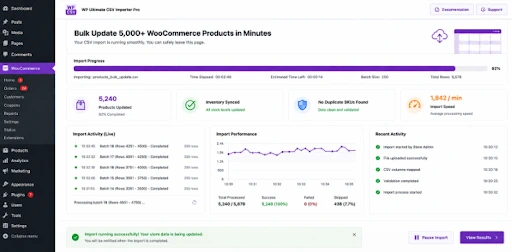
- Run the import. Use batch processing on large files to keep your store uninterrupted.
Bulk Product Import & WooCommerce Inventory Management
Importing New Products in Bulk via WooCommerce CSV
- Build a CSV with columns: Name, SKU, Price, Stock, and Image URLs. Refer to the WooCommerce product import guide for required columns, correct formatting rules, and common template mistakes.
- Upload the file inside WP Ultimate CSV Importer Pro.
- Select the WooCommerce Products module.
- Map each column to the correct WooCommerce field.
- Click Run Import.
One upload replaces hundreds of manual product entries, regardless of catalog size.
Updating Existing WooCommerce Products Without Duplicates
- Export your current product data to confirm SKU or Product ID references.
- Edit only the fields that need changing.
- Re-upload and select Update Content.
Products are modified precisely – no duplicates are created. See the full WooCommerce import and update guide for the complete field list and configuration steps.
Bulk WooCommerce Price and Stock Updates via CSV
A single CSV handles price changes across hundreds of products – regular price, sale price, and stock quantity are all updated in one import session. This is the most efficient approach for stores running seasonal promotions or syncing supplier cost changes.
How to bulk update WooCommerce prices and stock:
- Build a CSV with only the SKU column plus the price and stock columns you want to change. Follow the bulk price and stock update guide for correct column structure.
- Upload and select the WooCommerce Products module.
- Map only the price and stock columns – leave all other fields unmapped.
- Select the Update option and run the import.
Descriptions, images, and categories stay exactly as they are. Stock status – in stock, out of stock, or backorder – is controlled by SKU across all variations and categories.
Importing Variable Products into WooCommerce via CSV
Each variable product needs one parent row with separate variation rows beneath it, all connected through the Parent SKU column. Follow the variable products import guide for step-by-step field mapping – the Pro version handles all size, color, and attribute combinations in one CSV file, eliminating multi-file imports and broken variation linkages.
WooCommerce Customer & Order CSV Import
Bulk Customer Import
- Prepare a CSV with username, email, billing address, shipping address, and user role. Download the WooCommerce customers sample CSV to validate your file format before working with live data.
- Select the WooCommerce Customers module.
- Map columns and choose to create new customers or update existing ones.
Importing Historical Orders
- Prepare a CSV with Order ID, Customer Email, Products, Total, Status, and Date.
- Select the WooCommerce Orders module.
- Map fields and run the import without affecting existing records.
Full steps and field references are in the orders import documentation.
Bulk Order Status Updates
- Build a CSV with Order ID and the target status – Processing, Completed, or Cancelled.
- Set Order ID as the matching identifier.
- Apply changes across all records in a single run.
Migrating Orders from Another Platform
Order data from Shopify, Magento, BigCommerce, or any custom platform is imported directly using the WooCommerce CSV import workflow. Format the export to match WooCommerce field expectations, and the plugin handles mapping and insertion with minimal risk of data loss.
Advanced WooCommerce CSV Import Features: Scheduling, Rollback & AI Mapping
Scheduled Imports via Cron – Automate imports at daily, weekly, or fully custom intervals. Supplier stock files are fetched automatically from a URL, FTP path, or server directory – keeping prices and inventory current with zero manual uploads.
Selective Field Updates – Update only what needs changing (regular price, sale price, stock quantity, or custom fields) without overwriting descriptions, images, SEO metadata, or categories. This is the safest approach for WooCommerce bulk updates on a live store.
AI-Assisted Field Mapping – Smart column detection automatically matches non-standard CSV headers to the correct WooCommerce fields – especially useful with supplier-generated files that use custom naming conventions.
Import Rollback – Instantly revert any import that produces unexpected results. No permanent data loss – configure rollback from the import settings screen before running any import on a live store.
Have questions about any feature? The WP Ultimate CSV Importer FAQ covers common setup scenarios, troubleshooting steps, and import guidance.
Best Practices & Mistakes to Avoid for WooCommerce CSV Import
| Best Practice | Common Mistake |
| Use SKU as the matching identifier | No unique identifier → duplicates created |
| Validate headers before uploading | Unverified mapping → data misplaced at scale |
| Back up before every large import | Skipping backups on live stores |
| Test with 5–10 rows first | Running full catalog imports unverified |
| Map only the fields you need | Full CSV for a partial update → overwrites content |
| Review import logs after every run | Ignoring silent failures in logs |
| Save CSV in UTF-8 format before upload | Uploading Excel’s default CSV → corrupts special characters |
| Confirm HPOS compatibility if on WooCommerce 8.2+ | Running legacy order storage with new WooCommerce versions |

WP Ultimate CSV Importer Pro
Get Ultimate CSV/XML Importer to import data on WordPress faster, quicker and safer.
FAQ-
Q1. How do I import a CSV file into WooCommerce?
Go to Products → All Products → Import in your WordPress dashboard to use WooCommerce’s built-in importer for basic product uploads. For orders, customers, coupons, or scheduled imports, install WP Ultimate CSV Importer Pro – upload your file, map columns to WooCommerce fields, choose create or update, and run the import. AI-assisted mapping handles non-standard column names automatically.
Q2. Can it update existing WooCommerce products without creating duplicates?
Yes, Set SKU or Product ID as the matching identifier during import setup. The plugin matches incoming rows to existing records and updates only those fields – no duplicate listings are created. The import and update documentation covers all identifier options.
Q3. Is it safe to use on a live WooCommerce store?
Yes, with the right precautions. Always take a full site backup before large imports. Use the Import Rollback feature to instantly revert unexpected changes. Test with 5–10 rows before processing your full catalog.
Q4. Does WooCommerce support CSV import natively?
WooCommerce includes a basic built-in product importer, but it does not cover orders, customers, coupons, reviews, or variable product variations fully. WP Ultimate CSV Importer Pro fills every gap – supporting all WooCommerce data types with advanced field mapping, scheduling, and rollback.
Q5. How do I bulk update WooCommerce product prices and stock?
Build a CSV containing only your product SKUs and the price or stock columns you want to change. Upload to WP Ultimate CSV Importer Pro, map only those fields, and select the Update option. Only the mapped fields are modified – descriptions and images stay untouched. Full steps are in the bulk price and stock update guide.
Q6. How do I import variable products into WooCommerce via CSV?
Variable products require a parent row plus variation rows linked by Parent SKU. Attribute columns must match exactly what is defined in WooCommerce. Follow the variable products import guide for the correct CSV structure and field mapping steps.
Q7. What happens if my CSV has duplicate SKUs?
The import processes the last matching row and overwrites earlier ones. Review your file and remove or merge duplicate entries before uploading. For variable products, use variation-specific rows linked to a single parent SKU.
Q8. Can I schedule automatic WooCommerce inventory updates?
Yes. The cron-based scheduling feature lets you fetch supplier files from a URL, FTP path, or Google Sheets at any interval – daily, weekly, or custom. Prices and stock update automatically without any manual uploads.
Conclusion
In 2026, with WooCommerce 9.x and HPOS now standard, CSV-based bulk management is the go-to workflow for any store managing 500+ SKUs. Setting up a WooCommerce CSV import workflow is the single biggest time-saver for any growing store.
Stop editing products one by one. Identify where your team loses the most time – price updates, inventory sync, order migration – and build your first bulk import workflow around that problem. Every hour saved on manual edits is an hour back for work that actually grows your store.
Try WP Ultimate CSV Importer Pro →
Built by Smackcoders – WordPress and WooCommerce specialists with 10+ years in plugin development, data migration, and eCommerce automation. For support: support@smackcoders.com
How to Keep Inventory in Sync Between WooCommerce and Shopify
12 Mar 2026, 8:21 am
Table of Contents
Syncing inventory between WooCommerce and Shopify ensures both stores reflect accurate stock levels in real time, preventing overselling, order cancellations, and manual update errors.
By default, WooCommerce and Shopify operate as separate systems. A sale on one platform does not update stock on the other, which creates discrepancies that affect fulfillment and customer experience.
A two-way API-based sync connects both platforms so any stock change, from an order, edit, or bulk update, reflects across both stores automatically. This requires proper API setup, consistent SKU mapping, and a reliable integration plugin.
This guide covers everything, from initial configuration and plugin setup to variable product sync, order-based stock updates, and troubleshooting, so you can manage multichannel inventory without confusion or revenue loss.
Understanding Inventory Synchronization Between WooCommerce and Shopify
Inventory synchronization means keeping stock levels automatically updated between WooCommerce and Shopify so both stores always show the correct number of items available.
When a customer buys something on one platform, the stock should drop immediately on the other platform too, no manual work needed.
- WooCommerce manages stock inside your WordPress database. You get full control: allow backorders, send low-stock alerts, and set custom rules per product.
- Shopify uses a central inventory system that easily tracks stock across multiple locations and stores, which is great when your business grows bigger.
- There are two maintypes of syncing WooCommerce to Shopify
One-way sync
Data flows in a single direction, such as from WooCommerce to Shopify. This is useful for migrations where one platform is primary.
Two-way (bi-directional) sync
Changes in either store update the other. This is ideal for parallel operations, preventing discrepancies in real-time.
For non-technical users, think of it like syncing your phone contacts with your computer; changes on one device appear on the other without manual input.
Why Inventory Synchronization Is Important for Multi-Store Sellers
For sellers managing multiple stores, inventory sync is more than a convenience; it’s a business necessity. Here’s why
Prevent Overselling:
Accurate stock visibility ensures you don’t sell unavailable items, reducing refund rates by up to 30% in multi-channel setups.
Accurate Stock Visibility:
Real-time updates provide a single source of truth, helping you make informed decisions on restocking or promotions.
Better Customer Trust:
Customers expect reliable availability; sync eliminates “out of stock” surprises post-purchase, boosting satisfaction and repeat business.
Reduced Manual Work:
Automation frees up time for growth activities, cutting down hours spent on spreadsheets or manual entries.
For example, a clothing retailer selling on both platforms might run a flash sale on WooCommerce. Without sync, Shopify could show outdated stock, leading to unfulfilled orders and unhappy customers.
Common Inventory Management Challenges
Multi-store sellers often face hurdles that disrupt smooth operations.
Overselling and Stock Mismatch
Overselling occurs when stock isn’t updated across platforms in time. Consider this scenario: Your WooCommerce store shows 5 units of a popular gadget. A customer buys 3 on Shopify, but without sync, WooCommerce still displays 5, allowing another sale that can’t be fulfilled. This mismatch results in cancellations, refunds, and potential chargebacks, harming your reputation.
Manual Stock Updates
Relying on spreadsheets or manual logins to update stock is error-prone and inefficient. As order volume grows, tracking changes becomes overwhelming. For instance, updating 100 products daily across platforms could take hours, and human errors like forgetting a variation amplify problems.
Delayed Order Sync
When orders aren’t synced promptly, stock availability appears incorrect. A delay of even a few minutes during peak hours can lead to multiple sales of the same item. This is common in setups without real-time WooCommerce Shopify inventory sync, causing inventory discrepancies and operational delays.
WooCommerce vs Shopify Inventory Handling
Understanding platform differences is key to effective sync. Here’s a comparison:
| Feature | WooCommerce | Shopify |
| SKU Handling | Allows custom SKUs for every product and variation. Very flexible structure. | Requires a unique SKU for each product and variant. Strict SKU management. |
| Product Variations | Supports unlimited attributes like size, color, and material. Each variation can have its own stock. | Supports up to 100 variants per product. Variants can track stock individually. |
| Stock Management Rules | Supports backorders, hides out-of-stock items, and low-stock thresholds. | Uses location-based inventory tracking with automatic stock adjustments. |
| Inventory Tracking Method | Managed at the product and variation level within the WordPress dashboard. | Managed per product and per location inside the Shopify admin. |
| Stock Notifications | Email alerts for low stock (requires configuration). | Built-in low stock alerts and detailed inventory reports. |
| Order-Based Stock Deduction | Stock reduces based on order status settings. | Stock reduces immediately after order placement. |
| Multi-Location Support | Requires extensions for advanced multi-location support. | Built-in multi-location inventory tracking. |
WooCommerce offers more customization for developers, while Shopify prioritizes simplicity for business owners. Sync tools bridge these gaps by mapping data appropriately.
Pre-Sync Requirements
Before setting up sync, ensure your stores are prepared. This minimizes errors and ensures smooth integration.
Store Access and Permissions
You need admin access to both WooCommerce and Shopify.
For WooCommerce
Go to Settings, open Advanced, and select REST API from your WooCommerce dashboard. Click on Add Key or Create API Key to generate new credentials. Set the permissions to Read and Write to allow full synchronization access, then generate the key and securely save the Consumer Key and Consumer Secret for use in the integration plugin.
For Shopify
Log in to your Shopify Admin panel and open Apps, then select Develop apps to begin creating a custom app. Click on Create an app and proceed to the Admin API access settings. Enable the necessary permissions for Products and Inventory to allow proper data synchronization. After configuring the permissions, install the app and copy the generated Admin API access token for authentication within the sync plugin.
Product SKU Consistency
SKUs must match exactly between stores for accurate mapping. Audit your products: Export CSVs from both, compare SKUs, and standardize them, e.g., use “PROD-001” consistently. Inconsistent SKUs are a top cause of sync failures.
API and Integration Readiness
Verify API limits-Shopify has rate limits,e.g., 2 requests/second, so choose tools that handle throttling. Test connections in a staging environment to avoid disrupting live stores.
Inventory Data That Can Be Synced
Not all data syncs equally; focus on essentials for efficiency.
Stock Quantity
Core to sync, this updates available units. Tools can push/pull quantities bi-directionally, ensuring real-time accuracy.
Product Variations
For items with options like sizes or colors, sync at the variant level. Map WooCommerce attributes to Shopify variants using SKUs.
Price and Product Status
Sync prices to maintain consistency and avoid pricing errors. Product status active/draft can also sync, along with limited metadata like descriptions. Limitations include images often requiring separate handling, and custom fields may need advanced tools.
| Data Type | Can Be Synced | Sync Direction | Notes |
| Stock Quantity | Yes | One-way / Two-way | Real-time supported |
| Product Variations | Yes | Bi-directional | SKU required |
| Price | Yes | Configurable | Avoid pricing conflicts |
| Product Status | Yes | Configurable | Active/Draft |
| Images | Limited | Usually One-way | May require separate handling |
| Custom Fields | Limited | Depends on the plugin | Advanced setup needed |
Methods to Keep Inventory in Sync
Several approaches exist, each suited to different needs and technical levels.
Plugin-Based Sync Method (Recommended) – WooCommerce to Shopify
Plugins are ideal for non-technical users, offering user-friendly interfaces and automation. They handle API connections, mapping, and scheduling without coding. Recommended for most sellers due to ease and reliability.
Manual Inventory Update Method
This involves logging into each platform and updating stock manually or via CSV imports. It works for very small stores under 50 products with low order volume, but fails as businesses scale, leading to errors and time loss.
Custom API Integration Method
Developers can build integrations using WooCommerce and Shopify APIs. Pros include full customization; cons are high development costs and maintenance needs. Suitable for large enterprises with unique requirements.
| Method | Technical Skill | Cost | Scalability | Recommended For |
| Plugin-Based Sync | Low | Medium | High | Most businesses |
| Manual Updates | None | Free | Very Low | Small stores |
| Custom API Integration | High | Expensive | Very High | Enterprises |
Step-by-Step Guide to Sync Inventory Between WooCommerce and Shopify | Plugin-Based Sync Method
Synchronizing inventory between WooCommerce and Shopify becomes much easier when you use a dedicated integration plugin instead of manual CSV exports or custom API scripts. The W2S – WooCommerce to Shopify Sync plugin by Smackcoders helps automate product, stock, order, and customer synchronization using native APIs from both platforms.
Below is a technical, implementation-focused breakdown of how to configure inventory sync properly.
Install and Configure the W2S – WooCommerce to Shopify Sync Plugin
Start by installing the plugin on your WordPress site where WooCommerce is active.
After activation:
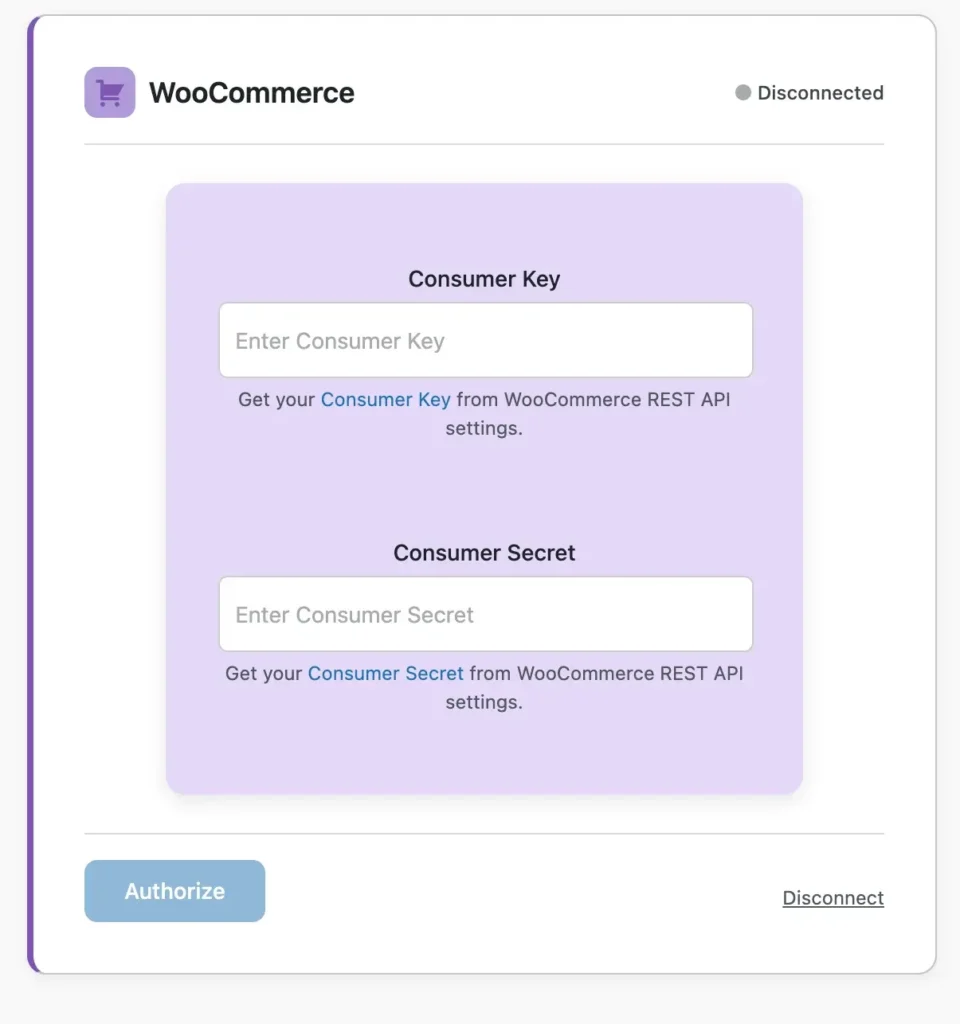
1. Generate WooCommerce REST API Keys
Go to WooCommerce, open Settings, navigate to Advanced, and select REST API. Create a new API key with Read and Write permissions, then copy the generated Consumer Key and Consumer Secret for later use in the integration process.
2. Create a Shopify Custom App
Log in to your Shopify Admin dashboard, open Apps, and select Develop apps to create a new custom app. Enable the required Admin API scopes, such as Products, Inventory, Orders, and Customers,s based on your synchronization needs, then generate and copy the Admin API access token.
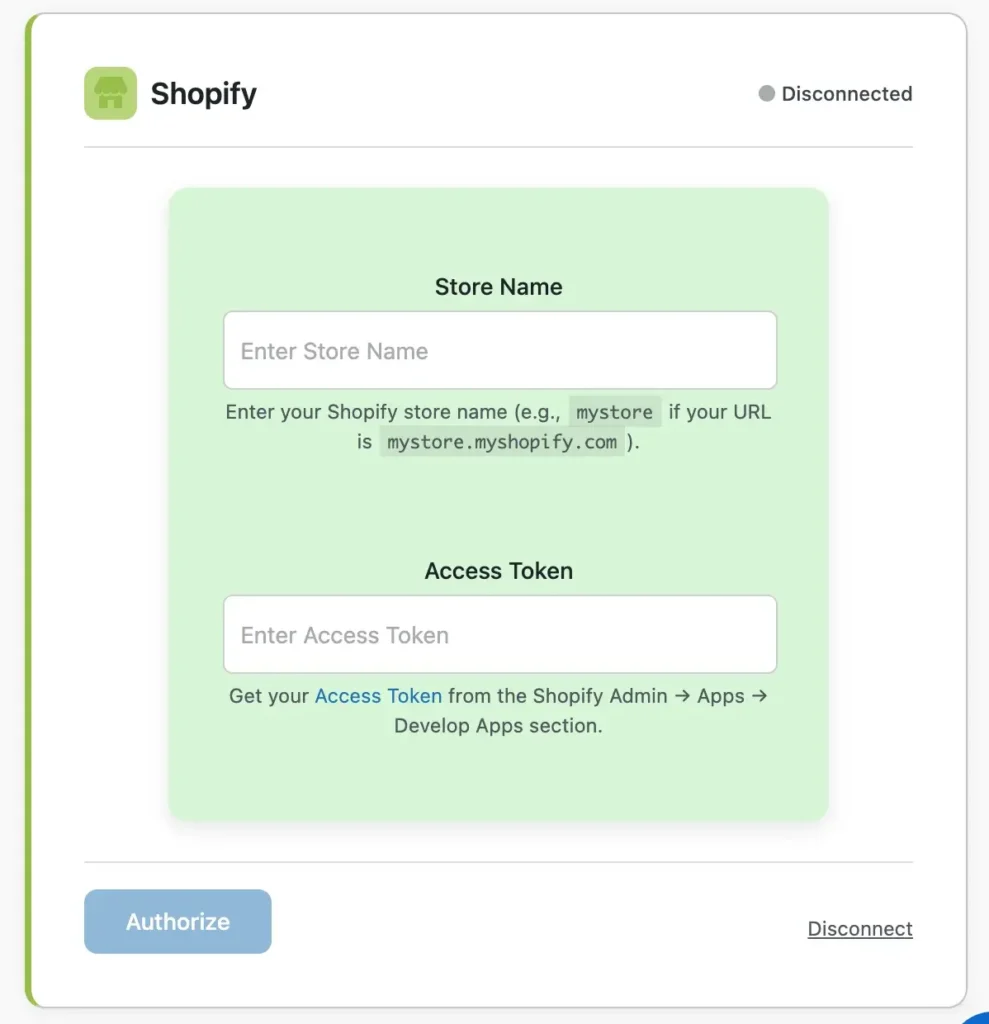
3. Authenticate Both Stores in the Plugin
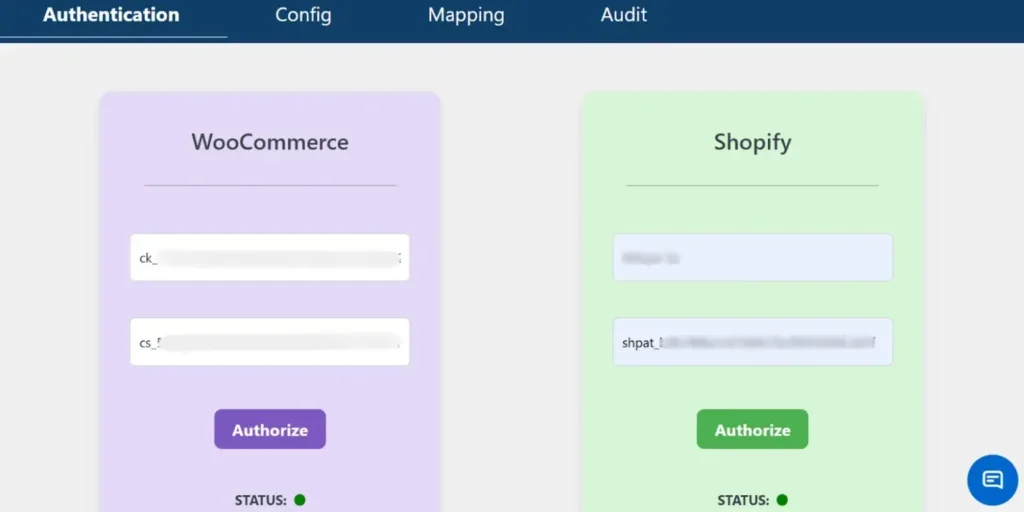
Open the sync plugin settings in your WordPress dashboard and enter the WooCommerce API credentials along with your Shopify store URL and Admin API access token. After entering the required details, validate the connection status to successfully authenticate both stores and establish secure communication between the platforms.
The plugin uses secure API-based communication. Once authentication is successful, you can proceed with inventory and product sync configuration.
Map Products Using SKU (Automatically Mapped)
Accurate inventory sync depends on consistent SKU mapping between platforms.
The plugin automatically matches products using
- SKU Primary identifier
- Product variations if SKUs are unique per variation
For technical setups
- Ensure all WooCommerce products have unique SKUs
- Ensure Shopify variants also use matching SKUs
- Avoid duplicate SKUs across variable products
If SKU values match correctly, stock updates sync seamlessly without creating duplicate products.
For stores with large catalogs, SKU consistency is critical to prevent incorrect stock adjustments.
Configure Sync Direction and Rules
The plugin allows you to define how inventory data flows between platforms.
You can configurew2s
- WooCommerce → Shopify (common for content-first stores)
- Shopify → WooCommerce (common for Shopify-primary sales)
- Bi-directional sync (for dual-active stores)
Sync Direction Options Between WooCommerce and Shopify
When configuring inventory synchronization, choosing the correct sync direction is critical. The direction determines which platform acts as the primary source of truth for product and stock data.
WooCommerce to Shopify
In this setup, WooCommerce acts as the main store where products and inventory are managed, and updates are pushed to Shopify. This approach is common for content-first stores that use WordPress for blogging, SEO, and content marketing while using Shopify as an additional sales channel. Any stock updates, product edits, or changes made in WooCommerce are automatically reflected in Shopify, ensuring consistency across platforms.
Shopify to WooCommerce
Here, Shopify becomes the primary sales platform, and WooCommerce mirrors its product and inventory data. This configuration is ideal for businesses that process most of their sales through Shopify and want WooCommerce to function as a secondary storefront. Stock updates triggered by Shopify orders are pushed to WooCommerce, helping prevent overselling and keeping inventory aligned.
Bi-Directional Sync
Bi-directional synchronization allows both WooCommerce and Shopify to update each other. If a sale occurs on either platform, the inventory is updated across both stores automatically. This method is suitable for dual-active stores where both platforms are used equally for sales. However, it requires careful configuration to avoid circular updates or conflicting data changes.
Selecting the right sync direction ensures accurate inventory management and prevents stock discrepancies across your multi-store setup.
For inventory management,
- Create new products on destination store
- Update stock levels automatically
- Enable or disable deletion sync
- Control which modules to sync (Products, Orders, Customers)
Technical users should carefully plan direction rules to avoid circular updates or unintended overwrites.
If Shopify is your primary checkout system, inventory should typically sync from Shopify to WooCommerce to avoid overselling.
Enable Real-Time or Scheduled Sync
- The plugin supports two primary synchronization modes that allow you to control how and when inventory updates are pushed between WooCommerce and Shopify. Choosing the right mode depends on your store traffic, sales volume, and operational workflow.
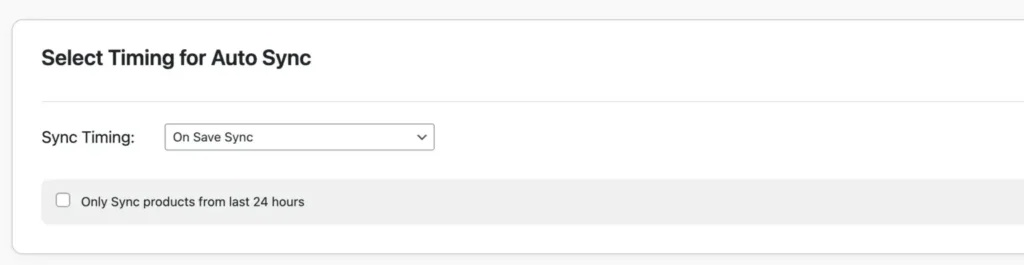
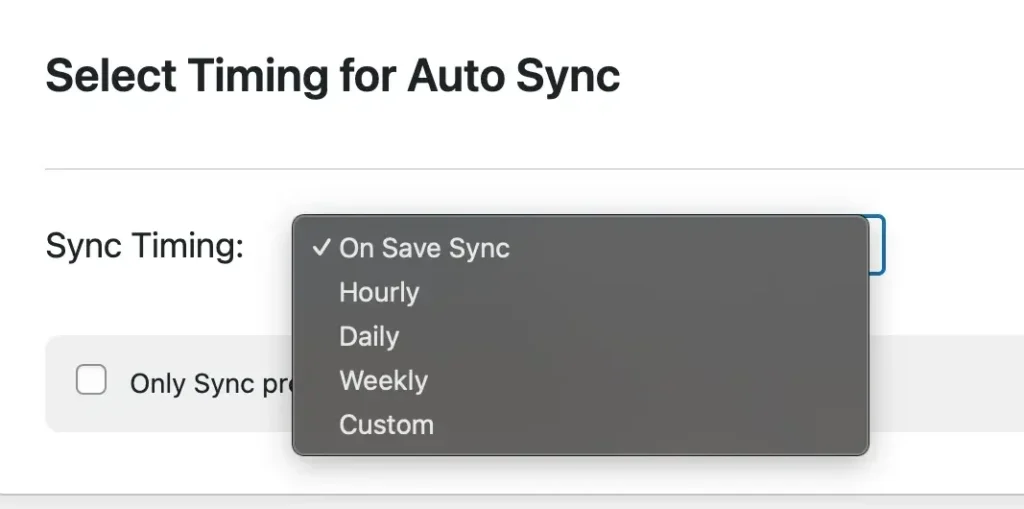
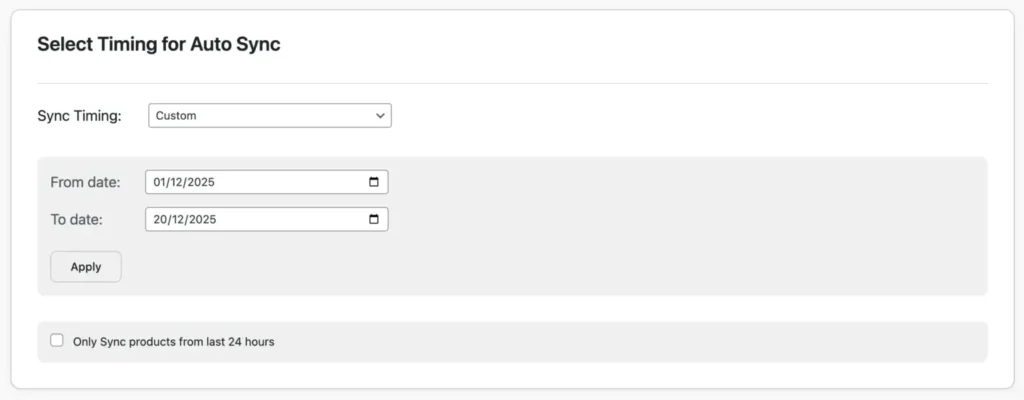
Real-Time Sync
- Real-Time Sync automatically triggers whenever a product is updated or an order is placed. As soon as stock levels change on one platform, the update is instantly pushed to the connected store. This ensures inventory accuracy across both systems without delay.
- This mode is ideal for high-volume stores where products sell frequently throughout the day. Immediate stock updates reduce latency between transactions and inventory adjustments, significantly minimizing the risk of overselling or stock mismatches. For businesses running flash sales, limited stock items, or fast-moving inventory, real-time synchronization provides maximum reliability and accuracy.
Scheduled Sync
- Scheduled Sync updates inventory at predefined intervals such as hourly, daily, weekly, or a custom time frame configured within the plugin settings. These updates run using WordPress Cron, which automates background synchronization tasks without manual intervention.
- This method is suitable for moderate-traffic or low-volume stores where real-time updates may not be necessary. It helps reduce server load while still maintaining consistent stock alignment between WooCommerce and Shopify. Scheduled sync is also useful when performing bulk product updates or managing larger catalogs where periodic synchronization is sufficient.
- By selecting the appropriate sync mode based on your business needs, you can ensure efficient inventory management while maintaining optimal store performance.
| Feature | Real-Time Sync | Scheduled Sync |
| Update Speed | Instant | Based on the interval |
| Best For | High-volume stores | Low/medium stores |
| Server Load | Higher | Lower |
| Overselling Risk | Very Low | Moderate |
Technical recommendation
- Use real-time sync for fast-moving inventory
- Use scheduled sync for bulk updates or low-traffic environments
- Ensure WP-Cron is functioning properly on your server
Monitoring can be done via the plugin’s audit logs to track sync status and troubleshoot failures.
For a stable WooCommerce Shopify inventory sync
- Maintain SKU consistency across platforms
- Avoid manual stock edits on both platforms simultaneously
- Test with a few products before enabling full sync
- Monitor logs after initial deployment
- Confirm Shopify API rate limits are not exceeded
Using a plugin-based sync method eliminates manual exports and reduces inventory errors, making it ideal for businesses running multi-platform e-Commerce operations.
Syncing Inventory for Variable Products
Variable products, like t-shirts in different sizes and colors, require precise mapping. In W2S Sync:
- Ensure each variation has a unique SKU in both platforms.
- The plugin syncs attributes automatically if SKUs match.
For example, if WooCommerce has a “Large-Red” variant with SKU “TSH-LR”, map it to Shopify’s equivalent.
- Test by placing an order: Stock should be deducted from the specific variant across stores.
Limitations: Complex bundles may need Pro features or custom tweaks.
This prevents partial overselling, where one size sells out but others remain available.
Handling Order-Based Stock Updates
Orders directly impact inventory. With sync enabled
- When an order is placed on Shopify, the plugin detects it and reduces stock in WooCommerce automatically.
- Vice versa for WooCommerce orders.
- Real-time sync is crucial here to avoid delays. Set it up to trigger on order creation or status change.
- For refunds or cancellations, enable reverse sync to restore stock.
This automation ensures stock reflects true availability, reducing manual interventions.
Error Handling and Troubleshooting
Common issues include
Missing SKU: Products won’t sync; fix by auditing and standardizing SKUs.
API Limits Exceeded: Shopify throttles requests; use plugins with retry logic or schedule during off-peak hours.
Connection Failures: Check API keys; regenerate if invalid.
Sync Conflicts: Set priority rules in the plugin.
Debugging: Use the Audit Log to view errors; export CSVs for analysis.
If issues persist, contact plugin support or test in staging.
Best Practices for WooCommerce–Shopify Inventory Sync
To maximize efficiency
- Regularly audit SKUs for consistency.
- Start with a small product set for testing.
- Use bi-directional sync only if both stores are active.
- Monitor audit logs weekly for anomalies.
- Set low-stock alerts on both platforms.
- Avoid manual edits during sync to prevent conflicts.
- Backup stores before initial sync.
- Optimize for performance: Limit sync to essential data.
- Update plugins and platforms regularly.
- Train the team on sync processes to avoid errors.
Following these ensures long-term accuracy.
Frequently Asked Questions (FAQs)
1. Can I sync products and inventory between WooCommerce and Shopify?
Yes, it is possible to sync products and inventory between WooCommerce and Shopify using a dedicated integration plugin such as W2S Sync. These plugins allow you to synchronize product details, stock quantities, variations, pricing, and other related data across both platforms. Many solutions also support bi-directional syncing, meaning updates made in either store can reflect automatically in the other, ensuring consistent product and inventory information.
2. How to keep WooCommerce and Shopify in sync?
To keep both platforms synchronized, you need to install a compatible sync plugin and connect the two stores using their respective APIs. Once connected, products are typically mapped using SKUs to ensure accurate matching. After mapping, you can enable real-time or scheduled synchronization so that inventory, product updates, and order-related stock changes remain aligned continuously without manual intervention.
3. How to enable inventory sync in the WooCommerce to Shopify sync plugin?
After installing and activating the plugin, navigate to its configuration settings within your WordPress dashboard. Enable the inventory or stock synchronization module, then choose the desired sync direction, such as WooCommerce to Shopify, Shopify to WooCommerce, or bi-directional. Finally, activate either real-time or scheduled synchronization based on your store’s needs to ensure stock levels update automatically.
4. How does WooCommerce Shopify inventory sync work?
Inventory synchronization works through secure API communication between the two platforms. When a change occurs in one store, such as a stock reduction after an order is placed, the plugin detects the update and pushes or pulls the corresponding data to the connected store. This automated data exchange ensures both systems reflect the same stock levels, minimizing discrepancies.
5. Can I sync inventory between WooCommerce and Shopify in real time?
Yes, most advanced sync plugins support real-time synchronization. In this mode, events such as product updates, stock edits, or order placements immediately trigger inventory updates on the connected platform. This helps prevent delays in stock adjustments and reduces the risk of overselling, especially in high-volume stores.
6. What happens if the SKU doesn’t match?
If SKUs do not match between WooCommerce and Shopify, the plugin cannot correctly identify corresponding products. As a result, those products may not sync, or the system may generate error logs. To resolve this, you need to manually correct the SKUs or map the products properly so that the plugin can establish accurate product relationships.
7. Can variable products be synced?
Yes, variable products can be synced effectively as long as each variation has a unique SKU. The plugin uses these unique identifiers to match variations such as size, color, or other attributes across both platforms. When configured correctly, inventory changes for each variation are updated automatically without affecting other variants of the same product.
Keeping inventory in sync between WooCommerce and Shopify transforms multi-store management from a challenge into a true growth advantage. By preventing overselling, reducing manual work, and maintaining accurate stock levels, real-time WooCommerce Shopify inventory sync builds customer trust and supports scalable multichannel selling. The key is proper setup begin with pre-sync checks, choosing a reliable plugin-based synchronization method, and following proven inventory management best practices. Instead of depending on manual updates that cause costly errors, automate your inventory syncing today and implement a professional WooCommerce-Shopify sync solution to eliminate stock confusion, streamline operations, and focus confidently on growing your eCommerce business.
How To Import ACF Custom Fields For WooCommerce Products – Complete Guide
11 Mar 2026, 1:11 pm
If you are looking for how to import ACF custom fields for WooCommerce products, the most reliable method is using WP Ultimate CSV Importer with properly structured CSV, XML, Excel, or Google Sheets files. ACF WooCommerce custom fields are stored as meta keys, which must be mapped correctly during import. For growing stores, manually adding additional product data is time-consuming and error-prone. Bulk importing ensures consistency across large product catalogs. It also enables faster updates, easier migrations, and structured data management. WP Ultimate CSV Importer supports multiple file formats and cloud sources like Dropbox. This makes it suitable for SMBs, developers, and high-volume WooCommerce stores. With proper field configuration, even repeaters and complex ACF metafields can be imported accurately. Automation further reduces repetitive manual work. Let us break down how ACF works with WooCommerce before starting the import process.
Key Takeaways
- ACF WooCommerce fields are saved as post meta (meta keys).
- Import files can be CSV, XML, Excel, Google Sheets, or Dropbox-based.
- Correct meta key mapping is critical for successful imports.
- Repeater and complex ACF fields require structured formatting.
- WP Ultimate CSV Importer enables scalable and automated WooCommerce product imports.
How to Add Custom Fields to WooCommerce Products using ACF?
Before starting the import process, you must first create the custom fields properly using ACF.
WooCommerce manages your products, and Advanced Custom Fields allows you to extend those products with additional data. When both WooCommerce and ACF are installed and activated, you can easily create structured advanced product fields for WooCommerce.
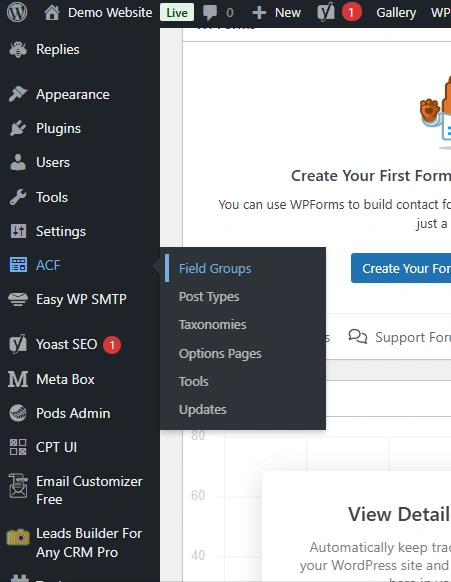
After activating the plugins, go to the Custom Fields or ACF section in your WordPress dashboard and click the Field group.
Then click the Add “New button”. This creates a new Field Group.
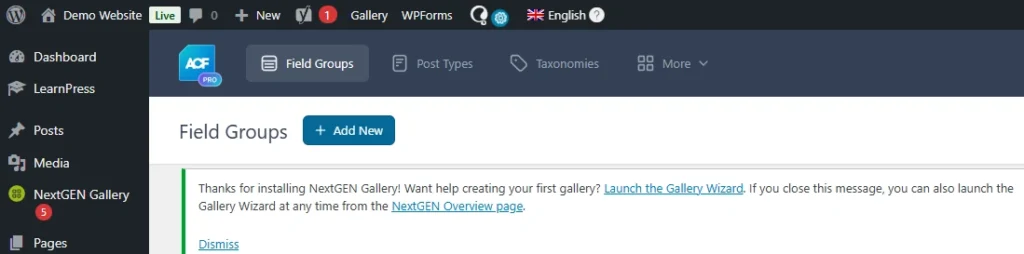
At the top of the page, you must enter a Field Group Title. This title is only for admin reference. For example, you can name it “Product Specifications” or “Additional Product Details.” This name helps you organize your fields in the backend.
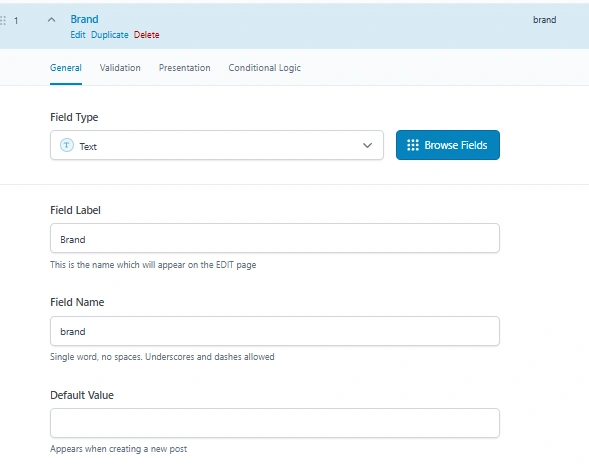
Inside the field group, click Add Field to create your custom fields. For each field, you need to fill in the Field Label, Field Name, and choose the Field Type. The Field Label appears in the product edit screen. The Field Name is the internal key stored in the database. This Field Name is very important because it must match exactly when importing WooCommerce ACF custom fields using a CSV file.
For example, if your Field Label is “Brand,” your Field Name can be “brand.” If your Field Label is “Warranty Period,” your Field Name can be “warranty_period.” During import, the CSV column header must use these exact field names.
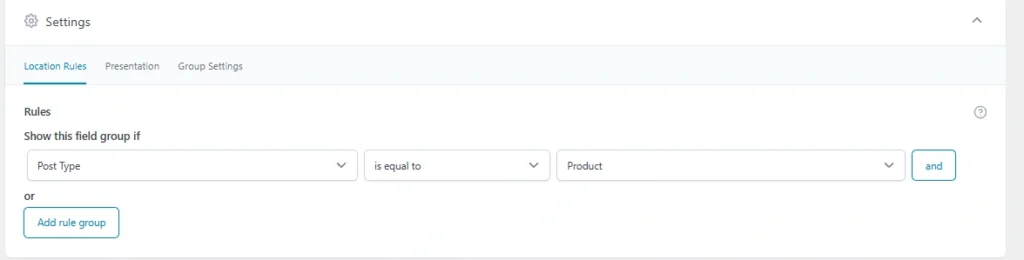
After adding all required fields, scroll to the Location section and set the rule so that the field group appears when the Post Type is equal to Product. This ensures the custom fields are displayed on the WooCommerce product edit page.
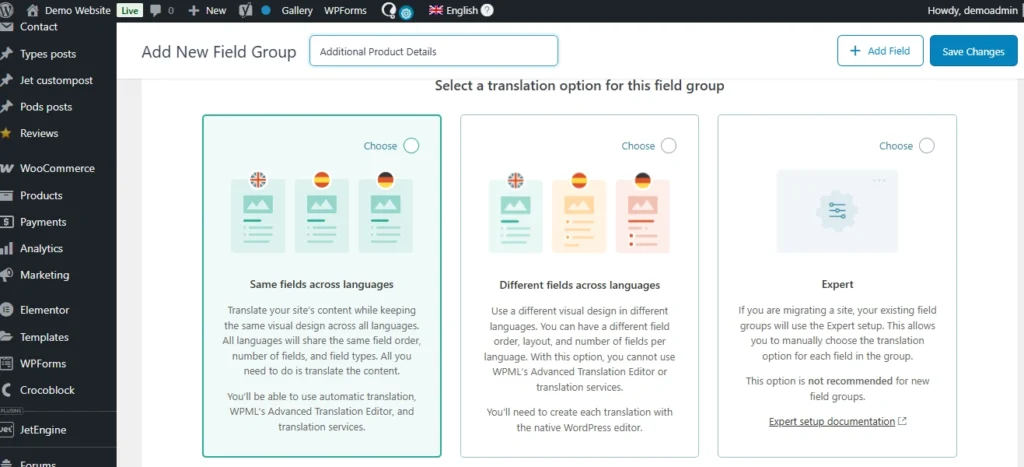
If multilingual settings are enabled on your site, you will see translation options within the same field group screen. Here you can decide whether the field values should be copied across languages or translated separately, depending on your store’s configuration.
Once everything is configured, click Publish or Save to activate the field group, which is in the top right corner of the page.

To verify the setup, open any WooCommerce product in the admin area and scroll down the page. Your newly created custom fields should appear there. Enter some sample data and update the product to confirm that the fields are working correctly.
Once confirmed, your custom product fields are properly configured and ready for bulk import.
WP Ultimate CSV Importer Pro
Get Ultimate CSV/XML Importer to import data on WordPress faster, quicker and safer.
Prerequisites Before Importing
Before importing ACF custom fields for WooCommerce products, make sure WooCommerce and ACF are installed, and your field group is fully created and verified.
Next, install WP Ultimate CSV Importer Pro. Go to the Smackcoders website, log in to My Account, download the plugin, then upload, install, and activate it on WordPress. Ensure the WooCommerce and ACF modules are enabled in the plugin settings.
Also, finalize your ACF field names, decide on product types (simple or variable), and ensure each product has a unique SKU if updating existing items. Once this is done, you are ready to prepare your CSV file for import.
Preparing the Import File for ACF Fields
Before importing, your product data file must be structured correctly so WooCommerce and ACF fields can be mapped properly. The Importer supports multiple file formats including CSV, XML, Excel (XLS/XLSX), and Google Sheets, giving you flexibility depending on your data source.
Include all required product details such as Product Name, SKU, Price, Categories, and Product Type. For variable products, make sure parent and variation details are structured correctly. Using a template from the importer is recommended to prevent errors.
For ACF fields, the file headers must exactly match the Field Names you created in your field group. This ensures the custom product data is imported correctly. Any mismatch in field names will prevent data from appearing in the product editor.

Check for common formatting issues like empty headers, duplicate SKUs, or missing mandatory fields. Each row should represent a single product, and all essential fields must be filled. Correct preparation ensures your WooCommerce ACF import runs smoothly.
For a deeper understanding of how ACF field exports and imports work in WordPress, you can explore our detailed guide here:
WP Ultimate CSV Importer Pro
Get Ultimate CSV/XML Importer to import data on WordPress faster, quicker and safer.
Importing ACF Custom Fields Using WP Ultimate CSV Importer
This section covers the full step-by-step process of importing WooCommerce products along with ACF custom fields using WP Ultimate CSV Importer Pro.
Step 1: Uploading the Import File
First, go to the plugin in your WordPress dashboard and select Import. Upload your prepared file, which can be CSV, XML, Excel (XLS/XLSX), or Google Sheets.
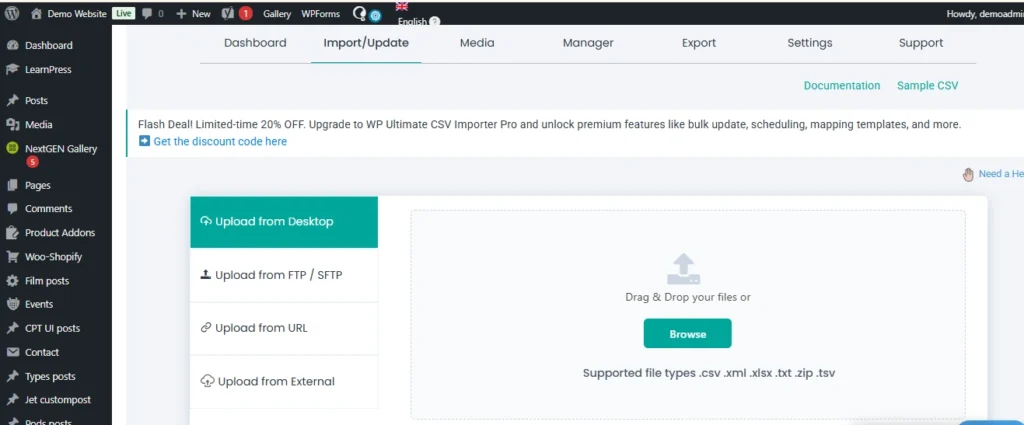
Then choose the fresh import and change the import record as “WooCommerce Product”.
Step 2: Mapping WooCommerce Product Fields
Next, map your standard WooCommerce product columns. Assign your file columns to fields such as Product Name, SKU, Price, Categories, and Product Type. Correct mapping ensures each piece of data goes to the right place in WooCommerce. For variable products, make sure parent and variation details are correctly matched.
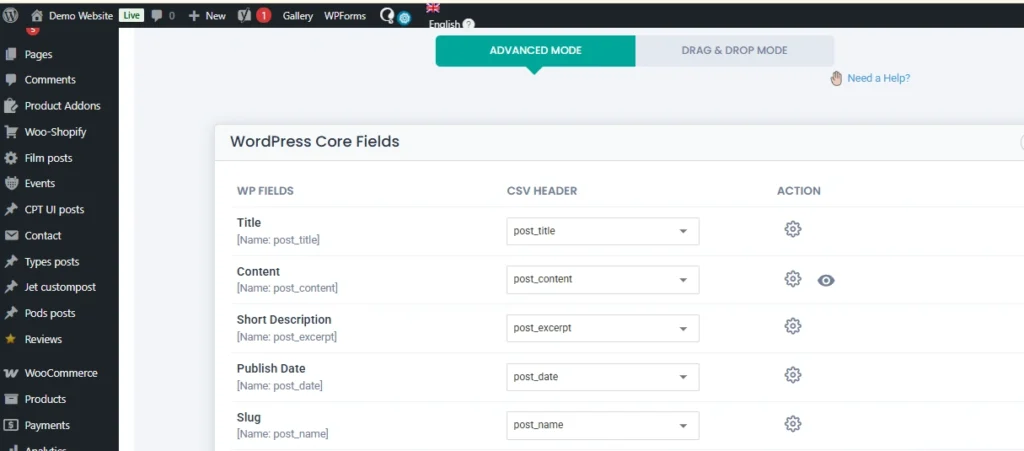
Step 3: Mapping ACF Custom Fields
After mapping the standard fields, map your ACF custom fields. Match each column header in your file to the corresponding Field Name in ACF. The importer supports complex fields such as repeaters or grouped fields. Ensure each ACF field is mapped correctly so that the data appears properly in the product editor.
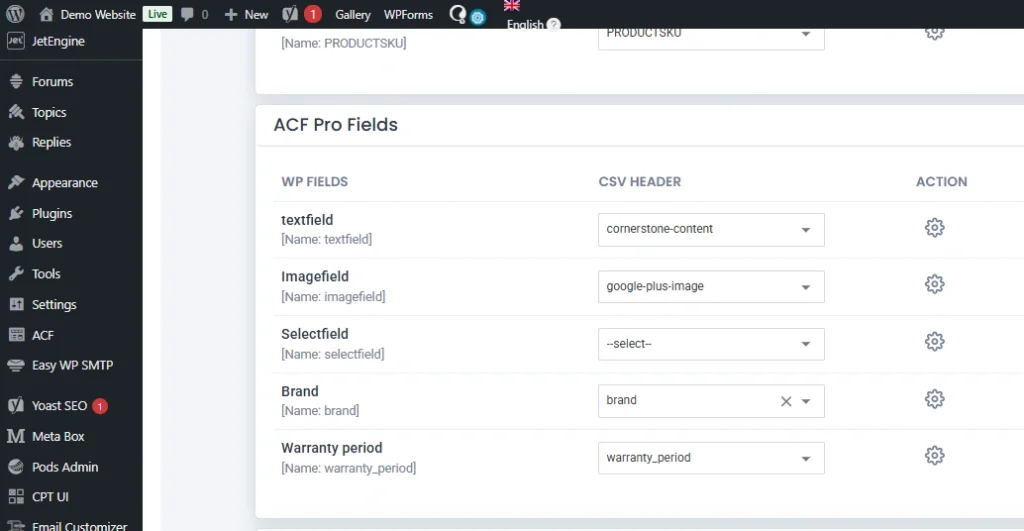
Step 4: Running the Import Process
Once mapping is complete, run the import. The plugin will validate your data, execute the import, and generate a log. For large catalogs, the plugin processes products in batches to prevent server timeouts.
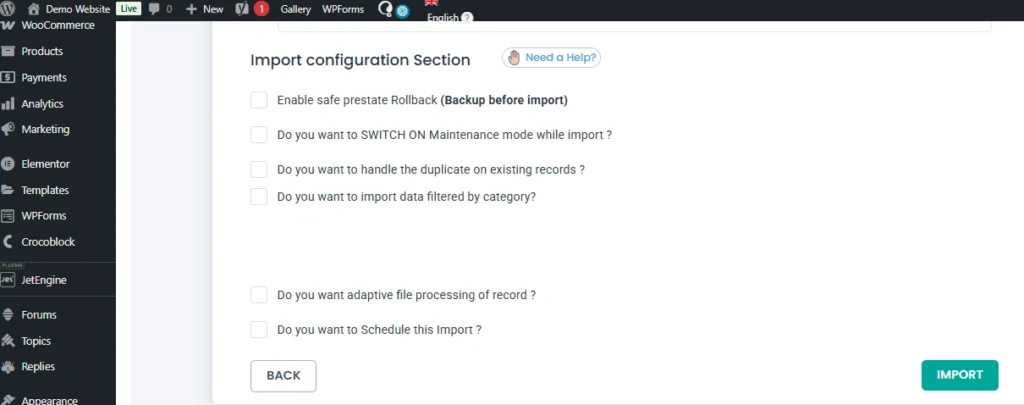
If you are updating existing products, include a unique identifier such as SKU or Product ID. WP Ultimate CSV Importer also allows scheduling imports, enabling WooCommerce to import products automatically on a regular basis.
After the import finishes, review the logs for any errors. Fix any issues and rerun the import for the affected products. Correct mapping and a clean file ensure that all WooCommerce and ACF custom fields display properly.
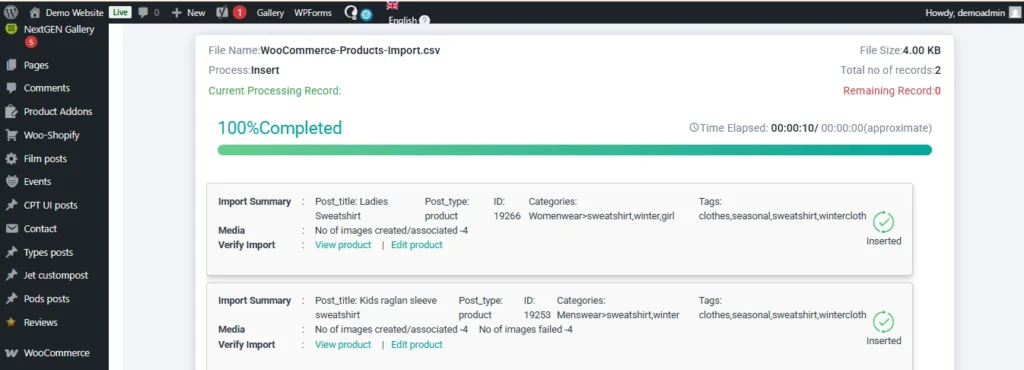
Verifying Imported ACF Data
After the import is completed, you need to check whether the data has been imported correctly.
First, go to the WordPress admin area and open any imported WooCommerce product. Scroll down to the product edit page.
The ACF custom fields you created should be visible, and the imported values should be correctly filled in those fields.
Next, open the same product on the frontend of your website. Check whether the custom field values are displaying properly on the product page.
If the values are visible in the backend and displayed correctly on the frontend, it means the import was successful.
WP Ultimate CSV Importer Pro
Get Ultimate CSV/XML Importer to import data on WordPress faster, quicker and safer.
Common Issues and Troubleshooting
When importing WooCommerce ACF custom fields, small configuration mistakes can prevent data from appearing correctly. Below are the most common issues and how to resolve them.
| Issue | Possible Cause | Solution |
| ACF field not showing in product editor | Field group not assigned to Product post type | Edit the field group and ensure the location rule is set to Post Type = Product |
| ACF data not imported | Field Name does not match file header | Ensure the file column header exactly matches the ACF Field Name |
| Data saved but not visible on frontend | Theme/template not displaying ACF fields | Update your product template to retrieve the field using get_field(‘field_name’) |
| Variable product import errors | Parent and variation structure incorrect | Ensure parent product and variations are properly structured and linked via SKU or parent ID |
| Duplicate products created | SKU not used for updates | Use SKU or Product ID as a unique identifier when updating existing products |
| Special characters or broken values | File formatting issues | Clean the file and check delimiter, encoding, and empty headers |
| Import stops midway | Server timeout or large file size | Split the file into smaller batches or increase server limits |
Most problems occur due to meta key mismatches or incorrect product structure. Always double-check field names, SKU values, and mapping settings before running large imports.
With proper preparation and correct mapping in the Importer, WooCommerce ACF imports work reliably even for large product catalogs.
Best Practices for Small and Medium Businesses
For small and medium businesses managing WooCommerce stores, structured imports are not just about convenience. They are about saving time, reducing errors, and preparing for growth.
Before running any large import, always take a complete website backup. This gives you a safe recovery point if something unexpected happens. Even when using reliable tools like WP Ultimate CSV Importer, backups are a standard best practice.
If possible, test your import on a staging site first. Import a small batch of products with WooCommerce ACF custom fields and verify everything. Once confirmed, proceed with the full catalog import on the live site.
Maintain a structured master file for your products. Whether you use CSV, Excel, XML, or Google Sheets, keep a clean and standardized format. Use consistent column headers that match your ACF field names. This makes future updates and scaling much easier.
For growing catalogs, always use SKU as the unique identifier. This helps when you need to update pricing, stock, or advanced product fields for WooCommerce without creating duplicates.
When dealing with large product databases, avoid importing thousands of records immediately. Split files into manageable batches if necessary. This reduces server strain and improves stability.
If your business frequently updates product data from external systems, consider configuring scheduled imports. This allows WooCommerce to import products automatically at defined intervals, reducing manual work.
Finally, document your field structure. Maintain a clear list of all ACF field names and their purpose. This helps developers, marketers, and operations teams stay aligned when modifying or expanding your WooCommerce ACF custom fields.
A structured approach today prevents data chaos tomorrow.
Frequently Asked Questions (FAQs)
1. How can you add custom fields to products in WooCommerce?
You can add custom fields to WooCommerce products using the Advanced Custom Fields plugin. After installing ACF, create a Field Group, add your required fields, and set the location rule to Post Type equal to Product. Once saved, the fields will appear on the WooCommerce product edit page.
2. How Do I Import Custom Fields to WooCommerce Products?
To import custom fields, prepare your product data file with column headers that exactly match your ACF Field Names. Then use WP Ultimate CSV Importer Pro to upload the file, map the WooCommerce fields, and map the ACF fields correctly before running the import.
3. How to import variable products in WooCommerce?
When importing variable products, you must structure the parent product and its variations correctly in your file. Each variation should be linked to the parent using SKU or a parent identifier. During mapping, ensure the Product Type is set correctly for both parent and variations.
For a detailed step-by-step explanation on how to import variable products in WooCommerce.
4. How to use ACF with WooCommerce?
ACF works with WooCommerce by attaching custom fields to the Product post type. You create a field group in ACF, assign it to Products, and then use those fields to store additional product information such as specifications, technical details, or extra attributes.
5. Does ACF work with WooCommerce?
Yes. ACF integrates seamlessly with WooCommerce because WooCommerce products are a custom post type. ACF allows you to extend product data without modifying WooCommerce core files.
6. What additional product options are available in WooCommerce?
WooCommerce supports simple products, variable products, grouped products, and external products. Using ACF, you can also create advanced product fields for WooCommerce such as brand details, specifications, warranty information, compatibility data, and more.
7. How to get an ACF field in WordPress?
You can retrieve an ACF field value using the function get_field(‘field_name’). When working with WooCommerce products, you can pass the product ID if needed to fetch the correct value.
8. What should be done if the ACF-imported data is not showing on the WooCommerce product frontend?
First, confirm the data is visible in the product editor in the backend. If it is saved but not displaying on the frontend, check your theme or product template. Ensure the correct ACF field name is being used in the template and that the field group is properly assigned to Products.
Importing structured product data into WooCommerce becomes straightforward when your ACF fields are configured correctly and your import file is properly prepared. The success of importing ACF fields into WooCommerce depends on accurate field names, correct mapping, and using a reliable import solution.
With WP Ultimate CSV Importer Pro, you can import WooCommerce products along with ACF custom fields from CSV, XML, Excel, or Google Sheets, update products using SKU, and manage even complex field structures efficiently.
If you have any questions about setup, mapping, or advanced imports, you can contact the Smackcoders support team directly at:
support@smackcoders.com
Start streamlining your WooCommerce ACF imports today and manage your product data with confidence.
WordPress Backup Strategy: Master Guide
11 Mar 2026, 12:55 pm
Table of Contents
A solid WordPress backup strategy is not optional; it’s a core part of running a reliable website. Whether you manage a blog, business site, or eCommerce store, losing your data can mean lost revenue, traffic, and reputation. A proper backup ensures your site can be restored quickly if something goes wrong.
If you use WordPress, you must assume that your website will at some point face issues such as hacking, server failures, or accidental data loss. A well-planned backup strategy acts as your safety net, allowing you to recover your entire website without panic or downtime.
This complete WordPress backup guide focuses on real-world implementation. You’ll learn how to back up a WordPress website, where to store backups, how often to run them, and how to test restores properly. Whether you’re a beginner or a developer managing multiple sites, this guide will help you build a practical, reliable backup strategy.
Key Takeaways
- Every WordPress website needs a structured backup strategy
- Backups protect against hacks, crashes, and human errors
- The 3-2-1 backup rule is the safest approach
- Multiple backup methods (plugin, hosting, manual) provide better protection.
- Testing restore is just as important as taking backups
Why Your Website Needs a Backup Strategy (The Risks of No-Backup)
A proper backup strategy is essential for every website running on WordPress because unexpected issues can occur at any time. Websites can crash due to failed updates, plugin or theme conflicts, or server errors, often without warning. Security threats like hacking and malware attacks can corrupt or delete important files and databases, while hosting failures can also result in permanent data loss.
Human errors are another common cause of website issues. Accidental deletions, incorrect configuration changes, or editing the wrong files can quickly break a website. Even experienced developers sometimes make small mistakes that lead to major problems if there is no reliable backup available.
Without a proper WordPress backup strategy, recovering your website can become stressful, time-consuming, and expensive. For business and e-commerce sites, this may lead to lost sales, reduced search rankings, and damaged customer trust. Regular backups ensure that no matter what goes wrong, your website can be restored quickly and continue running smoothly with minimal disruption.
The 3-2-1 Backup Rule for WordPress
A strong WordPress backup strategy starts with the simple and reliable 3-2-1 backup rule. If your website runs on WordPress, this rule helps protect your data from crashes, hacks, and server failures. The idea is always to keep three copies of your website, store them in two different storage types, and maintain one backup in an off-site location.
In practical terms, your live website is the first copy, your hosting or plugin backup can be the second, and a cloud or remote backup becomes the third. Using different storage types like hosting, backup, and cloud storage ensures that if one fails, the other is still safe. Most importantly, keeping at least one off-site backup protects your website even if your main server crashes or gets hacked.
Following the 3-2-1 rule creates a reliable safety net. It ensures that no matter what happens, whether it’s a technical failure or human error, you can quickly restore your website without major downtime or data loss.
WP Ultimate CSV Importer Pro
Get Ultimate CSV/XML Importer to import data on WordPress faster, quicker and safer.
Types of Backups You Should Know
Understanding backup types is an important part of building a reliable WordPress backup strategy. If you run a site on WordPress, knowing what exactly needs to be backed up and how to ensure complete protection of your website.
Files vs Database
A WordPress website consists of two main components: files and the database, and both are equally important. Website files include themes, plugins, core WordPress files, images, media uploads, and configuration files that control how your site looks and functions. The database, on the other hand, stores all your posts, pages, user information, comments, and site settings. If you back up only the files but ignore the database, your content and configurations will be missing during restore. Similarly, backing up only the database without files means your design and media elements won’t be recovered. A complete WordPress backup always includes both files and the database to ensure full restoration.
Full, Incremental, and Real-Time Backups
There are different types of backups based on how data is stored and updated. A full backup creates a complete copy of your entire website, including files and database, and is usually taken weekly or monthly for complete safety. Incremental backups store only the changes made since the last backup, which helps save storage space and speeds up the backup process, making it ideal for regularly updated websites. Real-time backups work continuously by saving changes instantly as they happen, which is especially useful for e-commerce or high-traffic websites where every update or transaction matters. Using the right combination of these backup types helps create a balanced and effective WordPress backup and restore strategy.
3 Ways to Backup Your WordPress Site
There are multiple ways to implement a reliable WordPress backup strategy, and the right method depends on your technical comfort level, hosting setup, and website type. If your site runs on WordPress, you can choose from plugin-based backups, hosting backups, or manual backups. Many professionals use a combination of all three for maximum protection.
Plugin Method (The Easiest Way)
Using a backup plugin is the most popular and beginner-friendly way to backup a WordPress website. Backup plugins allow you to automate the entire process, including scheduling daily or weekly backups, storing files securely, and restoring the site when needed. To implement a reliable WordPress backup process, start by installing a trusted backup plugin, then configure it to back up both your website files and database regularly according to your site’s activity, whether daily, weekly, or in real-time for high-traffic sites. Choose secure storage locations, including cloud services like Google Drive or Dropbox, to ensure off-site safety, and run an initial manual backup to verify everything is working correctly. Finally, test your backups by restoring them on a staging or local environment to confirm that all pages, media, plugins, and settings are intact, and make testing a recurring habit to ensure your website can be quickly recovered from crashes, hacks, or accidental data loss.
Recommended Plugins
- UpdraftPlus – best for easy automated backups with cloud storage and one-click restore.
- BlogVault – ideal for real-time, secure offsite backups for eCommerce and high-traffic websites.
- Jetpack Backup – perfect for fully automated, hands-off backups with quick and reliable restore.
Managed Hosting Backups (The Set-and-Forget Way)
Many managed hosting providers offer built-in backup solutions as part of their hosting plans. These backups usually run automatically daily and can be restored with a single click from the hosting dashboard. This method is convenient because it requires no setup or maintenance from the user. However, hosting backups should not be your only backup method. In some cases, hosting backups may have limited retention periods or may not include complete off-site storage. That’s why it’s best to combine hosting backups with another backup method for a safer and more reliable website backup strategy for WordPress.
Recommended Hosting Providers for WordPress
- Kinsta – Offers automatic daily backups, manual backups, and one-click restore with secure offsite storage, making it ideal for business and high-traffic WordPress sites.
- WP Engine – Provides daily automated backups, on-demand restore points, and easy rollback options directly from the dashboard for safer updates.
- Pressable – Includes daily site backups, hourly database backups, and one-click restore on all plans, ensuring strong backup protection for WordPress and WooCommerce sites.
Manual Backup (FTP & phpMyAdmin – For Techies)
Manual backups are best suited for developers and advanced users who want full control over their website data. This method involves downloading website files using FTP or a file manager and exporting the database through tools like phpMyAdmin. Manual backups are useful before major updates, migrations, or custom development changes. Although this approach provides complete control, it requires technical knowledge and regular attention to ensure backups are taken correctly. It is not the most convenient method for daily use, but it works well as an additional safety layer in a complete WordPress backup guide.
Where to Store Your Backups (Off-site Storage Options)
Choosing the right storage location is a crucial part of any WordPress backup strategy. If your website runs on WordPress, storing backups only on the same hosting server is risky because server crashes, hacking incidents, or data corruption can wipe out both your website and its backups. Keeping backups in a separate location ensures that even if your main site goes down, you still have a safe and accessible copy to restore quickly.
Cloud storage is one of the most reliable off-site backup options because it allows automatic and secure storage of your website data. Many website owners also maintain additional copies on external drives or remote servers for extra safety. The best approach is to store backups in more than one location, such as cloud storage plus a local or remote copy, so your website data remains secure and recoverable in any situation.
Frequency: How Often is Enough?
How often you back up depends on how active your site is. If you run a website on WordPress, your backup frequency should match how often content or data changes. Personal blogs can be backed up weekly, while business websites should have daily backups to avoid losing important updates.
For eCommerce or high-traffic sites, more frequent or real-time backups are recommended because every order and user action matters. The safest approach is to automate regular backups so your latest data is always protected and ready to restore if needed.
The Most Important Step: Testing Your Restore Process
Creating backups is important, but testing your restore process is what truly makes your WordPress backup strategy reliable. If your site runs on WordPress, you should never assume your backups will work perfectly until you test them. Many website owners only discover backup issues when a real problem occurs, and by then, it may be too late.
A simple restore test ensures your backup files are complete, usable, and up to date. You can test by restoring your backup on a staging site or local environment instead of your live site. Check whether pages, images, plugins, and settings load correctly. Make this a regular habit, such as once a month, so you always know your website can be restored quickly and safely whenever needed.
Common Mistakes & Best Practices
Even with a backup system in place, many website owners make mistakes that put their data at risk. If your site runs on WordPress, avoiding these common errors will make your backup strategy more reliable and effective.
Common Backup Mistakes
- Not testing backups regularly
- Storing backups only on the same hosting server
- Forgetting to automate backups
- Taking backups too infrequently
- Not backing up both files and the database
- Overwriting old backups without keeping versions
These mistakes often go unnoticed until a website crash or data loss occurs, making recovery difficult.
WordPress Backup Best Practices
- Automatically perform backups daily or weekly, tailored to site activity.
- Follow the 3-2-1 backup rule for better protection
- Store backups in secure off-site locations
- Keep multiple backup versions instead of one
- Test the restore process at least once a month
- Take manual backup before major updates or migrations
Following these best practices ensures your WordPress backup and restore process is reliable, secure, and ready whenever you need it.
WP Ultimate CSV Importer Pro
Get Ultimate CSV/XML Importer to import data on WordPress faster, quicker and safer.
Frequently Asked Questions
1. How do I backup my WordPress site completely?
To backup your site completely on WordPress, you need to back up both website files and the database. This can be done using a backup plugin, hosting backup feature, or manual method. A complete backup includes themes, plugins, media files, and all website content stored in the database.
2. What is the best backup method for WordPress?
The best method is a combination of plugin backups, hosting backups, and off-site storage. Plugin-based backups are easiest and allow automation, while hosting backups provide an extra safety layer. Using multiple methods creates a reliable WordPress backup strategy.
3. How often should I backup my website?
Backup frequency depends on how often your site updates. Blogs can be backed up weekly, business sites daily, and eCommerce or high-traffic websites should use daily or real-time backups to avoid data loss.
4. Are hosting backups enough for WordPress?
Hosting backups are helpful, but should not be your only backup. If the hosting server fails or backups get corrupted, you may lose everything. Keeping an additional off-site backup ensures full protection and control over your data.
5. Where should I store WordPress backups?
WordPress backups should be stored in secure off-site locations such as cloud storage, remote servers, or external drives. Storing backups in multiple locations ensures your website can always be restored even if one storage option fails.
Conclusion
Setting up a structured WordPress backup system is simple when your backup tools are properly configured and your storage plan is well thought out. The success of a WordPress backup strategy depends on proper scheduling, secure off-site storage, reliable automation, and regularly testing your restore process to ensure your data is always recoverable.
With the right combination of plugin backups, hosting backups, and manual backup options, you can protect your website from crashes, hacking, server failures, and accidental data loss. A well-implemented backup strategy not only safeguards your content but also ensures business continuity and peace of mind while managing your website.
If you have any queries about backup setup, restore testing, or advanced WordPress backup strategies, you can contact us directly at support@smackcoders.com
Start implementing your WordPress backup strategy today and keep your website secure, recoverable, and ready for growth.
How to Export WordPress Data to CSV: Complete Tutorial (2026 Guide)
11 Mar 2026, 12:47 pm
Table of Contents
Exporting WordPress data to CSV is an essential task for website owners, bloggers, and WooCommerce store managers. Whether you are migrating your website, preparing reports, integrating with third-party tools, or backing up specific content, knowing how to export WordPress data to CSV can save time and reduce errors.
In this complete tutorial, you will learn multiple methods to export WordPress data safely and efficiently. We will cover built-in tools, plugin-based exports, WooCommerce exports, database methods, and advanced WP-CLI options. By the end of this guide, you will know exactly which method suits your needs.
Key Takeaways
- You can export WordPress data using built-in tools, plugins, database access, or WP-CLI.
- CSV format is ideal for reporting, spreadsheets, and external integrations.
- WooCommerce allows direct CSV exports for products and orders.
- Large websites require batch exports to avoid timeout errors.
- Always take a backup before exporting data from a live site.
Method 1 – Export WordPress Data Using the Built-in Export Tool
If you’re looking for a simple way to export WordPress data, the built-in export feature is a good place to start. WordPress comes with a default export tool that allows you to download your content without needing to install any additional plugins.
While this method does not generate a CSV file directly, it helps you export your site data in XML format, which can later be converted to CSV if needed.
Let’s walk through the process step by step.
Step 1: Log in to Your WordPress Dashboard
First, sign in to your WordPress admin panel. You’ll need administrator access to export website data. Once you’re inside the dashboard, you’re ready to proceed.
Step 2: Navigate to Tools → Export
On the left-hand side menu, look for Tools. Hover over it, and then click on Export. This will take you to the WordPress Export screen.
Step 3: Choose What You Want to Export
Here, WordPress gives you a few options:
- All Content
- Posts
- Pages
- Media
- Custom Post Types
If you want to export everything, choose All Content.
If you only need specific data, like blog posts or a page, you can select that particular option. This flexibility makes it easy to export only the data you actually need.
Step 4: Click “Download Export File”
Once you’ve selected the content type, click the Download Export File button.
WordPress will generate an export file and download it to your computer. This file will be in XML format, not CSV.
When Should You Use This Method?
This built-in export method is best for:
- Migrating your website to another WordPress installation
- Creating a backup copy of your content
- Transferring posts and pages between WordPress sites
If you specifically need a structured CSV file, using a plugin-based method is usually more efficient.
Method 2 – Export WordPress Data to CSV Using a WP Ultimate CSV Importer Pro Plugin (Recommended)
If you want a direct and hassle-free way to export WordPress data to CSV, using a plugin is the smartest option. Instead of converting XML files or accessing your database manually, a professional export plugin allows you to generate clean CSV files in just a few clicks.
For this tutorial, we will use WP Ultimate CSV Importer Pro, a powerful plugin that supports exporting WordPress and WooCommerce data in structured CSV format. This method is beginner-friendly, yet advanced enough for developers managing large websites or WooCommerce stores.
Why Use WP Ultimate CSV Importer Pro for CSV Export?
When you need to export WordPress data to CSV, you want more than just a basic file download. You need flexibility, accuracy, and full control over what gets exported. WP Ultimate CSV Importer Pro makes this process simple by allowing you to generate structured CSV files directly from your WordPress dashboard without touching the database or converting XML files.
Direct CSV Download
The plugin lets you export WordPress data directly in CSV format. There’s no need to generate an XML file and convert it separately. You get a clean, ready-to-use CSV file that works perfectly with Excel, Google Sheets, and other tools.
Custom Field Selection
You can choose exactly which fields to export such as post titles, product SKUs, prices, or user emails. This helps you create a focused and well-structured CSV file without unnecessary columns.
Advanced Filtering
WP Ultimate CSV Importer Pro allows you to filter data before exporting. You can export based on:
- Date range
- Post status
- Categories
- Product type
- User role
This is especially useful for large websites.
WooCommerce Support
The plugin fully supports WooCommerce data, including:
- Products
- Orders
- Customers
- Coupons
This makes it easy to manage eCommerce data from one interface.
Batch Processing for Large Sites
For websites with thousands of records, the plugin supports batch exports. This prevents server overload and ensures smooth data extraction.
Safe and Database-Free Export
There’s no need to access phpMyAdmin or handle raw database tables. Everything can be managed securely inside your WordPress dashboard.
A Smarter CSV Export Solution
If your goal is to export WordPress data to CSV efficiently and safely, WP Ultimate CSV Importer Pro provides a reliable and scalable solution for both beginners and advanced users.
Step-by-Step: How to Export WordPress Data to CSV Using WP Ultimate CSV Importer Pro
Now let’s actually export your WordPress data to CSV using WP Ultimate CSV Importer Pro. Don’t worry the process is simple, and once you do it once, it becomes very easy to repeat.
Let’s go step by step.
Step 1: Install and Activate WP Ultimate CSV Importer Pro
- First, log in to your WordPress dashboard.
- From the left sidebar, click on Plugins → Add New.
- Upload the WP Ultimate CSV Importer Pro plugin file, then click Install Now.
- Once the installation is complete, click Activate.
After activation, you’ll see the plugin menu appear in your dashboard. That’s where you’ll manage all your export options.
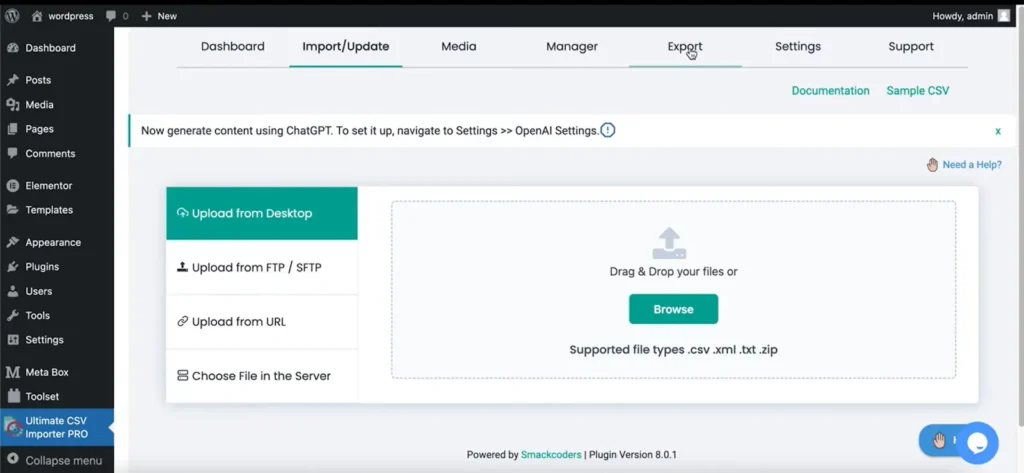
Step 2: Open the Export Section
- Now that the plugin is active, click on the WP Ultimate CSV Importer Pro menu in your dashboard.
- Inside the plugin, choose the Export option. This is where you decide what type of WordPress data you want to download.
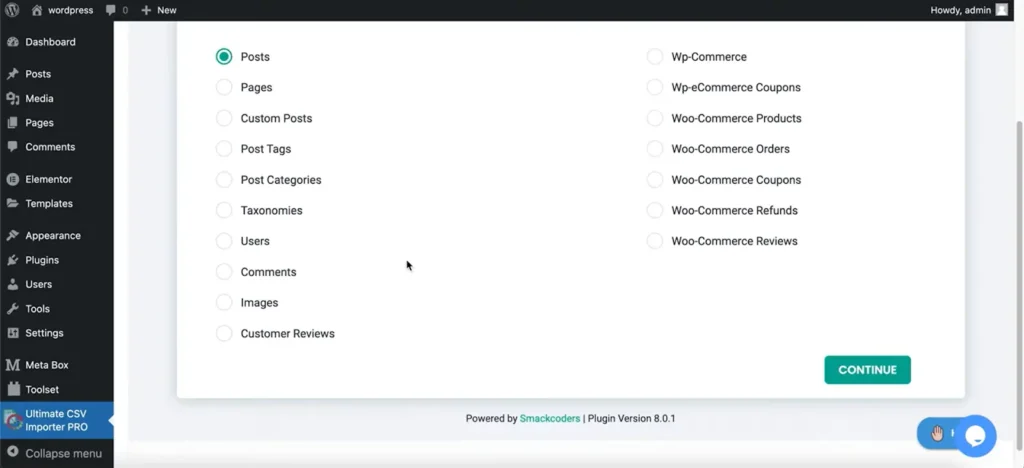
- You’ll see several modules available, such as:
- Posts
- Pages
- Custom Post Types
- Users
- WooCommerce Products
- WooCommerce Orders
- Customers
- Coupons
This flexibility allows you to export only the specific data you need instead of downloading everything at once.
Step 3: Select the Data Type
- Are you migrating blog content? Select Posts.
- Need user details for an email campaign? Choose Users.
- Managing inventory or pricing? Go with WooCommerce Products.
Selecting the right module ensures your CSV file contains structured and relevant data.
Step 4: Choose the Fields You Want to Export
This is where WP Ultimate CSV Importer Pro really stands out.
You don’t have to export every available column. Instead, you can customize your CSV file by selecting only the fields you actually need.
You can:
- Include required fields
- Add custom fields
- Rearrange column order
- Remove unnecessary data
For example, if you’re exporting WooCommerce products, you might include:
- Product Name
- SKU
- Price
- Stock Status
- Category
This helps create a clean, well-organized CSV file that’s easy to work with in Excel or other tools.
Step 5: Apply Filters (Optional but Very Helpful)
If your website has a lot of data, exporting everything may not be necessary.
WP Ultimate CSV Importer Pro allows you to filter your data before exporting. You can filter based on:
- Date range
- Post status
- Product category
- User role
Filtering ensures you export only relevant records and improves performance during the process.
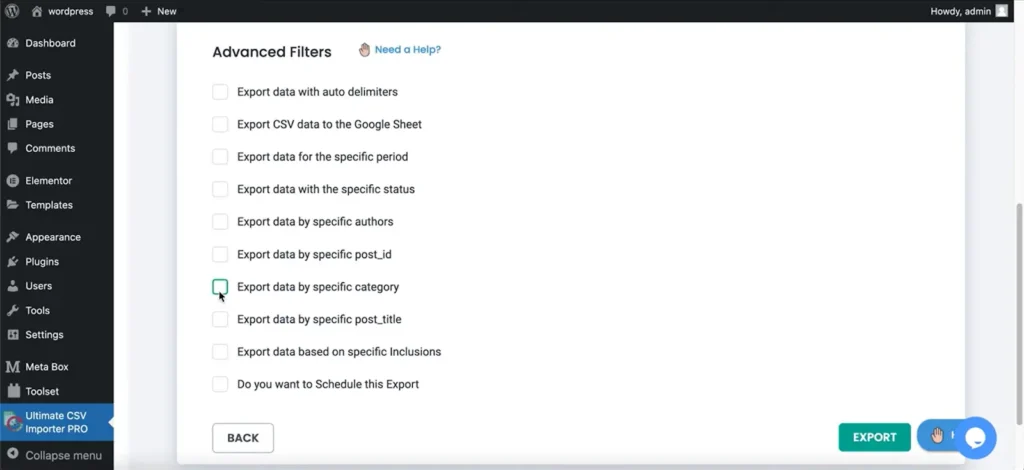
Step 6: Generate and Download the CSV File
- Once you’ve selected your data type, chosen fields, and applied filters, it’s time to export.
- Click the Export button. The plugin will process your request and generate the CSV file.
- Download the file and open it in Excel or Google Sheets to confirm everything looks correct.
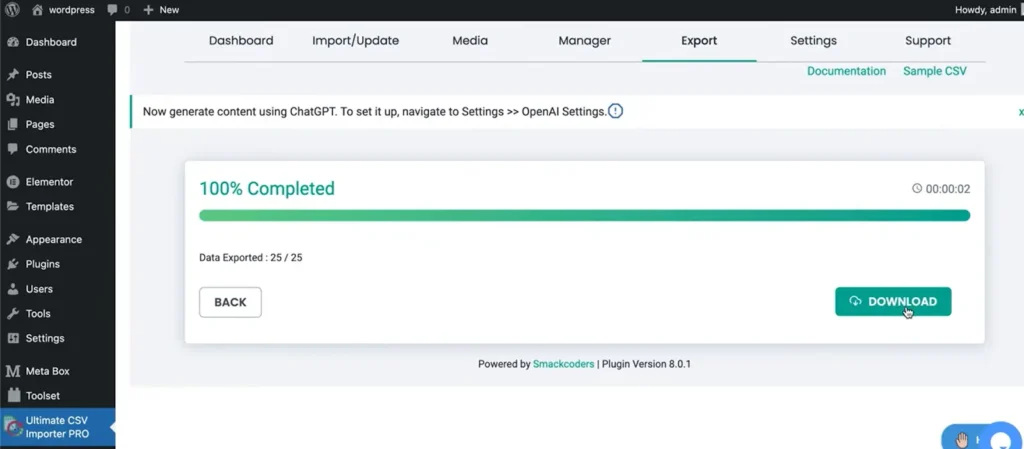
And that’s it, your WordPress data is now successfully exported to CSV.
How to Export WooCommerce Data to CSV Using WP Ultimate CSV Importer Pro
If you run a WooCommerce store, exporting data is often necessary for accounting, reporting, supplier updates, or ERP integrations.
Export WooCommerce Products
To export product data:
- Go to the plugin’s Export section
- Select WooCommerce Products
- Choose the product fields you want (SKU, Price, Stock, Category, etc.)
- Apply filters if needed
- Click Export and download the CSV file
This is perfect for inventory management and bulk product updates.
Export WooCommerce Orders
If you need order reports:
- Choose WooCommerce Orders from the module list
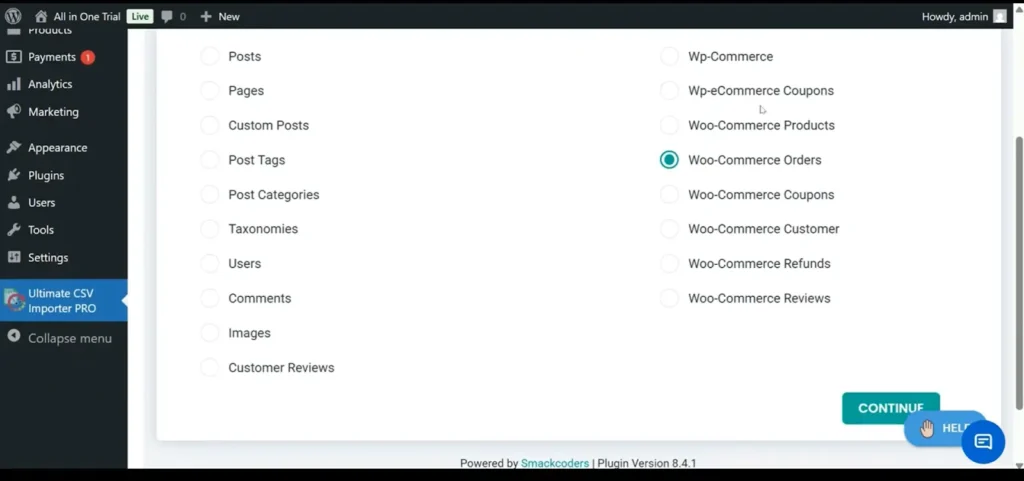
- Select required fields such as Order ID, Customer Name, Total Amount, Status, and Date
- Apply date filters if necessary
- Generate and download the CSV file
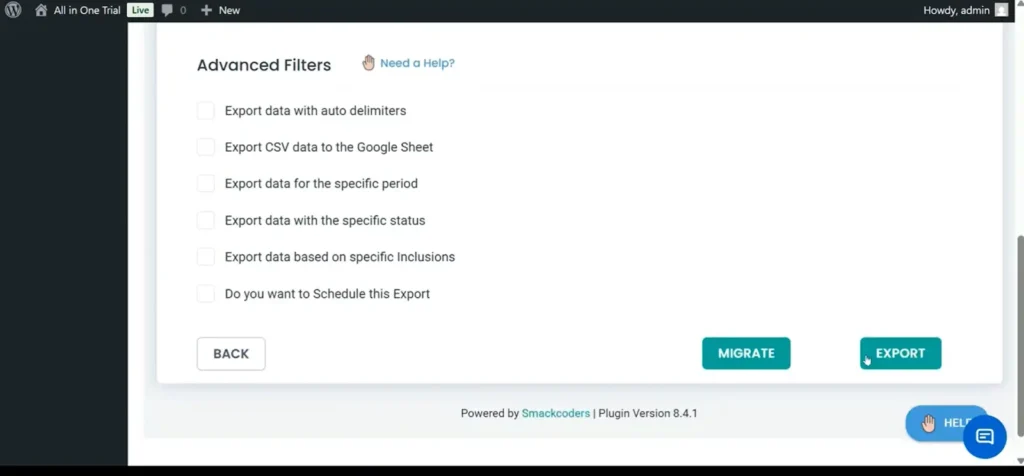
This method is especially useful for financial reporting and reconciliation.
Export WooCommerce Customers
To export customer details:
- Select the Customers or Users module
- Choose the relevant customer fields
- Click Export
This is helpful for CRM integration or email marketing campaigns.
Scheduled WooCommerce Exports
One of the most powerful features of WP Ultimate CSV Importer Pro is automation.
Instead of exporting manually every time, you can:
- Schedule recurring exports
- Set automatic CSV generation
- Configure cron-based automation
For large WooCommerce stores with frequent transactions, scheduled exports save time and ensure your data stays updated without manual effort.
Want to Automate It? You Can.
One powerful feature of WP Ultimate CSV Importer Pro is automation. Instead of exporting manually every time, you can:
- Schedule regular exports
- Set automatic CSV generation
- Use cron-based automation
This is a lifesaver if you manage a large WooCommerce store with constant updates.
Method 3 – Export WordPress Data Using phpMyAdmin (Database Method)
For users who are comfortable working at the database level, exporting WordPress data through phpMyAdmin offers complete control. This method allows you to download specific database tables directly in CSV format. However, it requires a technical understanding of how WordPress stores its data.
Below is the step-by-step process.
Step 1: Log in to Your Hosting Control Panel
Start by accessing your web hosting account. This could be cPanel, Plesk, or any custom hosting dashboard provided by your hosting company. You will need administrative access to continue.
Step 2: Open phpMyAdmin
Once inside your hosting control panel, locate and click on phpMyAdmin. This tool allows you to manage and export your website’s database tables.
Step 3: Select Your WordPress Database
After phpMyAdmin opens, you’ll see a list of databases on the left side. Select the database associated with your WordPress installation.
If you’re unsure which one it is, you can confirm the database name inside your wp-config.php file.
Step 4: Choose the Relevant Tables
WordPress stores different types of data in separate database tables. Depending on what you want to export, select the appropriate table.
Common tables include:
- wp_posts – Contains posts, pages, and custom post types
- wp_users – Stores registered user information
- wp_comments – Holds comment data
You can select a single table or multiple tables based on your export requirement.
Step 5: Export the Table in CSV Format
After selecting the required table:
- Click on the Export tab at the top
- Choose the export method (Quick or Custom)
- Select CSV as the output format
- Click Go to download the file
Your selected WordPress data will now be saved as a CSV file on your computer.
Method 4 – Export WordPress Data Using WP-CLI (Advanced Users)
For developers and advanced users who prefer working from the command line, WP-CLI provides a fast and flexible way to export WordPress data. WP-CLI is a command-line interface that lets you manage WordPress directly from your server without using the admin dashboard.
This approach is especially useful for automation, staging environments, and large-scale export operations.
Below is the step-by-step process.
Step 1: Connect to Your Server via SSH
Before using WP-CLI, you need SSH access to your server. Log in to your hosting account using an SSH client and navigate to the root directory where WordPress is installed.
Make sure WP-CLI is installed and properly configured on your server.
Step 2: Run the Export Command
Once you are inside your WordPress installation directory, you can run a command to export specific data.
For example, to export posts, use:
wp export –post_type=post
This command generates an export file containing all posts from your website. You can modify the –post_type parameter to export other content types such as pages or custom post types.
Step 3: Customize the Export (Optional)
WP-CLI allows you to refine your export by adjusting parameters. You can:
- Specify a date range
- Export a particular post type
- Define a filename for the export
- Control the export directory
These options make WP-CLI a powerful tool for developers who need precision and flexibility.
Step 4: Automate the Export Process
One of the biggest advantages of WP-CLI is automation. Developers can combine export commands with server cron jobs to schedule recurring exports.
This is especially helpful for:
- Automated reporting
- Backup workflows
- Staging-to-production synchronization
- Continuous integration pipelines
With automation in place, exports can run in the background without manual intervention.
When Should You Use WP-CLI for WordPress Data Export?
WP-CLI is not the first choice for beginners, but it becomes extremely powerful in the right situations. If you are working in a development-focused environment or managing large-scale WordPress projects, this method can save significant time and effort.
Let’s look at when using WP-CLI for exporting WordPress data makes the most sense.
Ideal for Developers Managing Multiple WordPress Sites
If you handle several WordPress installations, logging into each dashboard to export data manually can be time-consuming. WP-CLI allows you to run export commands directly from the server, making it easier to manage multiple sites efficiently from a single interface.
For developers working with client projects, this approach offers consistency and speed.
Suitable for Large Websites with Frequent Exports
Websites that handle large volumes of content or transactions often require regular data exports. Running export commands via WP-CLI reduces the chances of browser-based timeouts and improves performance when dealing with large datasets.
This makes it a practical solution for high-traffic blogs and WooCommerce stores.
Best for Automated Workflows and Staging Environments
WP-CLI works especially well in automated environments. Developers can integrate export commands into scheduled cron jobs or deployment scripts. This allows data exports to run automatically without manual intervention.
It is also useful in staging environments where developers test data synchronization before pushing changes to a live site.
Recommended for Users Comfortable with Server Access
WP-CLI requires SSH access and a basic understanding of command-line operations. If you are familiar with server management and terminal commands, you will appreciate the control and flexibility it provides.
However, beginners without technical experience may find plugin-based export methods more suitable.
Common Errors When Exporting WordPress Data
While exporting WordPress data to CSV is usually straightforward, certain technical issues can interrupt the process. Understanding these common errors will help you troubleshoot problems quickly and complete your export without frustration.
1. Timeout Errors
One of the most frequent problems during data export is a timeout error. This typically happens when the export process takes longer than the server’s maximum execution time. Large databases or websites with thousands of records are more likely to face this issue.
To resolve this, consider exporting data in smaller batches or increasing the server’s execution time limit through your hosting settings.
2. PHP Memory Limit Issues
If your WordPress site contains a large volume of content or WooCommerce data, you may encounter memory exhaustion errors. This occurs when the export process requires more memory than your server allows.
In such cases, increasing the PHP memory limit in your hosting configuration or the wp-config file can help complete the export successfully.
3. Character Encoding Problems
Sometimes, after downloading the CSV file, you may notice unusual characters or broken text formatting. This is usually caused by incorrect character encoding during export.
To prevent this issue, make sure your CSV file is generated using UTF-8 encoding. This ensures compatibility with spreadsheet tools like Excel and Google Sheets.
4. Permission and Access Issues
If you are unable to export certain data, the problem may be related to user permissions or file access restrictions. Only administrators typically have full export privileges.
Ensure that:
- Your WordPress role has export permissions
- Server file permissions are correctly configured
- No security plugin is blocking export actions
By being aware of these common export issues, you can handle them quickly and ensure a smooth WordPress data export process.
Best Practices for Exporting WordPress Data Safely
Exporting WordPress data to CSV is generally safe, but following a few important precautions can help you avoid unexpected issues. Whether you’re handling blog posts, user information, or WooCommerce data, these best practices ensure your export process remains secure and reliable.
Create a Full Backup Before Exporting
Before starting any export process, always generate a complete backup of your website. This includes both your database and website files. While exporting data does not usually modify content, having a backup gives you peace of mind and a restore point in case anything unexpected happens.
Avoid Exporting During High Traffic Periods
Large export operations can temporarily consume server resources. If your website receives heavy traffic, running exports during peak hours may affect performance.
To minimize disruption, schedule exports during low-traffic periods, such as late at night or early in the morning.
Export Large Datasets in Smaller Segments
If your site contains thousands of posts, users, or WooCommerce records, exporting everything at once may result in timeouts or memory errors.
Breaking the export into smaller batches reduces server load and improves stability. This approach is especially helpful for large eCommerce stores.
Secure Your Exported CSV Files
Exported CSV files often contain sensitive information, including user data or order details. Once downloaded, store these files securely.
Consider:
- Saving them in password-protected folders
- Limiting access to authorized users only
- Deleting files once they are no longer needed
Protecting exported data is just as important as protecting your live website.
Test Exports in a Staging Environment
Whenever possible, test your export process in a staging environment before performing it on your live site. This allows you to verify file structure, formatting, and completeness without impacting real users.
Testing ensures that your CSV file is accurate and ready for its intended purpose.
By following these best practices, you can export WordPress data safely and maintain the integrity of your website and its information.
FAQ – How to Export WordPress Data to CSV: Complete Tutorial
1. What Does Exporting WordPress Data to CSV Mean?
Exporting WordPress data to CSV means downloading your website information in a structured, spreadsheet-friendly format. A CSV (Comma-Separated Values) file organizes data into rows and columns, making it easy to open in Excel, Google Sheets, or import into external tools like CRM, ERP, or analytics platforms. Unlike the default WordPress XML export, CSV files are better suited for reporting and data analysis.
2. What Types of WordPress Data Can Be Exported?
You can export various types of data depending on your needs and the tools used.
Core WordPress Data
This includes:
– Posts
– Pages
– Custom post types
– Categories and tags
– Users
– Comments
These are typically exported for migration, reporting, or backup purposes.
WooCommerce Data
If WooCommerce is installed, you can also export:
– Products
– Orders
– Customers
– Coupons
WooCommerce CSV exports are commonly used for accounting, inventory management, and third-party integrations.
3. How Do I Export WordPress Data to CSV?
You can export WordPress data to CSV using a dedicated export plugin, a database tool like phpMyAdmin, or WP-CLI for advanced users. Plugins are the easiest method because they allow direct CSV downloads without requiring technical knowledge.
4. Can I Export WordPress Posts to CSV?
Yes, WordPress posts can be exported to CSV using a CSV export plugin. Most plugins allow you to choose specific post types and select only the fields you need before generating the file.
5. How Do I Export WooCommerce Products to CSV?
WooCommerce products can be exported directly from the WooCommerce export feature or by using a specialized WordPress export plugin. You can customize which product fields—such as SKU, price, and stock status—are included in the CSV file.
6. Can I Export WordPress Users to CSV?
Yes, user data can be exported using a plugin designed for user exports or by exporting the relevant database table. This is often done for email marketing, CRM integration, or internal reporting.
7. How Do I Export Large WordPress Data Without Timeout Errors?
For large websites, it’s best to export data in smaller batches. You can also increase your PHP memory limit or use WP-CLI for better performance. Using optimized export plugins designed for large datasets can also reduce server strain.
8. Is It Safe to Export WordPress Data from a Live Website?
Yes, exporting data does not typically modify your website. However, it is recommended to create a backup before starting and avoid running heavy exports during peak traffic hours to prevent performance slowdowns.
9. Can I Automate WordPress CSV Exports?
Yes, automation is possible using scheduled export features available in advanced plugins or by setting up cron jobs with WP-CLI. Automated exports are especially useful for WooCommerce stores that require regular reporting.
10. How Do I Export Specific Fields Only?
Most WordPress export plugins allow you to customize the fields included in your CSV file. You can select only the required columns, remove unnecessary data, and rearrange fields to match your reporting or integration need
Conclusion
Exporting WordPress data to CSV is straightforward when you use the right approach for your website’s needs. Whether you prefer a plugin-based method, database export, or WP-CLI for automation, choosing the proper workflow ensures accurate, structured, and secure data handling.
As your site grows, having a reliable export process becomes essential for reporting, migration, integrations, and WooCommerce management. Always follow best practices such as creating backups, exporting in manageable batches, and verifying your CSV files to maintain data integrity.
For businesses seeking a dependable WordPress data export solution, Smackcoders offers tools designed to simplify bulk data management and large-scale operations. If you need assistance or have questions, feel free to contact the team at support@smackcoders.com for expert guidance.
How to automatically import 10,000+ products into WooCommerce (Step-by-step)
10 Mar 2026, 12:54 pm
Table of Contents
Automatically importing 10,000+ products into WooCommerce is one of the most efficient ways to manage a large product list without any manual effort. Adding products one by one is not practical for growing businesses, especially when they deal with frequent updates, large inventories, or supplier-based product data. Instead, the owners can use CSV or XML files, along with an advanced import plugin like WP Ultimate CSV Importer, to upload products in bulk and automate updates.
This approach is mostly useful for large WooCommerce stores, marketplace websites, and businesses that regularly update their prices, stock levels, or product details. Automated product imports help maintain consistency, reduce human error, and save time compared to manual uploads.
This blog explains how to automatically import large volumes of products into WooCommerce by using the WP Ultimate CSV Importer plugin. The plugin is built to handle bulk uploads, scheduled imports, and large datasets smoothly, making it easier for store owners to manage thousands of products efficiently and to keep their WooCommerce store up to date.
Key Takeaways
- WooCommerce supports bulk product imports using CSV or XML files
- Importing 10,000+ products manually is not efficient
- WP Ultimate CSV Importer is used to automate the large product imports
- Automated imports save time, reduce data entry errors, and improve store management
- Proper file preparation and import scheduling ensure smooth and error-free imports
Why Automating Product Imports in WooCommerce Matters
As your WooCommerce store grows, manually adding and updating products becomes time-consuming and difficult to manage. Each product requires accurate details such as pricing, stock levels, categories, and images, which increases the risk of errors. Automated product imports allow store owners to upload and update products in bulk using CSV or XML files, reducing manual effort and improving data accuracy. This automation ensures consistency across product information and keeps the store well – organized. It also saves valuable time and improves overall efficiency, allowing store owners to focus more on marketing, sales, and delivering a better customer experience.
Things to Prepare Before Importing Products into WooCommerce
Importing products into WooCommerce helps store owners save time, especially when adding a large number of products at once. However, starting the import without proper preparation can lead to errors, missing product details, or incorrect product listings. To ensure a smooth and successful import process, it is important to get a few essential things ready in advance.
- Choose the correct file format, such as CSV or XML, supported by WooCommerce or your import plugin.
- Make sure the import file is properly structured with clear and correct column headers.
- Prepare required product fields like product name, SKU, price, product type, and stock status.
- Ensure each product has a unique SKU to avoid duplication issues
- Create and organize product categories and tags before importing, or the plugin will automatically create them during import
- Prepare product images by uploading them to the media library or using valid image URLs
- Check and set up product attributes and variations if importing variable products
- Verify prices, taxes, and currency settings in WooCommerce
- Install and configure a reliable product import plugin like WP Ultimate CSV Importer
- Take a full website backup to prevent data loss
- Test the import using a small sample file before importing all products
Choosing the Right Import Tool or Plugin for WooCommerce
When importing products into WooCommerce, choosing the right import tool or plugin is very important. The right tool helps you import products accurately, save time, and avoid data errors. WooCommerce provides a built-in importer, but for advanced needs, third-party plugins like WP Ultimate CSV Importer offer more powerful features.
WP Ultimate CSV Importer (Advanced Import Plugin)
WP Ultimate CSV Importer is an advanced WordPress plugin used to import and export large amounts of data in WooCommerce. It supports CSV, XML, and many file formats and allows store owners to import products, variations, categories, images, and custom fields easily. The plugin provides advanced field mapping, which helps match file data accurately with WooCommerce fields. It is especially useful for bulk imports, scheduled imports, and regular product updates. Overall, it saves time, reduces errors, and is ideal for stores with large or complex product data.
Best suited for:
- Stores with large product catalogs
- Regular or scheduled product imports
- Complex data such as variations, attributes, images, and custom fields
Key features and benefits:
- Supports CSV and XML file imports
- Advanced field mapping and customization
- Imports product images, attributes, and variations easily
- Allows scheduled imports using cron jobs
- Suitable for bulk imports of thousands of products
Which Import Tool Should You Choose?
If you are a beginner or managing a small store, the default WooCommerce importer is a good starting point for simple imports. However, if your store handles large volumes of products, frequent updates, or complex product data, WP Ultimate CSV Importer is the better choice. It offers more flexibility, automation, and control, making the import process faster and more reliable.
WP Ultimate CSV Importer Pro
Get Ultimate CSV/XML Importer to import data on WordPress faster, quicker and safer.
Step-by-step guidance to Automate Products Import
Automatically importing products into WooCommerce helps store owners save time and manage large product catalogs efficiently. Instead of adding products one by one, you can use a plugin like WP Ultimate CSV Importer to upload products in bulk and even schedule imports to run automatically. Below is a simple step-by-step guide to help beginners understand the complete process.
Step 1: Log in to Your WordPress Dashboard
Firstly, log in to your WordPress admin panel using your username and password. This is where you will manage plugins, products, and import settings.
Step 2: Install and Activate WP Ultimate CSV Importer
Go to Smackcoders and click on my account, and then log in. Now download the plugin and go to the WordPress plugin, then install and activate it.
Step 3: Prepare Your Import File
Create a CSV or XML file containing your product data. Make sure it includes important fields such as product name, SKU, price, category, stock status, and image URLs. Ensure the file is clean, well-structured, and free of errors before importing. Download the sample CSV file WooCommerce Products Import CSV.
Step 4: Open WP Ultimate CSV Importer
Navigate to WP Ultimate CSV Importer and then Import from the WordPress menu.
Step 5: Upload Your Import File
Upload your CSV or XML file from your computer, or choose other options like Upload from URL, FTP/SFTP, or external sources if your data is stored online.
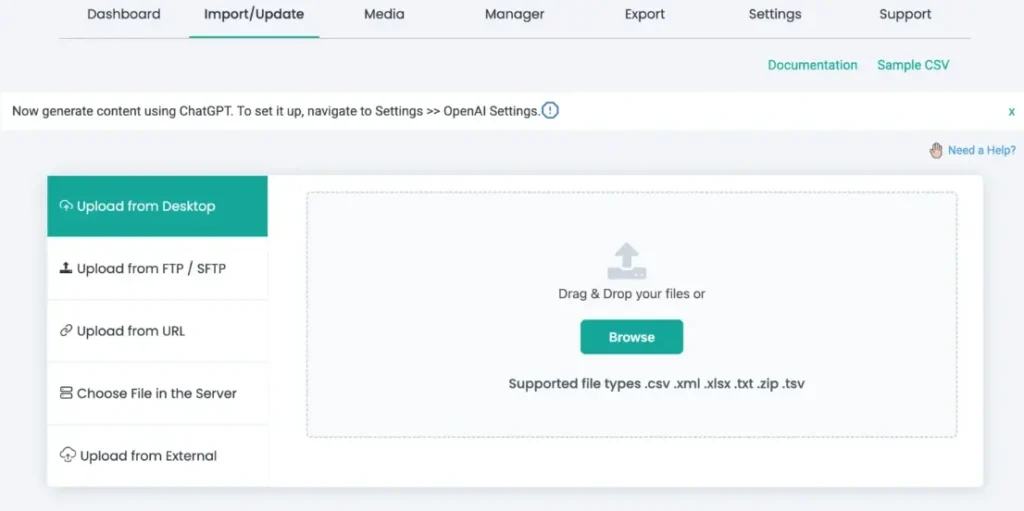
Step 6: Choose import type
Choose Fresh Import if you are importing products from a new file for the first time. Choose Update Content if you want to update existing products or schedule automatic imports.
Choose the post type as WooCommerce Products to begin the import process.
Select the option you need, then click Continue to proceed to the next step.
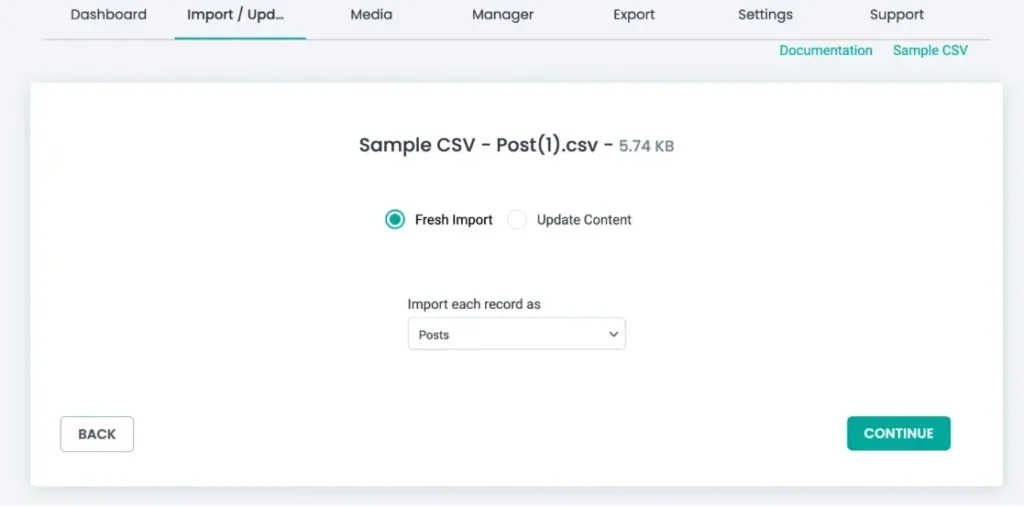
WP Ultimate CSV Importer Pro
Get Ultimate CSV/XML Importer to import data on WordPress faster, quicker and safer.
Step 7: Map File Fields to WooCommerce Fields
Field mapping is a crucial step. Here, you match the columns in your import file with WooCommerce product fields such as title, price, SKU, categories, and images.
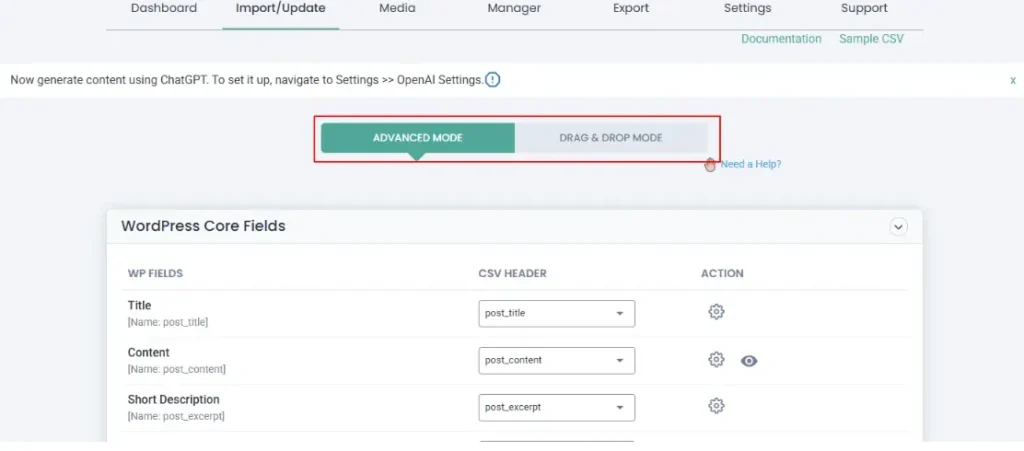
WP Ultimate CSV Importer provides an easy drag-and-drop interface to make this step simple.
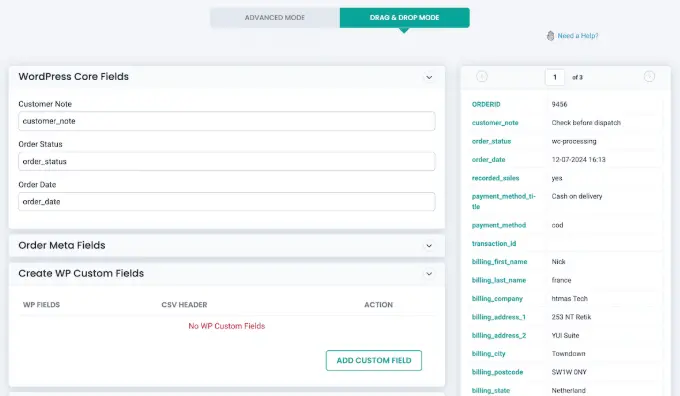
Step 8: Configure Import Settings
Depending on your needs, you can easily manage media files and configure import settings in one place. The plugin lets you back up data using the Rollback (backup before import) option and enables maintenance mode during the import process. It also supports smart duplicate handling, ensuring existing products are updated correctly, and imports remain duplicate-free.
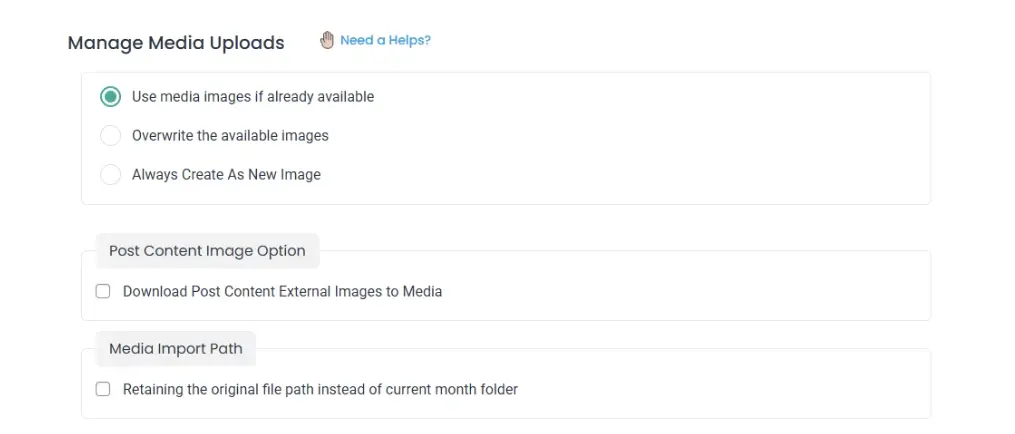
Step 9: Enable Automatic or Scheduled Import
To import products automatically, enable scheduled import using cron jobs. This allows WooCommerce to import products at fixed intervals without manual action. Make sure server cron jobs are enabled before scheduling the import. Enable Schedule Import and choose the frequency (hourly, daily, weekly, or custom).
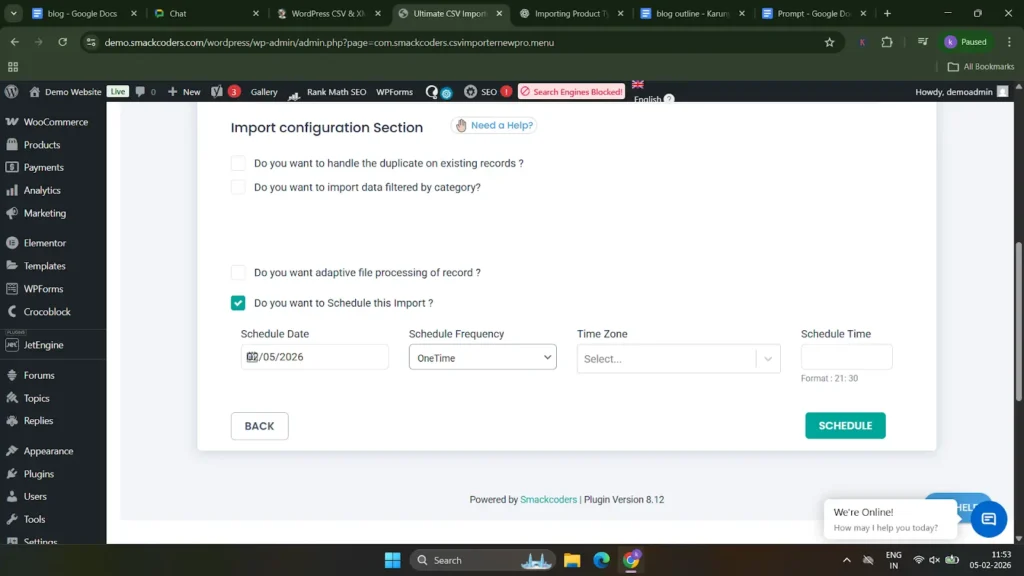
Step 10: Schedule the Import
Click the Schedule Import button to start the process. The plugin will display progress and logs so you can track the import in real time. To check the scheduled import, go to the manager and then click file manager. There, you can see the imports that have already been scheduled.
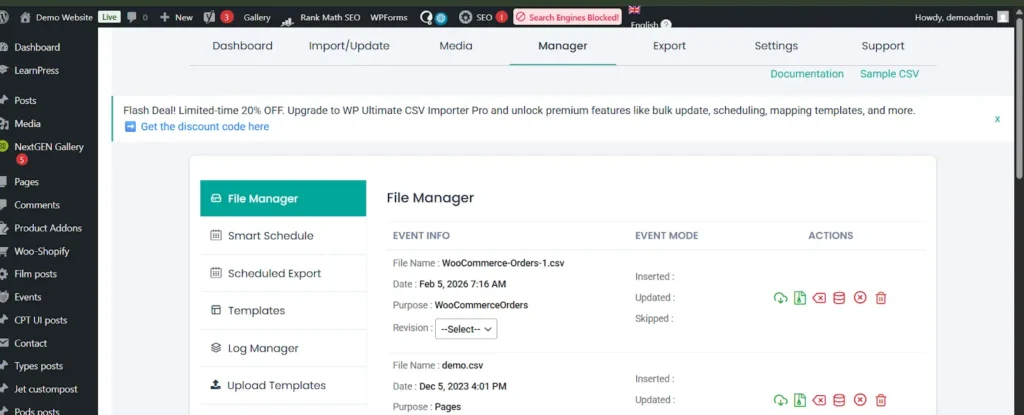
Step 11: Verify Imported Products
After the import is completed, go to Products and click All Products in WooCommerce to verify that the products are imported correctly.
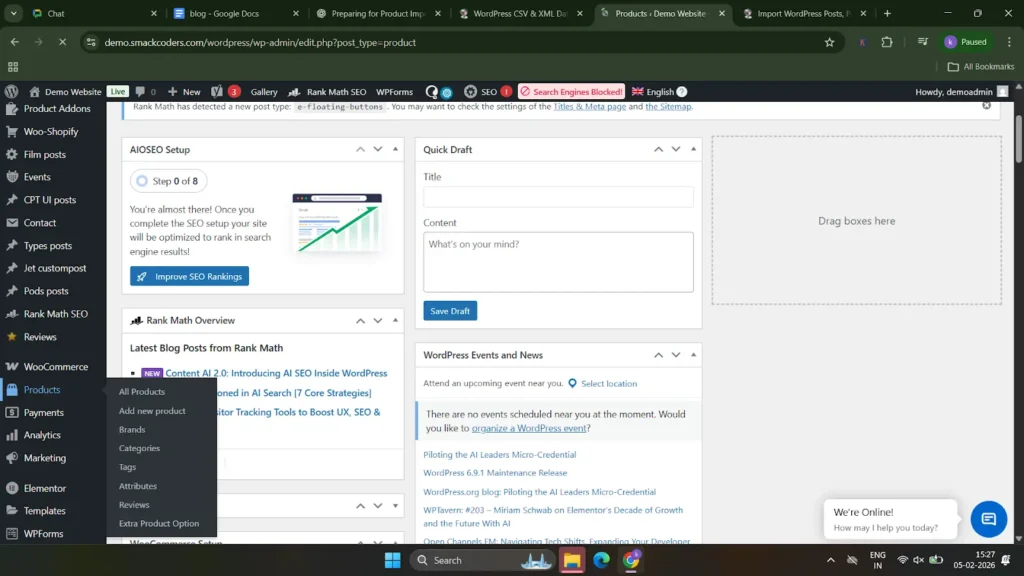
Check prices, images, categories, and stock details to ensure accuracy.
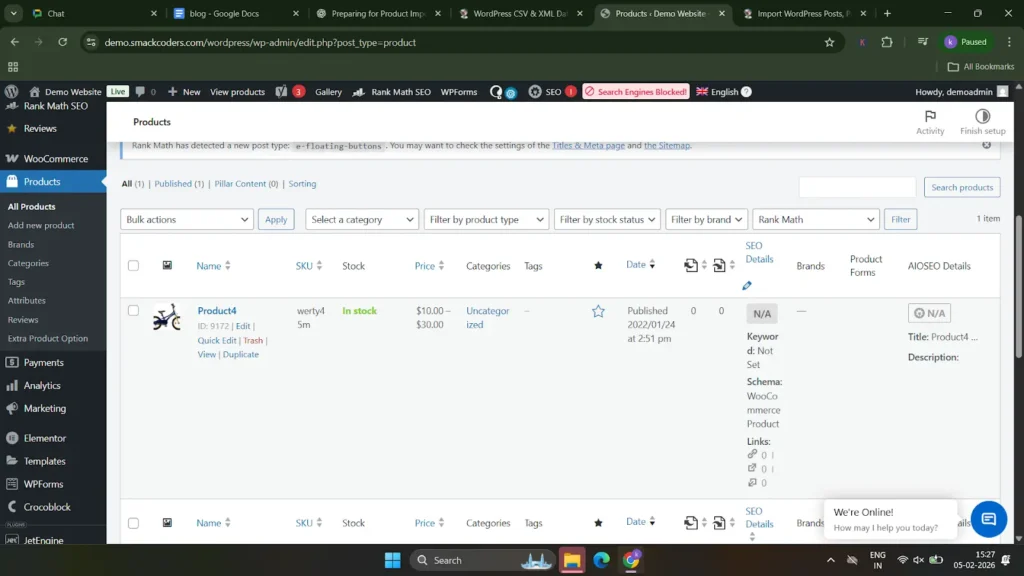
WP Ultimate CSV Importer Pro
Get Ultimate CSV/XML Importer to import data on WordPress faster, quicker and safer.
Best practices for smooth import of bulk products (10,000 or above)
Importing products becomes much easier when you follow a few simple best practices. These tips help beginners avoid common errors and ensure a smooth import process.
Make Sure Your File Is Ready
Before importing, ensure your CSV or XML file is properly prepared to avoid errors. Use the correct file format, keep column headers clear and accurate, fill in all required fields, remove empty rows or extra spaces, and save the file in UTF-8 format. A clean and well-structured file helps ensure a smooth and successful WooCommerce product import.
Double-Check Your Product Details
Before importing, carefully review all product details to ensure accuracy. Check product names, prices, categories, stock status, and descriptions for mistakes or missing data. Verifying these details in advance helps prevent incorrect product displays and reduces the need for re-imports later.
Use Unique Product Codes to avoid duplicates.
Always use unique product codes, such as SKUs, for each product to prevent duplicates during import. Unique SKUs help WooCommerce identify products correctly, making it easier to update existing items instead of creating repeated entries. This ensures a clean, organized, and duplicate-free product catalog.
Keep Images Light and Clear
Use optimized, high-quality images that are clear but not too large in size. Compress images before import and use supported formats like JPG or PNG to improve import speed and site performance. Light and clear images help your products load faster and look professional in your WooCommerce store.
Use server cron jobs instead of WordPress cron jobs.
Using server cron jobs is more reliable than WordPress cron jobs, especially for large product imports. Server cron runs tasks at fixed times regardless of site traffic, ensuring scheduled imports execute on time without interruption. This helps improve performance and makes bulk imports more stable and consistent.
Keep WooCommerce and import plugins updated.
Always keep WooCommerce and your import plugins updated to ensure compatibility, security, and better performance. Updates often fix bugs and improve import stability, helping you avoid errors during product imports and maintain a smooth workflow.
Run a test import with small samples.
Before importing all products, run a test import with a small sample of data. This helps you identify mapping errors, missing fields, or formatting issues early, saving time and preventing problems during the full import.
plan rollback strategy
Always plan a rollback strategy before starting the import. Take a full site or database backup so you can quickly restore your store if something goes wrong. A proper rollback plan ensures data safety and gives you confidence when importing products.
Frequently asked questions (FAQs)
1. How to import variable products in WooCommerce?
To import variable products in WooCommerce, first prepare a CSV or XML file with one row for the parent variable product and separate rows for each variation. Set the product type correctly, define attributes like size or color, and link variations to the parent using a parent SKU or product ID. Upload the file using the WooCommerce importer or an import plugin, map all fields properly, and run a small test import before completing the full import.
2. How to add products from Excel to WooCommerce?
To add products from Excel to WooCommerce, first convert the Excel file to a CSV format. Then upload the file using WP Ultimate CSV Importer, map the Excel columns to the correct WooCommerce product fields, configure import settings, and run a test import before importing all products.
3. How to prevent duplicate products from being imported?
You can prevent duplicate products by using unique SKUs for each product and enabling the update existing records option in WP Ultimate CSV Importer. This allows the plugin to match products correctly and update them instead of creating duplicates.
4. Is it possible to set up two daily imports – one for updating products and one for adding new ones?
Yes, it is possible. You can create two separate scheduled imports in WP Ultimate CSV Importer – one set to update existing products using SKUs and another set to add new products only. By configuring the update and duplicate-handling options correctly, both imports can run daily without conflicts.
5. How to automate products exported from WooCommerce?
You can automate products exported from WooCommerce by scheduling imports in WP Ultimate CSV Importer using the exported CSV file. Once the file is updated regularly, set up a scheduled import with server cron, enable the update option using SKUs, and WooCommerce products will be automatically added or updated without manual effort.
6. How to import products with images in WooCommerce?
You can import products with images in WooCommerce by including image URLs or file names in your CSV file and importing it using WP Ultimate CSV Importer. During import, map the image field correctly and enable media handling options so the plugin downloads and attaches images to products automatically.
7. Can I import other product types?
Yes, you can import other product types using WP Ultimate CSV Importer. The plugin supports simple, variable, grouped, virtual, downloadable, and external/affiliate products, as long as the product type and required fields are correctly defined in your import file.
Managing products in WooCommerce does not have to be time-consuming or stressful. By using automated product imports and advanced tools like WP Ultimate CSV Importer, you can save hours of manual work, reduce errors, and keep your store organized. Now is the perfect time to explore automation, experiment with powerful import plugins, and optimize your WooCommerce workflow. Start small, test confidently, and take your online store management to the next level.
If you have any questions or need help during the setup, the Smackcoders support team is here to help. Feel free to contact support@smackcoders.com for expert assistance.
22 Best WooCommerce Plugins for Your WooCommerce Store in 2026
7 Mar 2026, 6:59 am
Table of Contents
Quick Answer: The best WooCommerce plugins for 2026 include WP Ultimate CSV Importer PRO (data management), Yoast SEO (search optimization), MailPoet (email marketing), Mollie Payments (European payments), and GDPR Cookie Consent (compliance). The right stack depends on your store’s size, market, and biggest operational gaps.
Running a competitive WooCommerce store in 2026 means more than just having great products. The best WooCommerce plugins make the difference between a store that runs efficiently and one that constantly falls behind – on orders, compliance, and customer experience. From order management and packaging to refunds, payments, and returns, the operational complexity adds up fast.
According to recent WordPress usage data, over 6 million stores run on WooCommerce globally. The right WooCommerce plugins separate high-performing stores from ones stuck firefighting daily issues. To cut through the noise, we’ve curated 22 must-have best WooCommerce plugins for 2026 covering inventory, payments, compliance, promotions, and marketing. Let’s get into it.
Best WooCommerce Plugins for 2026 (Full List)
1. WP Ultimate CSV Importer PRO for WooCommerce Import & Export

WP Ultimate CSV Importer PRO handles the complete import and export of WooCommerce products, simple, grouped, variable, and external/affiliate, along with reviews, categories, tags, coupons, orders, and refunds. It supports CSV, XML, Excel, Google Sheets, and TSV formats. Built-in AI integration with ChatGPT, Gemini, and Claude can generate product descriptions and images during import. Google Sheet sync scheduling keeps inventory updated in real time, and multilingual product imports are supported out of the box. Fully HPOS-compatible for reliable data workflows at scale.
2. Checkout Field Editor for WooCommerce
Checkout Field Editor for WooCommerce plugin lets store owners customize the checkout page through a drag-and-drop interface, no code required. You can add over 20 custom field types, including text, email, phone, select, radio, and date picker, and apply conditional logic so fields only appear when relevant. Built-in validation and compatibility with WPML, Polylang, and Loco Translate make it a reliable pick for multilingual stores. It is one of the best WooCommerce plugins for improving checkout conversion rates.
3. Smart Coupons for WooCommerce
Smart Coupons centralizes discount and promotion management without the need for additional extensions. You can create bulk gift vouchers, store credits, BOGO deals, and discount coupons from one place. The plugin supports issuing store credit that customers can use across multiple orders, as well as sending branded digital gift certificates via email. Seasonal campaigns with custom prefixes, limits, and date ranges are straightforward to configure.
4. Salesforce CRM Integration for WooCommerce
This integration automatically syncs customers, products, orders, reviews, coupons, and inventory data into Salesforce in real time. Two-way product synchronization keeps both platforms aligned, and abandoned cart details are pushed to Salesforce leads to help recover lost sales. It works with ACF, WooCommerce Memberships, Affiliate Manager, and Subscriptions, making it well-suited for stores running advanced custom setups.
5. Accessibility Tool Kit

With the EU’s European Accessibility Act enforcement underway since June 2025, compliance is no longer optional. The Accessibility Tool Kit helps your site meet WCAG 2.1, Section 508, and ARIA guidelines by identifying missing labels, incorrect heading structure, and keyboard navigation issues. A free Chrome extension companion tool performs fast WCAG-based audits covering alt text, color contrast, and focus order on desktop and mobile.
6. WooCommerce Marketing Automation
WooCommerce Marketing Automation tool brings email and behavioral marketing directly into WooCommerce. Send customizable email templates based on shopper behavior, schedule drip campaigns, create sign-up forms, and launch exit intent and cart abandonment pop-ups, all without additional tools. Triggers for abandoned carts, purchases, and win-back campaigns can be set up in minutes using the campaign builder.
7. PDF Invoices and Packing Slips for WooCommerce
PDF Invoices and Packing Slips for WooCommerce plugin generates invoices, packing slips, and credit notes automatically for every order. Store managers can add their logo, business details, and terms to PDF documents that are instantly available through order confirmation emails and the customer account area. Auto-numbering keeps documents organized and audit-ready, while bulk PDF export and email attachment options give owners additional flexibility.
8. Dokan

Dokan transforms a WooCommerce store into a fully operational multi-vendor marketplace. Sellers get individual dashboards to manage products, orders, earnings, and inventory, while admins maintain control over commissions, vendor approvals, and site-wide policies. It supports digital and physical products, variable pricing, and subscription-based selling, a solid foundation for building Etsy-style marketplaces without heavy custom development.
9. GDPR Cookie Consent
GDPR Cookie Consent automates cookie declarations and consent management for WordPress sites. It scans for all cookies in use, categorizes them as essential, analytical, or marketing, and displays a customizable banner to collect visitor consent. Non-essential cookies are blocked until consent is given, consent records are maintained for audits, and cookie policy pages are auto-generated and tailored to WooCommerce needs.
10. LoyaltyX – WooCommerce Loyalty & Rewards Plugin
LoyaltyX is a WooCommerce loyalty plugin built to increase repeat purchases and lifetime value without relying solely on discounts. Customers earn points through purchases, referrals, reviews, birthdays, and social sharing. Campaigns launch automatically, the plugin works with any WooCommerce theme, and no developer is required to get started. A live demo is available for testing before committing.
More Best WooCommerce Plugins for SEO, Marketing & Payments
11. Yoast SEO – Best WooCommerce SEO Plugin
Yoast SEO remains the standard for search optimization without requiring SEO expertise and is one of the most widely adopted WooCommerce plugins globally. It helps craft better product titles, meta descriptions, and schema markup, while real-time content analysis guides keyword usage, readability, and internal linking. WooCommerce-specific features include product SEO fields, clean sitemaps, and Open Graph integration.
12. WebToffee WooCommerce Product Recommendations

This plugin increases average order value by surfacing relevant products at the right moment. Dynamic recommendation types frequently bought together, customers also bought, and related items appear on product, cart, or checkout pages without custom code. A rules-based engine gives store owners control over what displays based on products, categories, or cart conditions. Upsell and cross-sell features are among the most effective tools for lifting revenue per order.
13. YITH WooCommerce Wishlist

YITH WooCommerce Wishlist lets customers save favorite products for later, reducing abandoned carts and improving engagement. A wishlist button is added to product pages, allowing visitors to bookmark items without committing to a purchase. Shoppers can create and share multiple wishlists, while store owners gain marketing opportunities such as triggering personalized emails when wishlisted items drop in price or go out of stock.
14. Sequential Order Numbers for WooCommerce
Sequential Order Numbers for WooCommerce plugin replaces WooCommerce’s default random order IDs with clean, sequential numbers, making order tracking clearer for both store managers and customers. You can build structured order formats using letters, numbers, or dates, with optional prefixes or suffixes. Custom reset schedules and the ability to apply numbering rules to past orders round out the feature set.
15. Customer Reviews for WooCommerce

Customer Reviews for WooCommerce plugin makes it easier for buyers to leave detailed feedback by streamlining the review process. Automated post-purchase reminders, photo uploads, ratings filters, and review voting build trust across the store. Offering discount coupons in exchange for reviews helps collect social proof without manual follow-up. Rich snippet support ensures product ratings appear in Google search results, improving click-through rates and conversions.
16. WooCommerce Product Feed
The WooCommerce Product Feed plugin simplifies product listing on major advertising and sales platforms, including Google Shopping, Meta, Pinterest, TikTok, and additional marketplaces. Filtering and attribute-mapping tools control which products appear in each feed and how their data is presented. Scheduled updates keep listings accurate as prices or stock levels change, and multiple simultaneous feeds can run at the same time.
17. MailPoet

MailPoet brings email marketing directly into the WordPress dashboard, letting store owners design and send newsletters, abandoned cart emails, and product promotions without a separate platform. A drag-and-drop editor with WooCommerce blocks makes it straightforward to create on-brand emails. Subscriber management, automated welcome emails, and list segmentation are all built in.
18. WooCommerce Gift Cards

WooCommerce Gift Cards allows stores to sell digital gift cards that customers can purchase, personalize with a message, and deliver via email on a scheduled date. Cards are redeemable at checkout, and store owners can track balances, expiration dates, and usage history. The plugin integrates directly with product pages, helping drive repeat business and attract new customers through gifting.
19. Variation Swatches for WooCommerce

Variation Swatches replaces standard dropdowns with clickable swatches for color, size, pattern, and more. Product galleries update dynamically based on customer selections, giving shoppers a clearer view of what they are ordering. Tooltips, out-of-stock indicators, and custom styling options let you match the swatches to your theme across any store with variable products.
20. Mollie – Best WooCommerce Payment Plugin for Europe

Mollie is one of the most practical WooCommerce payment plugins for stores selling across Europe. It enables stores to accept major cards, wallets, and region-specific methods such as iDEAL, Bancontact, and Klarna without any coding. The plugin integrates cleanly with WooCommerce and supports recurring payments, refunds, and multilingual checkout while meeting European payment compliance requirements. Its coverage of local payment methods makes it an essential WooCommerce payment plugin for cross-border commerce.
21. FedEx Shipping Plugin for WooCommerce with Print Label
This WooCommerce shipping plugin automates the full FedEx workflow, displaying real-time rates at cart and checkout, generating shipping and return labels, and sending tracking details to customers automatically. Seamless FedEx account integration and REST API support let store owners manage shipping, tracking, and documentation from within WooCommerce. Domestic, international, LTL freight, SmartPost, and One Rate services are all supported, along with bulk label printing and multi-currency compatibility.
22. ReachShip Multi-Carrier Shipping Plugin
ReachShip Multi-Carrier Shipping Plugin is a free WooCommerce shipping solution that helps store owners automate their shipping operations from a single dashboard. It supports leading carriers such as UPS, USPS, FedEx, DHL Express, Australia Post, Canada Post, Aramex, Sendle, and more, enabling merchants to display real-time shipping rates at checkout, generate shipping labels, schedule carrier pickups, and track shipments without switching between multiple carrier portals. The plugin also includes features like address validation, automatic package selection, conditional shipping rules, and estimated delivery dates to reduce shipping errors and improve delivery efficiency. Whether you’re shipping locally or internationally, ReachShip simplifies order fulfillment while providing a seamless shipping experience for both merchants and customers. The core plugin is free to use, with premium add-ons available for advanced carrier integrations and enhanced shipping automation.
Conclusion
Running a WooCommerce store efficiently comes down to having the best WooCommerce plugins in place – not working harder. The tools covered here address real operational challenges from checkout customization and customer retention to compliance, shipping, and marketing, so you can focus on growing the business rather than managing its moving parts.
Start by identifying the biggest friction points in your current setup, then pick two or three WooCommerce plugin 2026 options from this list that directly address them. Small, deliberate improvements compound quickly.
Exploring the best WooCommerce plugins for your store? Start with the areas causing the most friction – whether that’s checkout optimization, inventory management, or compliance.
For data management and bulk imports: Try WP Ultimate CSV Importer PRO to streamline product updates and reduce manual effort. Need help choosing the right setup? Reach out to support@smackcoders.com – our team can help you find the right WooCommerce plugin stack for your store size.
MasterStudy LMS Review: Is It the Right WordPress LMS for Online Courses?
4 Mar 2026, 1:02 pm
Table of Contents
Online learning is no longer optional for educators; it’s an expectation. To run structured courses, manage lessons, quizzes, assignments, payments, and students’ progress, you need more than just videos on your website.
This is where a Learning Management System (LMS) plugin becomes essential. One plugin that has gained strong attention in recent years is MasterStudy LMS.
In this review article, we’ll take a deep look at MasterStudy LMS, what it offers, how it works, how to use it step by step, who it’s best suited for, and where it may not be the right fit. By the end, you’ll clearly know whether MasterStudy LMS is worth using for your online course business.
What is MasterStudy LMS?
MasterStudy LMS is a WordPress Learning Management System plugin designed to help you create, manage, and sell online courses directly from your WordPress website.
Instead of relying on third-party platforms like Udemy or Teachable, MasterStudy gives you full ownership of your content, branding, users, and revenue.
At its core, the plugin transforms a standard WordPress installation into a complete LMS environment. You can create courses, organize lessons, add quizzes and assignments, issue certificates, manage instructors and students, and monetize learning, all within WordPress.
MasterStudy LMS is available in both Free and Pro versions, making it accessible for beginners while still offering advanced tools for institutions and growing e-learning businesses.
Key Features of MasterStudy LMS
Rather than focusing on one or two LMS features, MasterStudy LMS is built to support the complete learning lifecycle, from course creation to student engagement and monetization. Below are the core feature areas that define how the plugin works in real-world use.
1. Course Creation & Management
MasterStudy offers a clean, drag-and-drop course builder that allows instructors to structure courses intuitively. You can create:
- Single standalone courses
- Multi-lesson programs
- Full training curricula
Courses can be organized into sections, reordered easily, and updated anytime. You can also control access rules, course duration, difficulty level, and enrollment limits.
Content can be released all at once or gradually using drip content, which helps keep students engaged and prevents content overload.
2. Multiple Lesson Formats
Lessons in MasterStudy are not limited to text. You can create:
- Text-based lessons
- Video lessons (self-hosted or embedded)
- Audio lessons
- PDF and downloadable resources
- Live lessons and webinars
Videos can be added from multiple sources, such as YouTube, Vimeo, embedded links, shortcodes, and Presto Player. This flexibility makes the plugin suitable for different teaching styles.
3. AI-Powered Course Creation
One of the modern features in MasterStudy LMS is its AI Lab. Using prompts, instructors can generate:
- Course outlines
- Lesson content
- Quizzes and questions
- Assignments
- Relevant images
This is particularly useful for educators who want to launch courses faster or need help structuring content professionally.
4. Quizzes & Assignments
MasterStudy supports advanced assessments that suit both academic and professional learning environments.
Quizzes support multiple question types, such as:
- Single choice
- Multiple choice
- True or false
- Fill-in-the-gap
- Item matching
- Image matching and image choice
Assignments can be created as:
- Essay submissions
- File uploads
Instructors can manually review submissions, provide feedback, and assign grades.
5. Student & Instructor Management
MasterStudy provides strong user management features:
- Student enrollment control
- Course progress tracking
- Instructor and co-instructor roles
- Public profiles for instructors and students
Students can view their progress, certificates, and completed courses, while instructors can track performance and engagement from their dashboards.
6. Monetization Options
The plugin supports multiple monetization models:
- One-time course purchases
- Subscription-based access
- Membership-based learning
- Course bundles
- Group or corporate training
With the WooCommerce integration, you can handle payments, taxes, and checkout customization smoothly.
7. Reports & Analytics
Built-in analytics help administrators track:
- Course performance
- Student progress
- Instructor activity
- Engagement trends
These insights are valuable for improving content quality and learner outcomes.
MasterStudy LMS Free vs Pro
MasterStudy LMS offers a genuinely usable free version, which is rare among LMS plugins.
Free Version – What You Get
The free version allows you to:
- Create unlimited courses and lessons
- Use the course builder and course player
- Add video lessons from multiple sources
- Create quizzes with multiple question types
- Manage students and instructors
- Enable reviews, ratings, and Q&A
- Use Gutenberg blocks and page builders
This version is ideal for:
- Individual tutors
- First-time course creators
- Small learning websites
- Testing LMS concepts before scaling
Pro Version – What Unlocks
The Pro version is designed for scalability and professional LMS needs. It adds:
- AI course creation tools
- Assignments and grading
- Drip content and prerequisites
- Certificate builder
- Live classes (Zoom, Google Meet)
- Subscriptions & Memberships
- Instructor payouts and commissions
- Track course progress and analytics
- Course bundles and group courses
- Advanced reports and analytics
- Email template and branding tools
- Custom course landing pages
- Upcoming course launches
- Free course trials
- Enable/disable tax rates
- Create coupons
For serious educators and institutions, Pro is where MasterStudy becomes a complete LMS ecosystem.
WP Ultimate CSV Importer Pro
Get Ultimate CSV/XML Importer to import data on WordPress faster, quicker and safer.
MasterStudy LMS Pricing
MasterStudy LMS follows a flexible pricing model that works well for both beginners and growing e-learning businesses. The plugin is available in two editions: Free and Pro, allowing users to start small and upgrade when they need advanced functionality.
The free version of MasterStudy LMS is available directly from the WordPress.org plugin repository. The free edition allows you to create unlimited courses and lessons, build quizzes, manage students, and run a functional learning platform without any upfront cost. This makes it a practical choice for tutors, coaches, or institutions that want to validate their online course idea before investing in premium features.
For users who need more advanced capabilities, MasterStudy LMS Pro is offered through paid plans with both annual and lifetime licensing options. The Pro version unlocks features such as different lesson types, assignments, certificates, drip content, live classes, Subscriptions & Memberships, advanced analytics, instructor payouts, and marketplace tools. Licensing is available for single-site and multi-site usage, making it suitable for both individual course creators and organizations managing multiple learning websites.
MasterStudy LMS offers strong value for money. Many advanced tools are included directly in the Pro package, reducing long-term costs and simplifying management. For users planning to build a serious or scalable LMS platform, the pricing feels justified and competitive.
How to Get Started with MasterStudy LMS
Getting started with MasterStudy LMS is straightforward, even if you’re new to LMS plugins. The plugin is designed to guide users through the setup process instead of leaving them to figure things out on their own.
To begin, log in to your WordPress admin dashboard and navigate to Plugins → Add New. Search for “MasterStudy LMS,” install the plugin, and activate it. Once activated, MasterStudy immediately launches an LMS setup wizard that guides you through the essential configuration steps. If you skip this step, you will be taken to the Settings page.
During the initial setup, you’ll be asked to select the business type (individual or marketplace) of your website and then set the appearance for Pages like Courses, Single Courses, Quizzes, and User Profiles. These pages act as the foundation of your learning platform.
After completing, you can either navigate to the new course creation or demo course import page (based on your choice).
Once you’ve done this, navigate to the settings page and configure essential settings like course settings, course player settings, quiz settings, currency, payment methods, enrollment rules, etc. If you’re using a page builder like Elementor or Gutenberg, MasterStudy integrates with them smoothly, allowing you to design LMS pages visually without custom coding. You can configure those pages inside Settings → LMS Pages.
Once these basics are configured, your LMS is technically ready. From here, everything revolves around creating courses and learning content.
For users who have tried other LMS plugins before, MasterStudy’s onboarding feels refreshingly guided instead of overwhelming.
How to Create a Course in MasterStudy LMS
Creating a course in MasterStudy LMS is the core workflow of the plugin. From your WordPress dashboard, go to MasterStudy → Courses → Add New Course. You’ll be taken to the course editor, where you start by adding the course title, url, category, level, and image. These details appear on the course page. It helps the audience to understand the course and helps them make a decision.
After that, you’ll move to the curriculum section. Here, you can create sections (modules) and organize lessons inside them. The drag-and-drop interface allows you to reorder content easily, which is helpful when refining course flow.
Finally, you configure pricing and access rules. You can make a course free, paid, subscription-based, or accessible via membership. If you’re using WooCommerce, payment handling integrates seamlessly. Once everything is set, publish the course, and it’s immediately available to students.
How to Create Lessons in MasterStudy LMS
Lessons are the building blocks of your course, and MasterStudy offers flexibility in how lessons are created and delivered.
Inside a course curriculum, click Add Lesson under any section. When creating a lesson, you’ll choose the lesson type, such as text, video, audio, slideshow, or live lesson. For video lessons, you can embed content from multiple sources such as YouTube, Vimeo, self-hosted MP4 files, or Presto Player.
Each lesson includes fields for lesson duration, description, and materials. You can attach downloadable files like PDFs, worksheets, or slides to support learning. If you want to give prospective students a preview of your teaching style, you can mark specific lessons as preview-accessible.
MasterStudy also supports lesson discussions, allowing students to interact with instructors directly within the lesson. This creates a classroom-like experience and encourages engagement beyond passive watching.
Lessons can be rearranged at any time using drag-and-drop, making it easy to refine the learning journey as your course evolves.
WP Ultimate CSV Importer Pro
Get Ultimate CSV/XML Importer to import data on WordPress faster, quicker and safer.
How to Create Quizzes in MasterStudy LMS
Quizzes in MasterStudy LMS are designed to test understanding, reinforce learning, and track progress accurately.
To create a quiz, navigate to MasterStudy LMS → Quizzes → Add New Quiz. Start by giving the quiz a clear title and description that explains its purpose. You can then begin adding questions using the built-in quiz builder.
MasterStudy supports a wide range of question types, including single choice, multiple choice, true/false, fill-in-the-gap, item matching, image matching, and image-based selection. Each question can be assigned a score, and you can define passing criteria for the quiz.
You can also configure quiz settings such as time limits, number of attempts, and whether points are deducted on retries. Questions can be randomized to prevent memorization, which is particularly useful for assessments and certifications.
Once created, quizzes can be attached to lessons or placed at the end of course sections. Quiz results are automatically recorded and reflected in student progress reports.
How to Create Questions in MasterStudy LMS
Questions are the foundation of quizzes in MasterStudy LMS, and it helps instructors assess how well learners understand a topic. Instead of relying only on course completion, questions allow you to evaluate knowledge in a structured and meaningful way.
To create a question, open your course or lesson and choose Add Question from the quiz section. You can directly add questions from the WordPress dashboard by simply navigating to MasterStudy LMS → Questions → Add New Question. MasterStudy LMS supports multiple question types, including multiple choice, true or false, single answer, and descriptive questions. This flexibility makes it easy to test both factual understanding and conceptual clarity.
Each question can be customized with clear instructions, answer options, and correct responses. You can also assign scores to individual questions, control how answers are evaluated, and decide whether learners can retry or review their responses after submission.
Once added to a quiz, questions are automatically included in the assessment flow. Instructors can review quiz results from the dashboard, track student performance, and identify areas where learners may need additional guidance.
Well-structured questions make learning more interactive and measurable, helping instructors deliver effective courses while giving learners a clear sense of progress and understanding.
Who Should Use MasterStudy LMS?
Because of its flexibility, MasterStudy LMS fits multiple learning models rather than a single teaching style.
MasterStudy LMS is well-suited for a wide range of learning models. Individual tutors and coaches can use it to sell structured online courses without relying on third-party platforms. Training centers and coaching institutes can manage multiple instructors, courses, and student batches efficiently.
Educational institutions such as schools and colleges can use MasterStudy to support blended or fully online learning. The gradebook, assignments, and progress tracking features align well with academic needs.
It’s also a strong option for entrepreneurs building online course marketplaces. With instructor commissions, course bundles, subscriptions, and group access, MasterStudy supports scalable learning businesses.
Who Should NOT Use MasterStudy LMS?
While MasterStudy LMS is flexible, it isn’t the right solution for every scenario. If you’re looking for an extremely lightweight solution with only basic video hosting, the plugin may feel more complex than necessary.
Users who prefer fully hosted SaaS platforms and don’t want to manage WordPress hosting, updates, or performance optimization may also find MasterStudy less suitable.
Additionally, if your use case doesn’t require structured courses, quizzes, assignments, or student tracking, a full LMS may be more than you need.
Pros & Cons of MasterStudy LMS
Pros
- Feature-rich even in the free version
- AI-powered content creation
- Flexible monetization
- Strong instructor and student management
- Marketplace-ready
- Competitive pricing
Cons
- Advanced features require Pro
- Initial learning curve for beginners
- Performance depends on hosting quality
WP Ultimate CSV Importer Pro
Get Ultimate CSV/XML Importer to import data on WordPress faster, quicker and safer.
Support, Documentation & Updates
MasterStudy LMS provides solid support and learning resources for users at all levels. The plugin includes detailed written documentation that covers installation, configuration, and advanced features. Step-by-step video tutorials are also available, making it easier for visual learners to follow along.
Pro users receive priority support, which is especially important for businesses running live courses or marketplaces. The development team releases regular updates to improve performance, compatibility, and security.
Overall, MasterStudy shows active development and long-term commitment, which is crucial when choosing an LMS plugin for a serious project.
Frequently Asked Questions
1. Is MasterStudy LMS free?
Yes, MasterStudy LMS offers a free version available in the WordPress plugin repository. The free version allows you to create unlimited courses and lessons, add quizzes, and manage students and instructors from your WordPress dashboard. However, advanced features like assignments, certificates, drip content, subscriptions, and detailed analytics are available in the Pro version.
2. What is the difference between MasterStudy LMS Free and Pro?
The free version of MasterStudy LMS includes essential LMS features such as course creation, lesson management, quizzes, and basic student management. The Pro version adds advanced functionality including assignments, certificates, drip content, subscriptions, live classes, AI-powered course creation, instructor payouts, and advanced reporting. The Pro version is better suited for scalable e-learning platforms and professional course businesses.
3. Can you sell online courses with MasterStudy LMS?
Yes, MasterStudy LMS allows you to sell online courses directly from your WordPress website. You can offer courses as one-time purchases, subscription-based access, memberships, or course bundles. With WooCommerce integration, you can manage payments, taxes, checkout pages, and payment gateways seamlessly.
4. Is MasterStudy LMS suitable for beginners?
MasterStudy LMS is beginner-friendly and includes a setup wizard that guides users through the initial configuration. The drag-and-drop course builder makes it easy to structure courses, lessons, and quizzes. While beginners can start creating courses quickly, learning some advanced features may take time as the platform offers many customization options.
5. Is MasterStudy LMS a good alternative to LearnDash?
MasterStudy LMS can be a strong alternative to LearnDash, especially for users looking for a feature-rich LMS with a usable free version. It includes built-in tools for course creation, quizzes, instructor management, and monetization. However, LearnDash is often preferred by users who need a highly mature LMS ecosystem with extensive third-party integrations.
Final Verdict: Is MasterStudy LMS Worth It?
Yes. MasterStudy LMS is a powerful, scalable WordPress LMS plugin that balances usability with advanced functionality. It’s especially suitable for educators and businesses that want full control over their learning platform without recurring SaaS fees.
If you’re serious about creating, managing, and monetizing online courses on WordPress, MasterStudy LMS is absolutely worth considering.
WordPress Firewall Plugins: Wordfence vs Sucuri
2 Mar 2026, 4:18 pm
Table of Contents
WordPress websites are one of the most common targets for hackers, bots, and automated attacks because of their popularity and open ecosystem. Even small blogs and business sites face risks like brute force login attempts, malware injections, and spam traffic. Basic security settings alone are not enough to stop these threats effectively.
That is where WordPress firewall plugins play a major role. A firewall acts as a protective barrier between your website and incoming traffic, filtering malicious requests before they can cause damage. Among many available tools, two names are compared most often: Wordfence and Sucuri. In this guide, we will compare both plugins in detail to help you choose the right firewall solution.
Choosing the right firewall plugin is not just about installing security software; it is about understanding how different protection models work. Wordfence and Sucuri follow different firewall architectures, offer distinct features, and vary in performance impact and pricing. By analyzing their strengths, limitations, and use cases, you can make an informed decision that aligns with your website’s size, traffic, and security requirements.
Overview of Wordfence Security Plugin
Wordfence is one of the most widely used WordPress security plugins. It provides firewall protection, malware scanning, login security, and real-time threat monitoring directly inside your WordPress dashboard. It is known for its detailed alerts and strong control options for administrators.
Wordfence uses an endpoint firewall model, meaning it runs within your WordPress environment. This allows it to deeply inspect requests and files but can also use more server resources compared to cloud-based solutions. It is popular among site owners who want detailed visibility and control over security events.
Key Features of Wordfence
Wordfence includes a web application firewall, malware scanner, login protection tools, and live traffic monitoring. It also provides rule updates and threat intelligence feeds. Users can block IP addresses, countries, or suspicious behavior patterns directly from the dashboard.
Another strong feature is its alert system. Site owners receive notifications about file changes, plugin vulnerabilities, and suspicious login attempts. This makes it easier to react quickly to potential threats.
Wordfence Firewall Type
Wordfence uses an endpoint firewall. This means the firewall runs on your server after WordPress loads but before most plugins execute. It can analyze requests with high context because it understands WordPress structure and user roles.
However, since filtering happens on the server itself, heavy attack traffic can still consume server resources before being blocked. That is the main architectural trade-off of endpoint firewalls.
Malware Scanning Capabilities
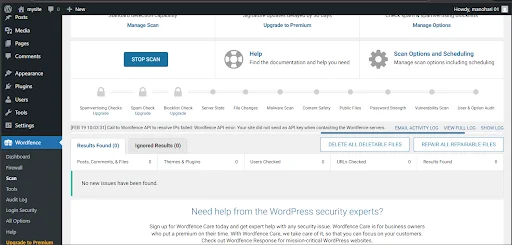
Wordfence includes a built-in malware scanner that checks core files, themes, and plugins for suspicious code and known malware signatures. It also compares your files with official WordPress repository versions to detect modifications.
The scanner can be scheduled and run automatically. Detailed scan reports help identify which files are risky and what action should be taken.
Login & Brute Force Protection
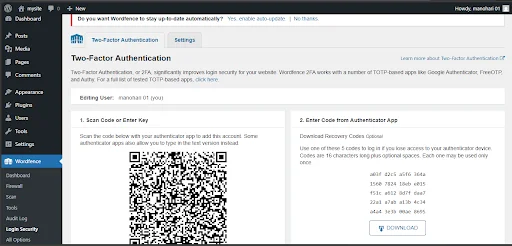
Wordfence offers strong login security controls such as brute force protection, login attempt limits, CAPTCHA support, and two-factor authentication. You can enforce strong passwords and lock out repeated failed login attempts.
These features are especially useful for sites that face repeated bot login attacks.
Overview of Sucuri Security Plugin
Sucuri Security is a website security platform that offers firewall protection, malware monitoring, cleanup services, and performance optimization. Unlike endpoint plugins, Sucuri is best known for its cloud-based firewall model.
Sucuri’s firewall sits between visitors and your server at the DNS level. Traffic is filtered in the cloud before it reaches your hosting environment. This reduces server load and blocks many threats earlier in the request lifecycle.
Key Features of Sucuri
Sucuri provides a cloud firewall, malware monitoring, blacklist monitoring, uptime tracking, and professional cleanup services in paid plans. It also includes virtual patching to protect against known vulnerabilities even before you update plugins.
It focuses on prevention plus post-hack recovery support, which is valuable for business websites.
Cloud-Based Firewall
Sucuri’s firewall is cloud-based, meaning traffic is routed through Sucuri’s network first. Malicious bots, exploit attempts, and DDoS patterns are filtered before they reach your server.
This approach reduces direct load on your hosting and can improve stability during attack spikes.
Malware Detection & Cleanup
Sucuri monitors website integrity and detects malware, defacements, and blacklist status. In paid plans, it also includes professional malware cleanup handled by their security team.
This is useful for site owners who prefer managed security response instead of handling cleanup themselves.
CDN & Performance Benefits
Sucuri includes a built-in content delivery layer along with its firewall. Cached content can be served from edge locations, which may improve loading speed for global visitors.
Because filtering happens before requests hit your server, performance often remains more stable under attack conditions.
Firewall Architecture Difference (Wordfence vs Sucuri)
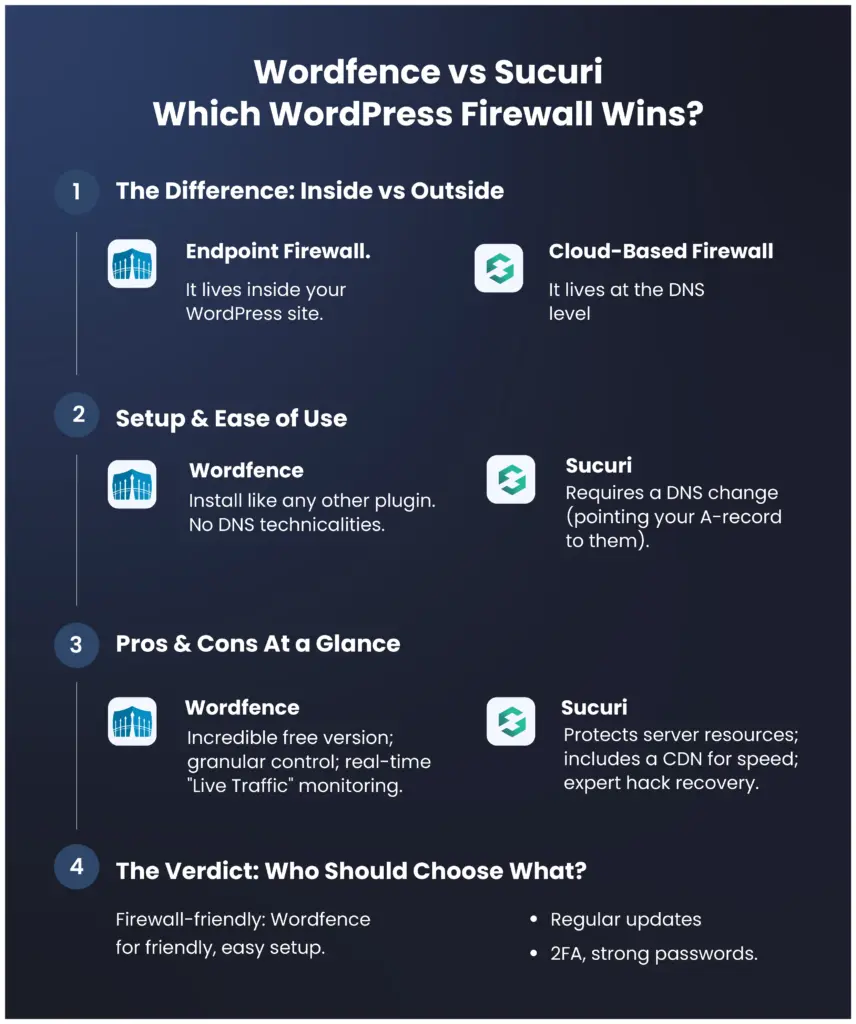
The biggest difference between Wordfence and Sucuri lies in how their firewalls are built and where traffic is filtered. Wordfence uses an endpoint firewall that runs directly inside your WordPress installation. This means every visitor request first reaches your server and then gets inspected and filtered by the plugin. It gives deep visibility and WordPress-aware filtering, but it still consumes server resources before blocking threats.
Sucuri uses a cloud-based firewall that sits in front of your website at the DNS and network level. Traffic passes through Sucuri’s security layer before it ever reaches your hosting server. Malicious requests are stopped earlier, which reduces server load and improves resilience during high-volume attacks. The architectural difference directly affects performance, scalability, and attack handling.
Feature-by-Feature Comparison
Both plugins provide strong security, but their feature focus and delivery models differ. Comparing them feature by feature helps in selecting the right tool based on your site’s needs rather than just popularity.
Firewall Protection
Wordfence provides application-level firewall protection with rule sets that are frequently updated. It understands WordPress context and can block threats based on plugin and theme vulnerabilities. Protection is detailed but happens on the server side.
Sucuri provides network-level firewall protection through its cloud gateway. It blocks malicious traffic patterns, exploit payloads, and suspicious bots before they reach WordPress. This gives earlier filtering and reduces exposure surface.
Malware Scanning
Wordfence includes a built-in malware scanner that checks files, compares core integrity, and detects suspicious code patterns. Scans can be automated and are visible directly inside the dashboard with detailed reports.
Sucuri focuses more on external monitoring and server-side integrity checks. Deep malware cleanup is included mainly in paid plans, where their team assists with removal and recovery.
DDoS Protection
Wordfence can block many malicious IPs and rate-limit abusive traffic, but since filtering occurs on your server, very large DDoS floods can still affect server resources.
Sucuri’s cloud firewall is better positioned for DDoS mitigation because traffic is absorbed and filtered in their network layer. This makes it more suitable for sites that expect high traffic or are frequent attack targets.
Bot & Brute Force Blocking
Wordfence is very strong in login and brute force protection. It allows login rate limits, lockouts, CAPTCHA, and two-factor authentication. You get granular control over login behavior and IP blocking.
Sucuri blocks malicious bots at the network edge and reduces automated attack traffic before it hits login pages. While it has login protection features, its strength is broader traffic filtering rather than only login control.
CDN Support
Wordfence does not include a built-in CDN. You need to use a separate CDN provider if required.
Sucuri includes CDN-style acceleration as part of its firewall platform. Static content can be cached and delivered faster from distributed locations.
Website Cleanup Services
Wordfence provides malware detection and guidance, but full cleanup assistance is limited unless you purchase additional services.
Sucuri includes professional cleanup and incident response in its paid plans. Their security team handles malware removal and blacklist recovery, which is valuable for non-technical site owners.
Performance Impact Comparison
Performance impact depends mainly on where filtering happens. Wordfence runs inside WordPress, so scanning and firewall checks use your server CPU and memory. On smaller hosting plans, heavy scans or attack spikes can slow down the site.
Sucuri filters traffic in the cloud before requests reach your server. This reduces server workload and can keep performance more stable during attack periods. Its caching layer can also improve load times for repeat visitors. For resource-limited hosting, cloud filtering generally has a lighter footprint.
CDN & Performance Benefits
Sucuri includes a built-in content delivery layer along with its firewall. Cached content can be served from edge locations, which may improve loading speed for global visitors.
Because filtering happens before requests hit your server, performance often remains more stable under attack conditions.
Ease of Setup and User Interface
When choosing a WordPress firewall plugin, ease of setup and user interface play a significant role, especially for beginners and small business owners. A powerful security plugin is only useful if it can be configured correctly. Both Wordfence and Sucuri offer guided setup processes, but the experience differs because of their firewall architecture. Wordfence works directly inside WordPress, while Sucuri’s full protection requires DNS-level configuration. Understanding how each plugin is installed and managed helps users decide which solution matches their technical comfort level.
Wordfence Setup Experience
Setting up Wordfence is relatively simple because it functions like a traditional WordPress plugin. It can be installed directly from the WordPress plugin directory, activated within minutes, and configured using its built-in setup wizard. The wizard guides users through firewall optimization, email alert configuration, and scan scheduling. Since Wordfence runs inside the WordPress environment, there is no need to modify domain DNS settings, which makes the initial setup more beginner-friendly.
The dashboard provides detailed options, including live traffic monitoring, firewall rules, and scan reports. While the interface may look technical at first, it offers extensive control for users who want deeper insight into website activity. For site owners who prefer direct access to security data within the WordPress admin panel, Wordfence delivers a powerful and information-rich interface.
Sucuri Setup Experience
Setting up Sucuri involves two parts: installing the WordPress plugin and activating the cloud-based firewall. Installing the plugin itself is straightforward, similar to any other WordPress plugin. However, enabling the full firewall requires updating the domain’s DNS settings to route traffic through Sucuri’s security network. This additional step may feel slightly technical for beginners, but detailed documentation and support are provided to assist users through the process.
Once DNS configuration is complete, most of the security filtering happens outside of WordPress at the network level. This reduces the need for constant adjustments within the dashboard. The interface is generally cleaner and more simplified compared to Wordfence, focusing on security status, monitoring results, and firewall performance rather than detailed traffic logs.
Dashboard & Alerts Comparison
Wordfence provides a highly detailed dashboard with real-time traffic views, attack statistics, file change detection, and granular security alerts. It is designed for users who want complete visibility into how their website is being accessed and protected. The live traffic feature, in particular, allows administrators to see login attempts, blocked IP addresses, and suspicious behavior instantly.
Sucuri’s dashboard, on the other hand, presents a more streamlined overview of website security. It highlights firewall status, blacklist monitoring, uptime, and general threat levels without overwhelming users with too much technical data. Alerts are structured around overall security health rather than real-time granular logs. For users who prefer a simpler monitoring approach with cloud-managed filtering, Sucuri offers a cleaner experience.
Pricing Comparison
Pricing is an important factor when selecting a WordPress firewall plugin, especially for website owners working within a budget. While both Wordfence and Sucuri offer free versions, the real differences appear in their premium plans. The type of firewall architecture, support level, and additional services influence the overall cost. Some users may only need basic protection, while others require advanced security and DDoS mitigation. Understanding what each pricing tier includes helps in making a practical and cost-effective decision.
Wordfence Free vs Premium
Wordfence offers one of the strongest free versions among WordPress security plugins. It includes firewall protection, malware scanning, and brute force login security, which is sufficient for many small websites. However, firewall rule updates in the free version may not be real-time.
The premium version provides immediate firewall rule updates, country blocking, advanced threat defense feeds, and priority customer support. This ensures faster protection against new vulnerabilities and emerging threats. It is suitable for websites that require stronger and more responsive security measures.
Sucuri Free vs Paid Plans
Sucuri’s free plugin focuses mainly on monitoring, file integrity checks, and security notifications. It helps detect potential issues but does not include the cloud-based firewall feature. For full protection, users must upgrade to a paid plan.
Sucuri’s paid plans include the website application firewall, DDoS protection, CDN performance optimization, and professional malware cleanup services. These features make it more suitable for business and high-traffic websites. The pricing reflects its cloud-based and managed security model.
Value for Money Analysis
Wordfence is generally more budget-friendly and works well for bloggers and small business owners who need strong internal security at a lower cost. It provides good value without requiring DNS configuration or external routing.
Sucuri, while higher in pricing, offers additional benefits such as cloud-level filtering and professional incident response. For eCommerce stores or websites where downtime directly affects revenue, the higher investment may provide better long-term security and stability.
Pros and Cons
Every security plugin has its strengths and limitations, and understanding both sides helps in making a practical decision. Wordfence and Sucuri are powerful WordPress firewall solutions, but they differ in architecture, pricing, and overall approach. Some users may prefer detailed server-level control, while others may value cloud-based filtering and managed services. Evaluating the pros and cons allows website owners to match the plugin with their technical needs, traffic volume, and budget. A balanced comparison ensures that the decision is based on real requirements rather than popularity alone.
Wordfence Pros and Cons
Wordfence offers strong endpoint firewall protection, a detailed malware scanner, and excellent brute force login security. Its free version is feature-rich and suitable for small to medium websites. The dashboard provides deep visibility into live traffic and security events, which is useful for administrators who want control.
However, since Wordfence runs on the server, it consumes hosting resources during scans and heavy traffic periods. It does not include built-in CDN support, and large-scale DDoS mitigation is limited compared to cloud-based firewalls.
Sucuri Pros and Cons
Sucuri provides a cloud-based firewall that filters malicious traffic before it reaches your server, reducing load and improving stability. It includes DDoS protection, CDN performance benefits, and professional malware cleanup in paid plans. This makes it ideal for business-critical and high-traffic websites.
On the downside, full protection requires DNS configuration, which may feel technical for beginners. Its pricing is higher than many endpoint plugins, and real-time granular traffic data inside WordPress is more limited compared to Wordfence.
Which Plugin is Best for Which Type of Website?
Choosing the right firewall plugin depends on your website’s purpose, traffic volume, and security needs. Wordfence is well suited for blogs, personal sites, and small business websites that want strong internal protection without extra configuration. It offers detailed monitoring and firewall controls directly inside the WordPress dashboard, making it a good choice for users who prefer hands-on visibility and control over security events. For sites on shared hosting or with limited resources, the simplicity of Wordfence can be an advantage.
On the other hand, Sucuri excels for high-traffic websites, eCommerce stores, and business-critical platforms where uptime and performance are priorities. Its cloud-based firewall filters malicious traffic before it reaches the server, reducing load and improving resilience against DDoS attacks. The inclusion of CDN benefits and managed cleanup services makes Sucuri more suitable for websites that require professional support and robust external protection. Understanding your site’s goals and threat exposure will help you choose the plugin that aligns with your security requirements.
When to Choose Wordfence
You should choose Wordfence if you prefer a plugin-based security solution that works entirely within your WordPress dashboard. It is ideal for bloggers, small business websites, and users who want strong firewall protection without modifying DNS settings. Wordfence offers detailed live traffic monitoring and granular login security controls, which are useful for hands-on administrators. If budget is a concern, its free version provides solid baseline protection. It is best suited for websites that want internal visibility and direct control over security configurations.
When to Choose Sucuri
Sucuri is a better choice when your website requires cloud-level filtering and stronger DDoS mitigation. It is particularly suitable for eCommerce stores, high-traffic websites, and business-critical platforms where downtime can directly impact revenue. Because it filters traffic before it reaches your server, it helps reduce hosting load and maintain performance stability. Sucuri also includes professional malware cleanup in its paid plans, which is valuable for non-technical users. It works well for websites that prioritize external, network-level protection over internal monitoring.
Best Practices After Installing a Firewall Plugin
Installing a firewall plugin is only the first step in securing your WordPress website. You should regularly update WordPress core, themes, and plugins to reduce vulnerability risks. Enabling two-factor authentication and using strong passwords adds an extra layer of login protection. It is also important to review security logs and scan reports periodically instead of ignoring alerts. Proper configuration and continuous monitoring ensure that your firewall remains effective against evolving threats.
Final Verdict
Both Wordfence and Sucuri are reliable WordPress firewall solutions, but they serve slightly different purposes. Wordfence provides strong endpoint protection with detailed monitoring at a lower cost. Sucuri delivers cloud-based filtering, better DDoS resilience, and managed cleanup services for higher-risk websites. The best choice depends on your hosting environment, traffic volume, and security expectations. Understanding the architectural difference is the key to making the right decision.
Frequently Asked Questions (FAQ)
1. What is a WordPress Firewall Plugin?
A WordPress firewall plugin is a security tool that protects your website by filtering incoming traffic and blocking malicious requests. It prevents hackers, bots, and exploit attempts from accessing your site. Firewalls act as a protective barrier between your website and potential threats. They help reduce risks such as malware infections, brute force attacks, and unauthorized access.
2. What is the difference between Wordfence and Sucuri?
The main difference lies in their firewall architecture. Wordfence uses an endpoint firewall that runs inside your WordPress installation, filtering traffic after it reaches your server. Sucuri uses a cloud-based firewall that filters traffic before it reaches your hosting server. This architectural difference affects performance, DDoS protection strength, and server resource usage.
3. Is Wordfence the best WordPress security plugin?
Wordfence is one of the most popular and powerful WordPress security plugins available. It offers strong firewall protection, malware scanning, and login security features. However, whether it is the “best” depends on your website’s size, traffic level, and security requirements. For many small to medium websites, Wordfence provides excellent protection.
4. What is better than Wordfence?
There is no universal “better” plugin, but cloud-based solutions like Sucuri may offer stronger DDoS mitigation and reduced server load. The better option depends on your specific needs. If you require network-level filtering and managed cleanup services, a cloud firewall may be more suitable. If you prefer detailed internal monitoring, Wordfence may be the better fit.
5. Is the Sucuri website firewall legit?
Yes, Sucuri is a well-established website security provider known for its cloud-based firewall and malware cleanup services. Many businesses use Sucuri to protect their websites from attacks and performance disruptions. Its firewall filters traffic at the network level and provides additional benefits such as CDN performance support.
Conclusion
Website security should never be treated as optional, especially for WordPress websites that frequently face automated attacks. Choosing between Wordfence and Sucuri depends on whether you prefer internal plugin-level control or external cloud-level protection. Both plugins can significantly improve your website’s security posture when configured properly. By evaluating your website’s size, risk exposure, and performance needs, you can select the firewall solution that aligns best with your long-term goals.
WordPress CSV Import: Ultimate Guide for Beginners
2 Mar 2026, 11:46 am
Table of Contents
CSV import is one of the most common requirements in WordPress websites, especially when you need to upload large amounts of data like posts, products, users, WooCommerce products, or custom content. Instead of adding data manually, CSV import allows you to upload everything quickly, accurately, and in a structured way.
Whether you manage a blog, business website, or e-commerce store, handling bulk data efficiently is important. A reliable CSV import process saves time, reduces manual work, and prevents data errors like duplication, missing fields, or formatting issues. This is where a dedicated import solution can make the process much easier and safer.
Tools like the WP Ultimate CSV Importer plugin help simplify bulk data import with structured mapping, automation options, and support for different post types. Using the right plugin ensures your CSV import process is smooth, scalable, and beginner-friendly without complex coding.
In this guide, you will learn a step-by-step approach to WordPress CSV import, what you need before starting, how to choose the right method, common mistakes to avoid, and how to import data safely using a reliable plugin-based workflow.
Key Takeaways
- CSV import helps upload bulk data quickly into WordPress
- Reduces manual work and prevents data errors
- Essential for posts, products, users, and custom fields
- Using a dedicated importer plugin makes the process easier
- Proper planning and testing ensure a successful import
Requirements and Prerequisites for WordPress CSV Import
Before starting the CSV import process in WordPress, make sure you have admin access to your dashboard, a properly formatted CSV file, and clarity on what you are importing, such as posts, products, users, or custom post types. Taking a full site backup is recommended to prevent data loss if something goes wrong.
Keep your CSV clean with clear headers, consistent formats, and correct image URLs. WP Ultimate CSV Importer simplifies field mapping and bulk imports. Always test with a small sample file before running the full import to avoid large-scale issues.
WordPress CSV Import Walkthrough: Step-by-Step Process
Purchase, Install, and Activate WP Ultimate CSV Importer
Before you can start importing CSV files into WordPress, you need the WP Ultimate CSV Importer plugin by Smackcoders. First, visit the Smackcoders website and log in to your account. Navigate to the WP Ultimate CSV Importer product page, select the plan that fits your requirements, whether for a single site or a multisite installation, and complete the purchase using your preferred payment method. After completing the purchase, you will receive a download link for the plugin ZIP file.
Once you have the plugin file, log in to your WordPress admin dashboard. Go to Plugins in the WordPress dashboard, then click Add New, and choose the Upload Plugin, select the downloaded ZIP file, and click Install Now. After the installation finishes, activate the plugin. You should now see WP Ultimate CSV Importer in your WordPress sidebar, ready to handle CSV imports efficiently and safely.
Upload CSV File
Once WP Ultimate CSV Importer is installed and activated, the next step is to upload your CSV file. To upload, navigate to the WP Ultimate CSV Importer menu in your WordPress dashboard and select Upload CSV. Choose your CSV file from your computer, and the plugin will analyze its structure.
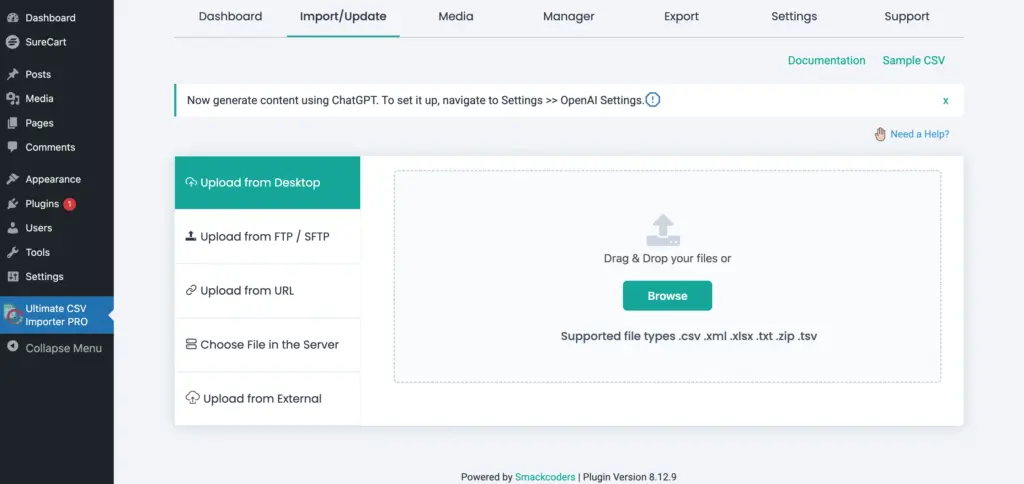
After this stage, the plugin will prompt you to select whether this is a Fresh Import (for new data) or an Update Content import (to update existing posts, products, or users). You will also need to select the Import Type, such as posts, pages, WooCommerce products, users, or custom post types, depending on the content you are importing.
Starting with a small sample file is recommended to test that all options are working correctly before importing a large dataset. This ensures that the correct import mode and content type are applied and avoids accidental overwriting or duplication of existing content.
Note
Our WP Ultimate CSV Importer plugin not only supports CSV files, but also supports XML, TXT, XLS, and XLSX file formats.
Field Mapping
After uploading your CSV file, the next step is field mapping, which ensures that each column in your CSV corresponds correctly to the relevant WordPress field, such as post title, content, categories, custom fields, or product SKU. Accurate mapping prevents missing data or incorrect entries during import.
WP Ultimate CSV Importer provides two modes for mapping: Advanced Mode and Drag & Drop Mode. Advanced Mode is for complex imports, allowing you to handle multiple custom fields, taxonomies, serialized data, and default values for missing fields. This mode is ideal for WooCommerce products with variations, multisite setups, or custom post types with unique metadata.
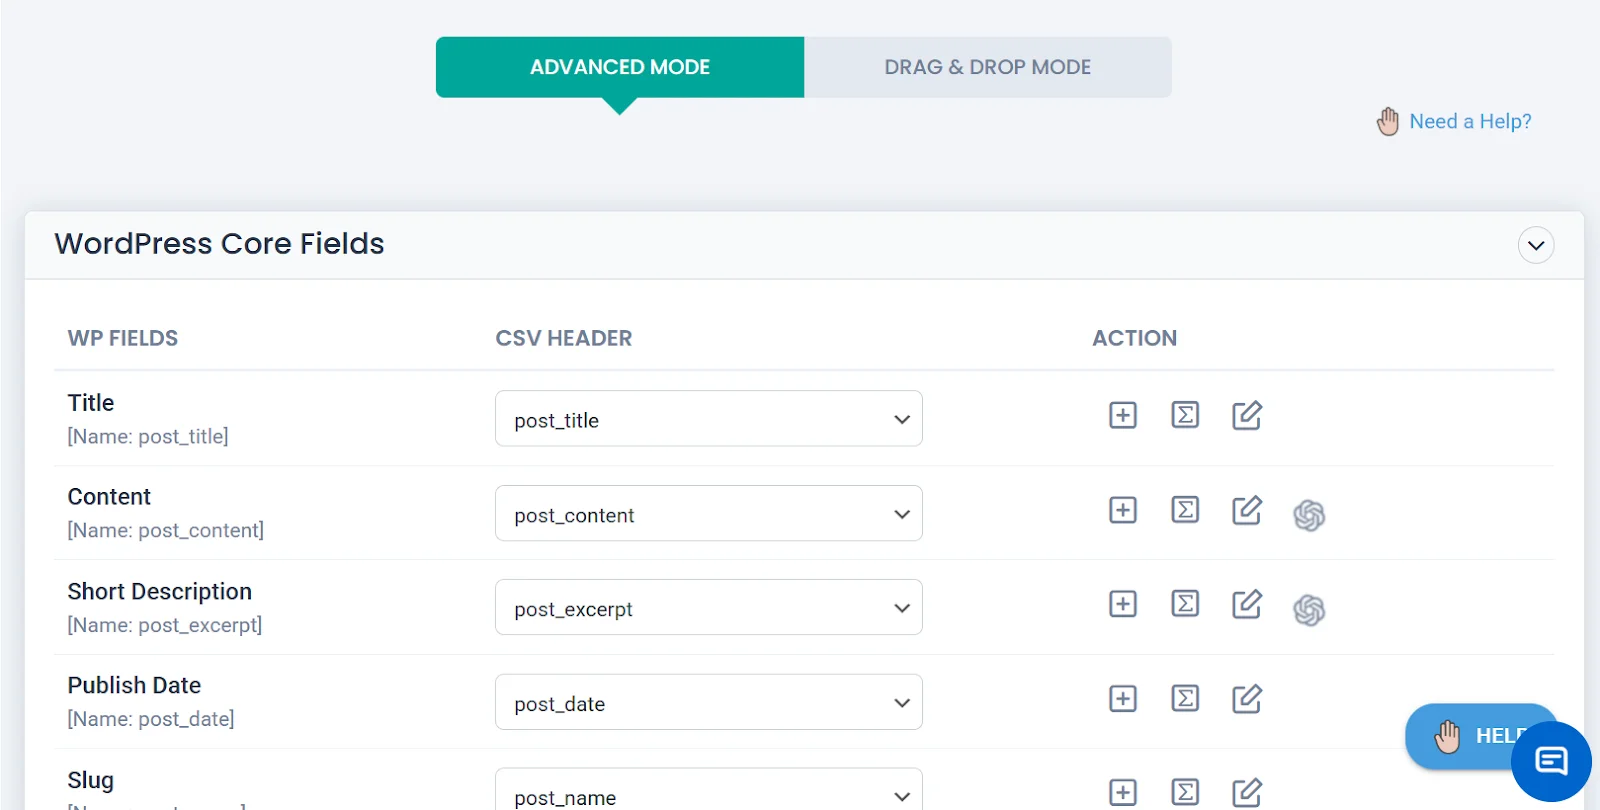
The Drag & Drop Mode offers a simple visual interface where you can match CSV columns to WordPress fields by dragging and dropping. This mode is perfect for beginners or for standard imports like posts, pages, and products, making it easier to map fields quickly and accurately.
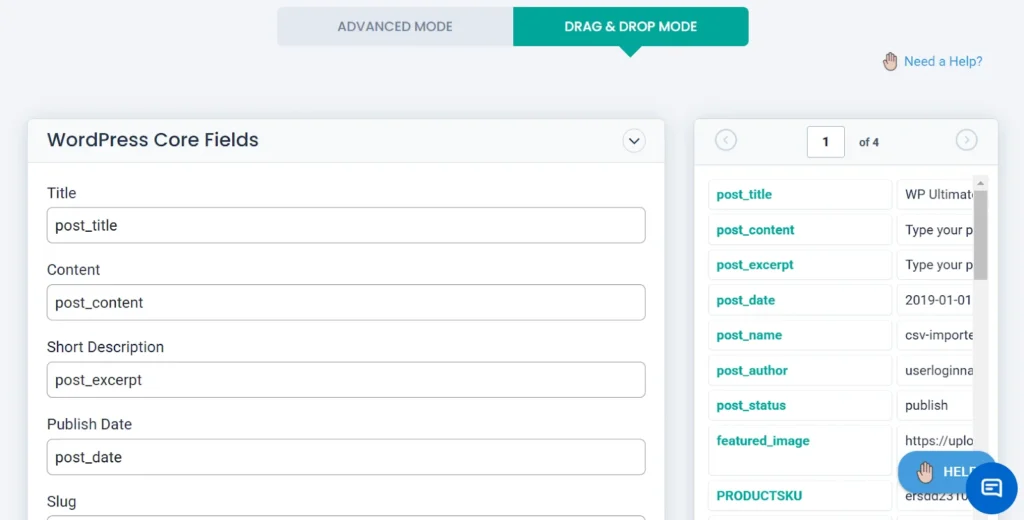
Using the Manage & Filter Option After Mapping
After you finish mapping the fields, scroll down, and you will see the Manage & Filter section. In that section, you can choose which posts should be imported. If you want only published posts to be imported, select the correct field in Element (for blog posts, choose post_status). Then, in Rule, select Equals, and in Value, type publish. Now only the posts with publish status will be imported.
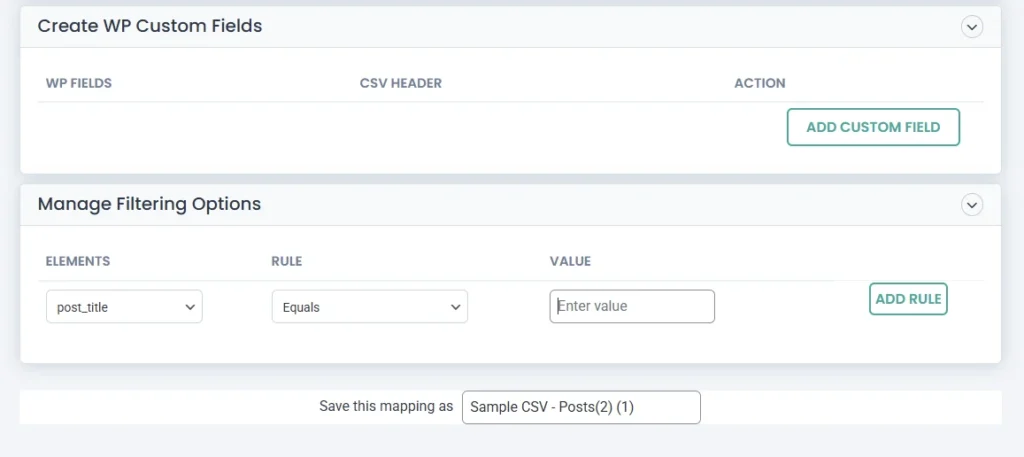
The same method works for WooCommerce products. If you want to import only products below a certain price, in Element, choose the price field (for WooCommerce products, select regular_price). In Rule, choose Less than, and in Value, enter the amount (for example, 500). Then only the products priced below 500 will be imported.
After mapping the fields using either mode, you can optionally save your mapping as a template to reuse it in future imports. This ensures consistency and saves time when importing similar CSV files repeatedly.
Configure Import Options
After mapping the fields, the next step is to configure the import options. WP Ultimate CSV Importer allows you to control how your CSV data is imported into WordPress to ensure accuracy and prevent issues like duplicates or missing content.
At this stage, you can choose to skip existing records, update existing content, or create new entries only, depending on your import goal. You can also set options for handling images, custom fields, and taxonomy assignments, ensuring that media files are linked correctly and metadata is imported without errors. Additionally, you can define the number of records to process per batch, which is useful for large CSV files to avoid server timeouts or memory issues.
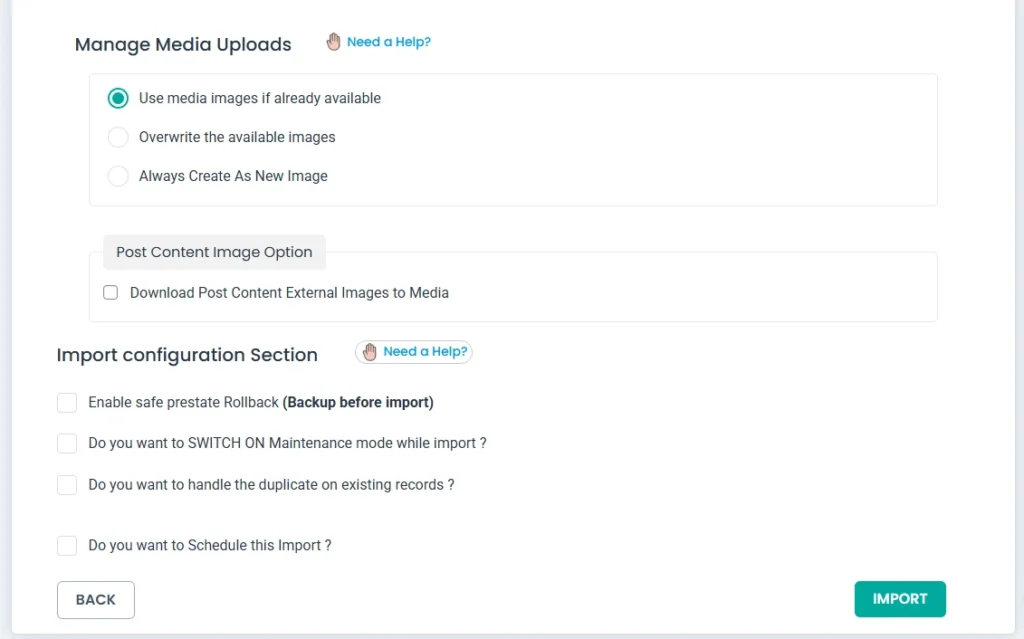
Once the options are configured, you can run the import. WP Ultimate CSV Importer will process your CSV according to the selected settings, creating or updating content in WordPress. After the import completes, always review your site to confirm that posts, products, users, or custom content have been imported correctly and that images and metadata appear as expected.
Run Import & Verify Results
After configuring the import options, you can run the CSV import by clicking the Import button in WP Ultimate CSV Importer. The plugin will process the CSV file according to your settings, creating or updating posts, pages, WooCommerce products, users, or custom post types.
Once the import is complete, verify the results by checking that all content appears correctly, including titles, descriptions, categories, custom fields, and images. For large datasets, it’s a good idea to review a few entries first to ensure the import worked as expected. This step ensures accuracy and prevents data errors on your site.
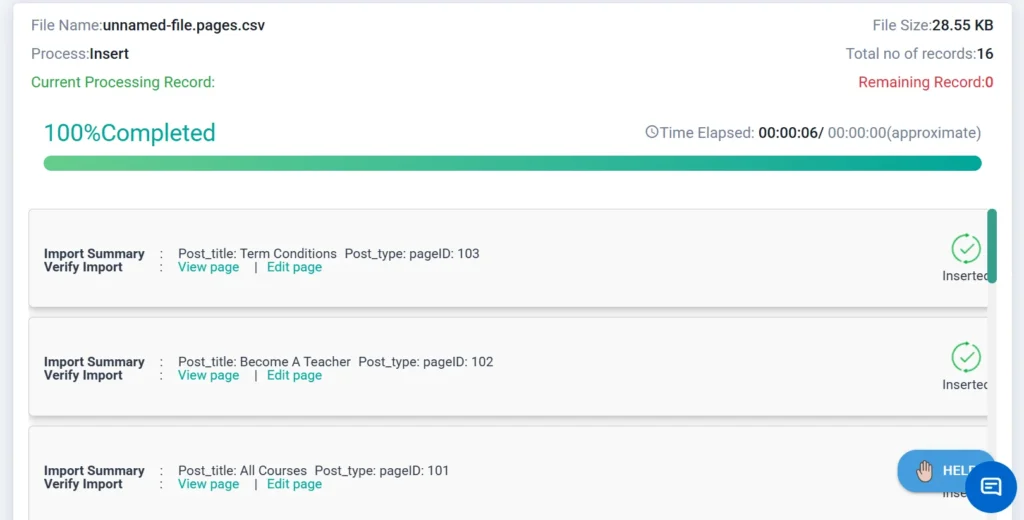
Import Everything with Our Plugin
With the help of WP Ultimate CSV Importer plugin, you can go beyond basic post imports and manage complex data effortlessly. Our solution supports multiple data types, making bulk imports faster, structured, and reliable.
- Import Taxonomies – Categories, tags, and custom taxonomies with accurate mapping.
- Import Custom Fields – Meta fields and advanced custom field data without breaking structure.
- Import Images – Import images using URLs and automatically attach them to the correct posts or products.
- Import eCommerce Data – Products, SKUs, pricing, stock details, and store data into WooCommerce.
- Import Any Custom Post Types – Seamlessly import data into any custom post types available on your website.
- Import Comments – Bulk import comments and map them correctly to posts.
- Import Users – Create or update users in bulk with roles and profile details.
Tips & Best Practices for CSV Import
When importing CSV files, always test on a staging site first to avoid mistakes on your live site. Make sure your CSV is clean, with clear headers and correct formats for dates, prices, and URLs.
Be careful with large files; they can time out or overload the server. WP Ultimate CSV Importer allows importing in small batches to prevent issues. Advanced Mode is recommended only if your CSV has custom fields or complex data.
After the import, check your site to ensure all posts, products, users, or custom content appear correctly. Fix any missing fields or errors before running the full import.
Frequently Asked Questions (FAQ)
1. How to import CSV into WordPress?
To import a CSV file into WordPress, go to your dashboard and navigate to the import section (or use a plugin like WP Ultimate CSV Importer). Upload your CSV file, map the file columns to the correct WordPress fields (such as title, content, category, etc.), and run the import. After completion, review the imported data to ensure everything is correctly assigned and formatted.
2. Can I import WooCommerce products using CSV?
Yes, you can import products, pricing, SKUs, and stock details into WooCommerce using a properly formatted CSV file.
3. Can I update existing content using CSV import?
Yes, you can update existing posts, products, or users by matching them using ID, slug, or unique fields during the import process.
4. Which mode should I use for field mapping?
For beginners, Drag u0026amp; Drop Mode is the easiest and fastest way to match CSV columns to WordPress fields. For more complex data, such as custom post types or WooCommerce product variations, Advanced Mode gives full control over all fields.
5. Can I test the import before running it on my live site?
Absolutely. Always start with a small sample CSV on a staging or test site. This helps confirm that your mapping, import options, and plugin settings are correct before doing a full import on the live site.
Conclusion
CSV import in WordPress becomes simple and safe when you follow a clear process. Start by purchasing, installing, and activating WP Ultimate CSV Importer, then upload your CSV, map the fields, configure the import options, and run the import. Always test with a small sample first and check the results carefully.
Following these steps ensures your posts, products, users, or custom content are imported accurately, reducing errors and saving time. With the right plugin and a structured approach, even beginners can handle CSV imports confidently.
For any questions or assistance, you can reach out to support@smackcoders.com. Get started today and simplify your WordPress CSV imports!