“OceanWP is a versatile WordPress theme that combines flexibility and ease of customization, making it ideal for creating diverse websites.”
WooCommerce Product Import: CSV Template Guide
28 Feb 2026, 5:54 am
Table of Contents
Running a WooCommerce store becomes more challenging as your product catalog grows in size and complexity. Adding products manually one by one can take a significant amount of time and effort. Small mistakes in pricing, stock quantity, or SKU can create serious inventory and sales issues. Managing bulk updates without a proper system can also lead to inconsistencies. That is why learning how to import products using a CSV file is extremely important for store owners and developers.
WooCommerce provides a built-in CSV product import feature that allows you to upload multiple products at once. Instead of entering every product detail manually, you can prepare all information inside a structured spreadsheet. This file can include product names, prices, stock details, categories, images, and attributes. Once uploaded, WooCommerce reads the file and maps the data to the correct fields. This method significantly reduces manual workload and improves overall efficiency.
This guide will help you understand how the WooCommerce CSV template works in detail. You will learn about required columns, optional fields, and correct formatting rules. It also explains how to handle simple and variable products during import. Additionally, you will see common errors and how to avoid them effectively. By the end, you will be able to manage bulk product uploads confidently and accurately.
Understanding the WooCommerce CSV Template Structure
The WooCommerce CSV template is organized in a structured format where each column represents a specific product field. WooCommerce reads the column headers to determine where each value should be mapped during import. If the headers are accurate and properly formatted, the import process runs smoothly. However, incorrect naming or missing fields can cause mapping errors or skipped products. Understanding this structure is essential before preparing your CSV file.
Each row in the CSV represents either a single product or a variation of a product. The template supports simple, variable, grouped, and external product types. Required columns handle essential product data, while optional columns allow advanced customization. Proper alignment between column names and WooCommerce fields ensures correct product creation. A clear understanding of this structure reduces the risk of import failures.
Core Required Columns
Core required columns include Product Name, Type, SKU, Regular Price, Stock Quantity, and Stock Status. These fields define the basic identity and selling details of the product. Without a product name and type, WooCommerce cannot properly create the product. SKU acts as a unique identifier and is especially important when updating existing products. Ensuring these core fields are correctly filled is the first step in successful CSV import.
Pricing and Tax Columns
Pricing columns include Regular Price and Sale Price, which define how the product is sold. You can also include Tax Status and Tax Class to manage taxation rules. If tax details are not specified, WooCommerce applies default store tax settings. Including tax information in the CSV helps maintain pricing accuracy. Proper formatting of numeric values ensures prices are imported correctly.
Inventory Management Columns
Inventory columns control stock tracking and availability. These include Manage Stock, Stock Quantity, Stock Status, and Backorders. If stock management is enabled, WooCommerce automatically updates inventory levels after each sale. Backorder settings determine whether customers can purchase out-of-stock products. Accurate inventory fields prevent overselling or incorrect stock display.
Product Description Fields
The CSV template allows you to include both full product descriptions and short descriptions. The full description appears in the main product content area. The short description is typically displayed near the product price. Adding structured descriptions ensures consistency across all products. Proper text formatting also improves the overall presentation of your store.
Category & Tag Formatting
Categories must follow the correct structure for proper assignment. If using subcategories, they should be written in a Parent > Child format. Multiple categories or tags should be separated correctly within the cell. Incorrect formatting may create duplicate or unwanted categories. Proper organization helps customers navigate your store easily.
Product Image Formatting
Images must be added using direct and publicly accessible URLs. Multiple images can be included by separating URLs correctly in the same column. WooCommerce downloads these images during the import process. If the URL is broken or restricted, the image will not import. Verifying image links before upload prevents display issues.
Attribute & Variation Columns
Attributes are essential for creating variable products. You must define attribute names, values, and indicate whether they are used for variations. Parent products define the attributes, while variation rows contain pricing, SKU, and stock details. The attribute values must match exactly between parent and variation rows. Proper structuring ensures variations link correctly and function as expected.

WP Ultimate CSV Importer Pro
Get Ultimate CSV/XML Importer to import data on WordPress faster, quicker and safer.
WooCommerce Default CSV Format Explained with Example
WooCommerce provides a default CSV format that serves as a standard template for importing products. When you export products from your store, the downloaded file includes predefined column headers that match WooCommerce fields exactly. These columns may include ID, Type, Name, SKU, Regular Price, Sale Price, Stock, Categories, and Images. Each column represents a specific product attribute, and every row represents a single product or variation. Understanding this structure helps you prepare your CSV file correctly and avoid mapping errors during import.
For example, the “Type” column defines whether a product is simple or variable, while the “Name” column stores the product title. Pricing columns control how the product is displayed and sold, and the “Categories” column assigns the product to the correct group using proper formatting. The “Images” column contains direct image URLs that WooCommerce downloads during import. If you are working with variable products, parent and variation rows must be structured properly. Reviewing the default export file before creating your own template ensures better accuracy and fewer import issues.
How to Download the WooCommerce CSV Template
WooCommerce allows you to obtain a properly structured CSV template in multiple ways. Using the correct template ensures that your column headers match WooCommerce’s required format. Instead of guessing field names, it is always safer to download a sample file directly from your store. This reduces the chances of formatting errors during import. Understanding these methods helps you prepare your CSV file accurately.
Export Existing Products as a Template
One of the easiest ways to get a correct CSV template is by exporting existing products from your store. Go to WooCommerce → Products → Export and download the product CSV file. If you need advanced field mapping, custom meta support, or bulk update flexibility, you can also use WP Ultimate CSV Importer Pro for more powerful WooCommerce product import options. This exported file contains all standard column headers used by WooCommerce. You can edit this file by removing old product data and adding new products. Using this method ensures perfect compatibility with the import system.
Create Custom CSV Template in Excel or Google Sheets
You can also create your own CSV template manually using Excel or Google Sheets. In this case, you must ensure that the column names exactly match WooCommerce’s field names. After entering all product data, save the file in CSV UTF-8 format to avoid encoding issues. Double-check formatting for categories, images, and attributes before uploading. A properly structured custom template works just as effectively as a downloaded one.
Preparing Your CSV File Before Import
Before importing your CSV file into WooCommerce, it is important to review and validate all product data carefully. Make sure required fields like product name, SKU, type, and price are filled correctly. Check for spelling mistakes, duplicate SKUs, or missing values that could cause import errors. Even small formatting issues can lead to skipped products during the process. Proper preparation ensures a smooth and error-free import experience.
You should also confirm that the file is saved in CSV UTF-8 format to avoid encoding problems. Remove unnecessary spaces, hidden characters, or special symbols that may affect data reading. Verify that image URLs are publicly accessible and categories follow the correct structure. If you are importing variable products, ensure parent and variation rows are clearly defined. Testing the file with a small batch of products before full import is always a recommended best practice.
WP Ultimate CSV Importer Pro
Get Ultimate CSV/XML Importer to import data on WordPress faster, quicker and safer.
Step-by-Step Guide to Import Products in WooCommerce
Importing products into WooCommerce using a CSV file is a straightforward process when your file is properly prepared. WooCommerce provides a default import tool, but for advanced import, custom fields, bulk updates, and better duplicate handling, plugins like WP Ultimate CSV Importer Pro offer more flexibility and control. The system guides you through upload, mapping, and confirmation stages. Each step ensures that your product data is assigned to the correct fields. Carefully reviewing each stage helps prevent duplication or missing data. Below is the complete step-by-step workflow.
Step 1 – Prepare Your CSV File
Before starting the import process, ensure your CSV file is properly structured. Each column should represent a specific WooCommerce product field such as Product Name, SKU, Categories, Images, Price and Stock. Make sure the data is clean and formatted correctly. Save the file in CSV UTF-8 format to avoid encoding issues. Proper preparation reduces errors during import.
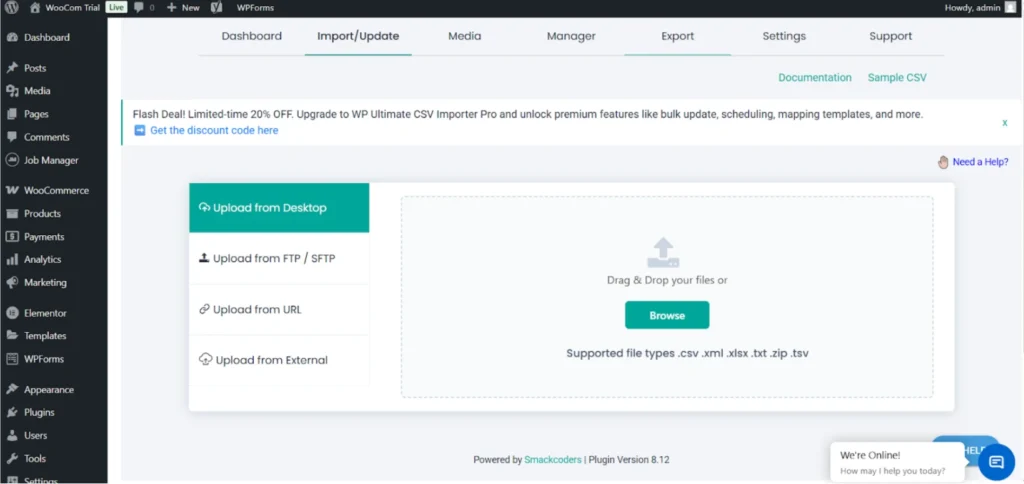
Step 2 – Upload Your CSV File
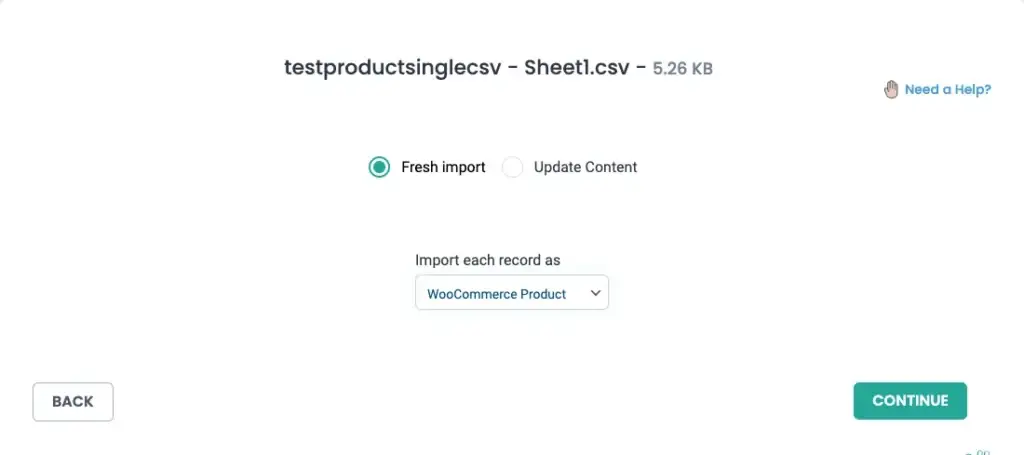
Login to your WordPress dashboard and navigate to WP Ultimate CSV Importer Pro → Import/Update. Click on Browse and select your prepared CSV file. Choose the import type such as Fresh Import for new products or Update Content for existing ones. Select the post type as WooCommerce Products. Then proceed to the next step.
Step 3 – Map Your Fields
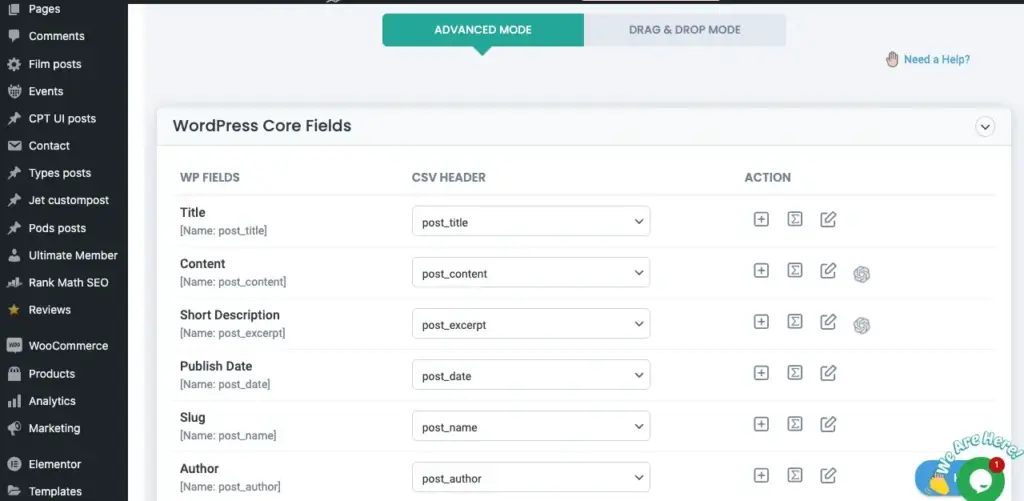
After uploading the file, the mapping screen will appear. Here, match the CSV columns with the corresponding WooCommerce product fields. You can use Advanced mode or Drag-and-Drop method for mapping. Ensure fields like Product Name, SKU, and Price are mapped correctly. Save the mapping template for future imports and click Continue.
Step 4 – Configure Import Settings
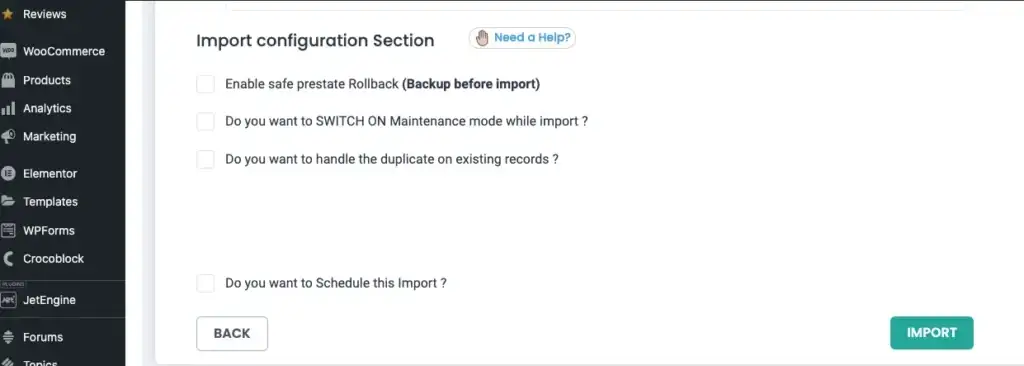
In this step, configure media handling and import options. You can manage duplicate handling, enable rollback backup, or activate maintenance mode during import. These settings help ensure a safe and controlled import process. Review all configurations carefully before proceeding. Proper settings prevent unwanted data overwrites.
Step 5 – Run the Import and Verify
Click on Import Now to start the process. Monitor the progress bar until the import completes successfully. After completion, review the import summary to check processed, imported, and failed records. Finally, navigate to WooCommerce Products to verify that products are imported correctly. This confirms successful execution of the CSV import.
WP Ultimate CSV Importer Pro
Get Ultimate CSV/XML Importer to import data on WordPress faster, quicker and safer.
Importing Variable Products via CSV (Detailed Structure)
Importing variable products through CSV requires a properly organized structure because both parent and variation data must be clearly defined. Unlike simple products, variable products contain multiple variations such as size, color, or style. Each variation has its own price, SKU, and stock quantity. WooCommerce depends heavily on correct attribute linking between parent and variation rows. If the structure is not accurate, variations may not connect properly after import.
Parent Product Row Setup
The parent product row represents the main variable product and must be clearly defined in the import file. In the “Product Type” column, the value should be set as 4 to indicate that it is a parent variable product. This row should include the product name, description, categories, and all attribute definitions, but it should not contain individual variation prices or stock quantities.
Attributes must be defined in separate columns such as Product Attribute 1, Product Value 1, and Visibility fields. For example, Attribute Name 1 can be “Color” and its values can be “Red, Blue, Green,” with visibility set as “1” to enable it. The parent SKU must also be defined because it will be used to link all variation rows. A properly configured parent row acts as the container that groups all variations under one variable product listing.
Variation Rows Configuration
Each variation must be added as a separate row in the same CSV file. In the “Product Type” column, the value should be set as 8 to indicate that the row represents a variation. Every variation row must include a unique SKU, price, and stock quantity along with the appropriate attribute values defined in separate attribute columns For variations, specify the attribute values in the Product Value column corresponding to the defined Product Attribute
Each variation row must reference the parent product using the Parent SKU field to establish the correct relationship. The attribute values in variation rows must exactly match the attribute names and values defined in the parent row. Even small mismatches in spelling or formatting can prevent variations from linking correctly. Proper variation configuration ensures that each option displays accurately with its own pricing and stock information on the product page. To better understand the structure, you can download the reference sample CSV file
Attribute Linking and Pricing Setup
Attributes must be clearly defined in the parent product row before adding variation rows. The attribute column should indicate whether the attribute is global or custom and whether it is used for variations. WooCommerce uses these attribute definitions to generate variation options on the product page. Without proper attribute setup, variations will not display correctly.
Pricing and stock information should be added only in the variation rows, not in the parent row. Each variation can have different prices, sale prices, and stock quantities. This allows customers to select different options with accurate pricing displayed dynamically. Careful alignment between attribute names and pricing fields ensures a smooth variation import process.
Updating Existing Products Using CSV
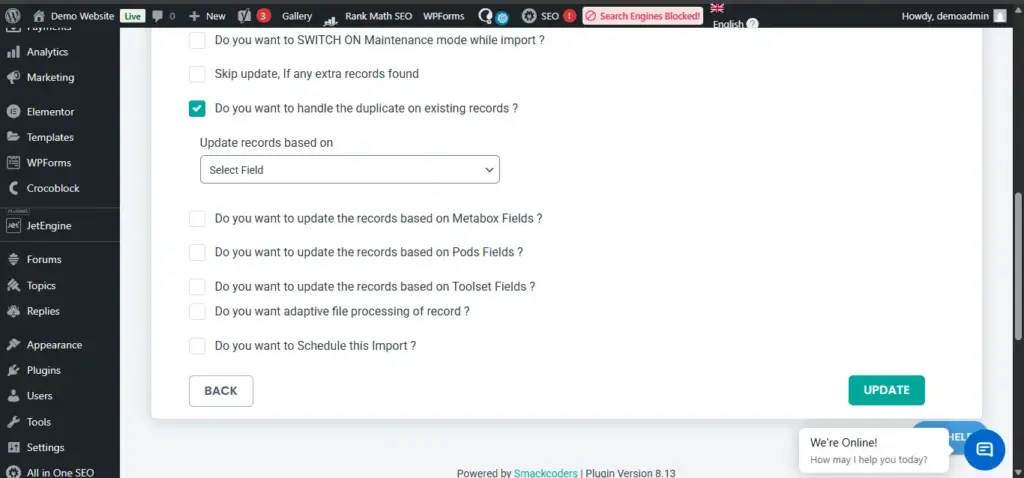
To update existing products using CSV in WP Ultimate CSV Importer Pro, first upload your file in the Import/Update section and select the “Update Content” option instead of Fresh Import. Then choose the post type as “WooCommerce Products” to ensure the importer targets product records. After proceeding to the Import Configuration section, enable the duplicate handling option and select a unique identifier such as ID or SKU from the dropdown. This allows the plugin to match existing products correctly and update them instead of creating duplicates.
Common WooCommerce CSV Import Errors & Solutions
While importing products using a CSV file is efficient, errors can occur if the file is not properly formatted. Most problems are related to incorrect data structure, missing values, or formatting mismatches. Even a small mistake in one column can affect multiple products during import. Understanding common errors helps you troubleshoot quickly and avoid repeated failures. Below are the most frequent issues and their practical solutions.
Invalid or Missing SKU
SKU is a unique identifier used by WooCommerce to recognize each product. If the SKU is missing, duplicated, or incorrectly formatted, the system may skip the product during import. This issue becomes more serious when you are trying to update existing products. Without a matching SKU, WooCommerce cannot identify which product to modify.
To fix this, ensure every product has a unique SKU with no duplicates. Avoid unnecessary spaces or special characters that may cause conflicts. When updating products, double-check that the SKU in the CSV matches exactly with the one in your store. Proper SKU management ensures smooth imports and updates.
Incorrect Attribute Format
Attribute errors usually occur when importing variable products. If attribute names or values do not match exactly between parent and variation rows, WooCommerce will fail to link the variations correctly. Even small spelling differences or extra spaces can break the connection. This results in missing or improperly displayed variations.
To avoid this problem, maintain consistent attribute naming throughout the CSV file. Ensure attributes are marked correctly as “used for variations” in the parent row. Always review a sample exported CSV to confirm the correct format. Consistency is the key to proper variation linking.
Image Not Importing
Images may not import if the URL provided in the CSV file is incorrect or restricted. WooCommerce requires direct and publicly accessible image URLs to download them successfully. If the link requires login access or leads to a broken page, the image will fail to load. This can leave your product listings without visuals.
To resolve this issue, test each image URL in a browser before importing. Ensure that the link opens directly without redirection or authentication. Separate multiple image URLs correctly within the same cell if needed. Verifying images beforehand prevents display issues after import.
Category Structure Errors
Incorrect category formatting can lead to duplicate or wrongly structured categories. If the hierarchy is not written properly, WooCommerce may create unexpected category levels. This can affect store navigation and product organization. Cleaning up category errors later can be time-consuming.
To prevent this, use the correct format such as Parent > Child when defining subcategories. Make sure category names are consistent with existing store categories. Avoid spelling variations that create duplicates. Proper structure ensures organized and accurate product grouping.
Encoding Issues
Encoding errors happen when the CSV file is not saved in the correct format. This may cause special characters to appear broken or unreadable after import. It can also interfere with how WooCommerce reads certain fields. Encoding problems are common when copying data from external sources.
Always save your CSV file in UTF-8 format before uploading it. Remove hidden characters or unusual symbols that may affect readability. Reopen and resave the file using a reliable spreadsheet tool if needed. Proper encoding ensures clean and accurate product data import.
WP Ultimate CSV Importer Pro
Get Ultimate CSV/XML Importer to import data on WordPress faster, quicker and safer.
Performance Considerations for Large CSV Imports
When importing a large number of products using a CSV file, performance issues may arise depending on your server capacity. If the file contains hundreds or thousands of products, the import process can take significant time to complete. In some cases, you may experience timeout errors, memory limit issues, or incomplete imports. These problems are usually related to hosting configuration rather than WooCommerce itself. Understanding these limitations helps you prepare properly before running large imports.
To reduce performance risks, it is recommended to split large CSV files into smaller batches instead of importing everything at once. Smaller files place less load on the server and are easier to manage if errors occur. You can also increase PHP memory limit and execution time through hosting settings if needed. Performing imports on a staging site before applying them to a live store is a safe practice. Proper planning ensures stable and successful bulk product imports.
Best Practices for Safe Product Import
Before performing any bulk product import, always take a complete backup of your website and database. This ensures that you can restore your store if something goes wrong during the process. Even small formatting mistakes in a CSV file can affect multiple products at once. Testing the import with a small sample file first is a smart approach. Careful preparation minimizes risks and prevents large-scale errors.
It is also important to review column mapping and formatting before running the final import. Make sure SKUs are unique, categories are structured properly, and image URLs are accessible. Avoid importing unnecessary columns that may overwrite existing data unintentionally. Keep your CSV file clean, organized, and saved in UTF-8 format. Following these best practices ensures a smooth and controlled import process.
Frequently Asked Questions (FAQ):
1. How to import products CSV file in WooCommerce?
To import a products CSV file in WooCommerce, go to your WordPress dashboard and navigate to WooCommerce → Products → Import (or WP Ultimate CSV Importer Pro → Import/Update if using the plugin). Upload your CSV file, map the fields correctly, configure import settings, and click Run Import. After completion, review the import summary and verify the products in your store.
2. How to import products from a CSV file?
First, prepare a properly formatted CSV file with required product fields such as name, SKU, price, stock, categories, and images. Then upload the file through the WooCommerce import tool or CSV importer plugin. Map the CSV columns to the correct product fields and start the import process. Finally, check the results to ensure all products are imported correctly.
3. Trade-offs between speed and correctness for WooCommerce?
There is always a balance between making quick changes and maintaining accuracy. Bulk updates done too fast may cause pricing errors or broken variations. It is safer to deploy one change at a time and test before going live. Using staging or phased rollouts helps reduce risks.
4. Compatibility with headless or multisite?
Compatibility depends on your WooCommerce setup and hosting architecture. In headless or multisite environments, imports must be tested carefully to avoid syncing issues. Always perform imports on a staging clone first. This ensures your configuration works correctly before production deployment.
5. Performance impact?
Large imports can temporarily increase server load and slow down the site. Monitor performance metrics like TTFB and server usage before and after import. Splitting large CSV files into smaller batches improves stability. Regular monitoring helps maintain long-term performance.
6. How to handle duplicate SKUs during bulk CSV import?
If duplicate SKUs exist in your CSV file, WooCommerce may skip products or update the wrong items. Always validate SKU uniqueness before import using spreadsheet filters. When updating products, enable the “update existing products” option carefully. Running a test import with a small batch helps detect SKU conflicts early.
7. Can I schedule automatic WooCommerce CSV product imports?
The default WooCommerce importer does not support scheduled imports. For automation, you need an advanced CSV import plugin with cron-based scheduling support. This is useful when importing supplier feeds daily or weekly. Always test scheduled imports in staging before applying them live.
8. How to safely import 10,000+ products without server timeout?
Large imports can cause PHP memory limit or execution timeout errors. Split the CSV file into smaller batches such as 500–1000 products per upload. You can also increase server memory limits through hosting settings. Performing imports during low-traffic hours reduces server load risks.
9. How to import custom meta fields or plugin-specific product data?
WooCommerce default importer supports standard product fields only. For custom fields added by themes or plugins, you must map meta keys properly. Advanced CSV import plugins allow meta field mapping for extended compatibility. Always verify that custom data appears correctly after import.
10. What happens if the CSV import process is interrupted midway?
If the import stops due to timeout or browser interruption, some products may still be partially created. WooCommerce does not automatically roll back incomplete imports. You must review the import summary and manually remove duplicates if needed. Keeping a backup before bulk import ensures recovery safety.u003cbru003e
Conclusion
WooCommerce CSV product import is a powerful feature that simplifies bulk product management for growing online stores. By understanding the correct template structure and formatting rules, you can avoid common errors and save valuable time. Proper preparation, testing, and validation play a crucial role in successful imports. Whether you are adding new products or updating existing ones, CSV import provides flexibility and efficiency.
With the right approach, managing large product catalogs becomes much easier and more organized. Always follow structured formatting, verify mapping, and monitor the import summary after completion. Taking these steps ensures that your products are uploaded accurately without affecting store performance. Mastering CSV import gives you better control over your WooCommerce store operations.
WooCommerce to Shopify Migration: Complete Step-by-Step Guide
24 Feb 2026, 12:52 pm
Table of Contents
WooCommerce to Shopify migration is the process of moving your online store from WooCommerce to Shopify while transferring essential data such as products, customers, and orders. Instead of rebuilding the store from the beginning, migration allows you to carry forward structured store data and continue operations with less disruption. This approach is commonly used by growing stores that want a more managed and stable commerce platform.
Many store owners decide to migrate when WooCommerce maintenance becomes complex and time-consuming. Managing hosting, security, updates, backups, and plugin compatibility requires ongoing technical attention. As the store scales, even small configuration issues can affect performance and reliability. Troubleshooting conflicts between themes and plugins can also slow down daily operations. For teams without dedicated technical support, this ongoing maintenance becomes a major challenge. Moving to a managed platform reduces these operational pressures.
This guide explains the complete WooCommerce to Shopify migration step by step, including preparation, migration methods, data transfer, SEO protection, testing, and validation. It also breaks down each method so both beginners and developers can follow the workflow clearly. You will understand what data can be migrated automatically and what needs manual setup. Additional checklists and verification steps are included to reduce mistakes. By following this structured approach, you can migrate with better control and confidence.
Key Takeaways
- WooCommerce to Shopify migration allows you to transfer products, customers, and orders in bulk instead of rebuilding the store manually, which saves time and reduces data entry mistakes during platform switching.
- Selecting the correct migration method – CSV import, automated tools, or sync plugins – directly affects migration speed, effort, and accuracy, so the method should match your store size and technical comfort.
- Clean and structured WooCommerce data is essential before migration because missing SKUs, duplicate customer emails, and broken product records can lead to failed imports and inconsistent results in Shopify.
- Proper field mapping between WooCommerce and Shopify ensures that product details, customer information, and order values appear correctly and remain usable after the transfer.
- Post-migration testing and verification help confirm that products, customer accounts, and checkout processes work correctly, reducing the risk of live store issues after launch.
Why Migrate from WooCommerce to Shopify?
Many stores migrate when WooCommerce maintenance becomes too technical and time-consuming. Managing hosting, updates, security, and plugin conflicts requires continuous attention. As stores grow, performance tuning and compatibility issues can slow operations.
Shopify provides managed infrastructure, built-in security, and centralized settings for payments, shipping, and taxes. This reduces technical workload and improves operational stability. Non-technical teams often find Shopify easier to manage daily.
Pre-Migration Checklist (Important Preparation Steps)
Preparation reduces migration risk. Always take a full site backup before exporting any data. Use a staging Shopify store first instead of importing into a live environment.
Clean your WooCommerce data by removing duplicates and fixing missing SKUs or images. Review active plugins and list features that must be recreated using Shopify apps. Avoid making catalog changes during the migration window.
What Data Can Be Migrated?
Most structured store data can be migrated using CSV files, automated tools, or sync plugins. This includes core business records needed for store continuity. Migration reduces the need to rebuild products and customers manually.
Some platform-specific features and plugin-driven settings will not transfer directly. Theme layouts and custom plugin fields may need manual recreation. Plan replacements in advance.
Product Data
Products, variants, SKUs, prices, categories, and images can be migrated reliably. Variant products require correct attribute structure. Image URLs should be verified before export. Unique SKUs improve import accuracy.
Customer Data
Customer names, emails, and addresses can be migrated. Accounts are created successfully in most cases. Passwords usually cannot be transferred. Customers will need to reset passwords after migration.
Order Data
Order history, totals, and line items can be migrated with most tools. This supports reporting and customer service reference. Verify sample orders after import. Some advanced metadata may not transfer.
Other Store Data
Coupons, reviews, and blog content may migrate depending on the tool used. Tax and shipping rules usually require manual setup in Shopify. Plugin-based features should be replaced with apps.
Migration Methods Overview
WooCommerce to Shopify migration can be done using different methods based on store size and technical comfort. Some methods offer more manual control, while others focus on automation and speed. Choosing the right method reduces errors and downtime.
The three main approaches are manual CSV migration, automated migration tools, and sync plugins. CSV suits small, clean stores. Automated tools are better for large datasets. Sync plugins support staged or continuous transfer.
Method 1 – Manual Migration Using CSV Files
Manual CSV migration moves WooCommerce data by exporting it into spreadsheets and importing it into Shopify after formatting. It gives full control over the data and is suitable for small or well-structured stores. However, it requires careful column mapping and format accuracy. Small header or variant mistakes can cause import errors.
Exporting Data from WooCommerce
Export products using the built-in WooCommerce export tool and use supported plugins for customers and orders. Include key fields like SKU, price, variants, and images. Remove duplicates and incomplete records before saving. Keep the CSV as your clean source file.
Formatting CSV for Shopify
WooCommerce CSV files must be adjusted to match Shopify column names and structure. Variant rows and image URLs must follow Shopify format rules. Attribute names should be consistent across rows. Using a Shopify sample CSV template reduces mapping mistakes.
Importing CSV into Shopify
Upload the CSV using Shopify’s import feature in the admin panel. Review the validation preview and fix any flagged errors. Re-upload if needed after corrections. Always verify a sample set of imported products.
Method 2 – Using Migration Tools or Apps
Migration tools or apps move WooCommerce data to Shopify through direct store connection instead of manual CSV work. This method is best for large product catalogs and customer databases. It reduces formatting effort and mapping errors. It is faster than manual migration.
Popular Migration Tools
Dedicated migration tools support transfer of products, customers, orders, images, and categories. Many provide demo migration and selective transfer features. Some also support redirects and rollback options. Features vary based on the tool and plan.
How Automated Migration Works
Automated migration follows a simple connect → map → transfer workflow. You connect both stores and choose which data to migrate. A demo run is usually done first for verification. Then the full migration is executed with logs for review.
Pros and Cons of Automated Tools
Automated tools save time and reduce manual errors in bulk migration. They are easier for beginners than CSV restructuring. However, most tools are paid and have feature limits. Custom plugin data may not always transfer fully.
Method 3 – WooCommerce to Shopify Sync Plugin
A WooCommerce to Shopify sync plugin transfers data continuously instead of using a one-time migration. It connects both stores and keeps selected data updated automatically. This method is useful when the WooCommerce store remains active during transition. It reduces data gaps between platforms.
What is W2S – WooCommerce to Shopify Sync Plugin
A W2S sync plugin links WooCommerce and Shopify through a secure integration. It syncs products, customers, and orders between stores. This helps when store activity cannot be paused. It supports ongoing updates instead of batch transfer.
How Sync-Based Migration Works
Sync migration follows a connect → configure → map → sync process. After connection, you select which data types should sync. An initial sync copies existing records. Scheduled or real-time sync keeps data updated.
What Data Can Be Synced Using W2S
Most sync tools support products, stock levels, customers, and orders. Product and inventory updates can reflect in Shopify after sync. Some tools also sync price changes. Custom fields may need manual handling.
Pros and Limitations of Sync Plugin Method
Sync plugins allow staged migration and reduce downtime risk. They are useful when both stores run in parallel. However, results depend on correct setup and plugin reliability. Not all custom WooCommerce data will sync.
Step-by-Step: Full WooCommerce to Shopify Migration Workflow
This section explains the complete WooCommerce to Shopify migration workflow in a practical step-by-step sequence. It combines preparation, store setup, data transfer, and verification into one structured process. Following these steps in order helps reduce errors and prevents missing data during migration.
You can use this workflow whether you choose CSV import, automated migration tools, or a sync plugin. The difference will be in how the data moves, but the preparation and validation steps remain the same. Each step below focuses on one stage of the migration lifecycle.
Step 1 – Create Your Shopify Store
Create your Shopify account and set up a new store workspace for migration. Use a trial or test store first instead of migrating directly into a live environment. This allows safe testing before public launch. Configure basic store identity details like store name and contact email.
Step 2 – Configure Basic Store Settings
Set your base store settings such as currency, region, and default tax behavior. Configure primary shipping zones and measurement units. These settings should be completed before importing products. Correct defaults prevent pricing and tax errors after import.
Step 3 – Choose and Customize Theme
Select a Shopify theme that closely matches your previous WooCommerce design. Set logo, brand colors, navigation menus, and homepage layout. Do not aim for perfect design at this stage — focus on structure first. Final design refinement can happen after migration.
Step 4 – Migrate Products
Import products using your chosen migration method — CSV, automated tool, or sync plugin. Verify product titles, prices, variants, and images after import. Check a sample set instead of assuming full accuracy. Fix mapping issues before continuing.
Step 5 – Migrate Customers
Transfer customer records including emails and addresses. Expect customers to reset passwords after migration due to encryption differences. Check for duplicate emails and incomplete profiles. Validate a few customer records manually.
Step 6 – Migrate Orders
Migrate order history if supported by your method or tool. Confirm order totals, dates, and line items after transfer. Historical orders help with support and reporting. Sample verification is recommended.
Step 7 – Import Reviews and Blog Content
Move product reviews and blog content using supported tools or manual copy if needed. Check formatting and author details after transfer. Some review plugins require separate export/import steps. Re-attach reviews to correct products.
Step 8 – Verify Imported Data
Run a structured verification after all imports are complete. Check random products, customers, and orders for accuracy. Test add-to-cart and variant selection. Fix detected issues before moving to SEO and redirect setup.
URL Structure and SEO Preservation
During WooCommerce to Shopify migration, URL structures often change, which can create broken links if not handled properly. Protecting URLs is important to maintain search visibility and user access. Redirect setup prevents traffic loss.
Create a mapping of old WooCommerce URLs to new Shopify URLs. Add 301 redirects in Shopify for all key pages. This preserves rankings and backlinks. Resubmit your sitemap and monitor crawl errors after migration.
Design and Theme Recreation
After migration, recreate your WooCommerce design using a suitable Shopify theme. Focus on brand consistency and clear navigation rather than exact visual copying. Prioritize layout, menus, and key pages like product and checkout.
Choose a theme close to your store style and rebuild menus and page structure. Match logo, colors, and fonts. Test the design on desktop and mobile for usability.
Payment, Shipping, and Tax Setup
Once your products and design are ready, you should configure payment, shipping, and tax settings in your Shopify store. These operational settings must be verified before launch because they directly affect checkout accuracy. Do not assume defaults are correct – review each configuration carefully.
Enable your required payment gateways and test them in sandbox or test mode first. Set shipping zones, delivery rates, and method rules based on your service regions. Configure tax rules according to your business requirements and product types. Run a few test checkouts to confirm totals, taxes, and shipping charges are calculated correctly.
App and Feature Replacement
After migrating your data, you should replace WooCommerce plugins and custom features with equivalent Shopify apps. WooCommerce stores often rely on multiple plugins for SEO, reviews, email marketing, backups, and advanced product features. These do not transfer directly and must be recreated using Shopify’s app ecosystem.
List the critical functions your WooCommerce plugins handled and map each one to a Shopify app alternative. Install only the necessary apps first to avoid performance overhead. Reconfigure features like reviews, popups, analytics, and automation workflows. Test each replaced feature to confirm it works correctly within the new store setup.
Testing After Migration
Testing after migration is essential to ensure your Shopify store works correctly before going live. Even when data import reports show success, field mismatches or configuration gaps can still affect real customer actions. A structured testing process helps you catch these issues early and fix them safely.
Run end-to-end tests covering product pages, variant selection, cart behavior, checkout flow, payment processing, and confirmation emails. Test both desktop and mobile experiences using test orders, and try multiple payment and shipping combinations. Log any errors you find and correct them before launch. Only move to live operation after all critical store functions pass testing.
Common Migration Problems and Fixes
During WooCommerce to Shopify migration, common issues usually come from format differences, missing fields, or wrong mapping. These can appear even when migration reports show success. Early detection prevents live store errors. Always review sample records after transfer.
Missing images are often due to broken image URLs and can be fixed by re-importing or correcting links. Duplicate SKUs and variant conflicts should be cleaned in source data and imported again. CSV errors are usually fixed by saving in UTF-8 format. If customer or order data looks incomplete, correct mapping and rerun that dataset import.
Post-Migration Checklist
Complete a final checklist before making your Shopify store live. This confirms that migration, configuration, and validation steps are finished correctly. It acts as a safety check between migration and launch. Do not skip this stage.
Verify sample products, customers, and orders for accuracy. Check redirects, payments, shipping, and tax calculations. Connect analytics and generate a new sitemap. Take a final backup or export before go-live.
WooCommerce vs Shopify After Migration (Quick Comparison)
After WooCommerce to Shopify migration, the day-to-day store management experience changes noticeably. WooCommerce gives deep customization through plugins and code control, but it also requires ongoing technical maintenance. Shopify provides a more controlled and managed environment where most infrastructure, security, and performance tasks are handled at the platform level.
From an operations perspective, Shopify reduces dependency on multiple plugins and server configurations, while WooCommerce offers greater developer-level flexibility. Shopify is generally easier for non-technical teams to manage, whereas WooCommerce suits stores that need heavy customization. The right choice after migration depends on whether you prioritize managed simplicity or maximum control.
Final Tips for a Smooth Migration
Plan your WooCommerce to Shopify migration in phases instead of a single switch. Use a staging Shopify store and run a sample migration first. Keep your WooCommerce data stable during the process. Always keep backups and export copies for safety.
Choose the migration method based on store size and complexity. CSV suits small stores, while tools or sync plugins are better for large or active stores. Follow a written checklist for transfer and testing to reduce launch risk.
Conclusion
WooCommerce to Shopify migration is a practical way to move your store to a more managed and scalable platform without rebuilding everything from scratch. When the migration is planned carefully – with proper backups, clean source data, correct mapping, and staged testing – most products, customers, and orders can be transferred safely. Choosing the right method, whether CSV import, automated tools, or sync plugins, makes a major difference in accuracy and effort.
Before going live, always complete validation checks, run full store testing, and confirm redirects, payments, and checkout flows are working correctly. Use a staging-first approach whenever possible and rely on migration tools for larger datasets. Follow your migration checklist step by step, verify results, and launch only after confirmation – this ensures a safe and confident platform transition.
Frequently Asked Questions (FAQ)
1. How to migrate a website from WordPress to Shopify?
You migrate by exporting your WordPress/WooCommerce store data (products, customers, orders) and importing it into Shopify using CSV files, migration tools, or sync plugins. After data transfer, you recreate design, configure payments and shipping, and set URL redirects. Always test the Shopify store before going live. A staging-first approach is recommended.
2. How to migrate WooCommerce to a new site?
Export WooCommerce data using CSV or migration plugins and import it into the new site or platform. Verify products, customers, and orders after import. Update settings, themes, and required plugins on the new site. Run full testing before switching traffic.
3. Can you integrate WooCommerce with Shopify?
Yes, integration is possible using sync plugins or connector tools that link both platforms. These tools can sync products, inventory, customers, and sometimes orders. Integration is useful for staged migration or multi-platform selling. Proper mapping and monitoring are required.
4. Is it better to use Shopify or WooCommerce?
It depends on your needs. Shopify is better for managed hosting, easier maintenance, and simpler operations. WooCommerce is better for deep customization and developer-level control. Stores without technical teams often prefer Shopify, while highly customized stores may prefer WooCommerce.
5. How to migrate from WooCommerce to Shopify?
You can migrate using three main methods: manual CSV import, automated migration tools, or WooCommerce to Shopify sync plugins. Choose based on store size and complexity. Prepare backups, clean data, run a demo migration, and verify results before final launch
How to Export WooCommerce Orders to Google Sheets
13 Feb 2026, 7:53 am
Table of Contents
Exporting WooCommerce orders to Google Sheets helps store owners, bloggers, and developers manage, analyze, and share order data more efficiently. Rather than relying on static reports in WordPress or manually exporting CSV files, which can be time-consuming and error-prone, Google Sheets provides real-time access to your data, with options to filter, sort, and collaborate instantly. This makes it easier to track sales trends, manage inventory, reconcile accounts, and share information with your team without giving direct access to your store dashboard.
While some methods attempt to export WooCommerce orders to Google Sheets without plugins, they are often unreliable, difficult to automate, and not suitable for large stores. Using WP Ultimate CSV Importer Pro offers a structured, secure, and beginner-friendly way to export WooCommerce orders accurately, with features like advanced filtering, scheduled exports, and automated syncing, allowing you to keep a real-time, easy-to-use WooCommerce orders spreadsheet.
Key Takeaways
- Export WooCommerce orders directly to Google Sheets for easy reporting and collaboration.
- WP Ultimate CSV Importer Pro simplifies the export process, even for large stores.
- Advanced filters allow exporting by date range, product, payment method, or order status.
- Scheduled exports automate your workflow and keep data up to date.
- Performing a quick pre-export checklist prevents errors and ensures accurate data.
- The plugin is beginner-friendly but powerful enough for advanced users.
Benefits of Exporting WooCommerce Orders to Google Sheets
Exporting WooCommerce orders to Google Sheets makes order management faster and more flexible. Instead of checking reports inside WordPress, store owners can work with data in a simple spreadsheet format.
Simplified reporting
Easily create sales summaries, tax reports, and performance metrics using Google Sheets formulas and filters.
Real-time collaboration
Share order data with accountants, marketing teams, or fulfillment partners without giving WordPress access.
Automation and efficiency
Scheduled exports reduce manual work and keep your order data up to date automatically.
Data backup and security
Keeping orders in Google Sheets provides an additional backup outside your WordPress database.
Scalability for high-traffic stores
Regular exports help store owners organize data efficiently and optimize WordPress for high traffic by reducing the amount of admin-side data processing.
These benefits explain why many store owners prefer exporting WooCommerce orders to Google Sheets instead of relying solely on dashboard reports.
What is WP Ultimate CSV Importer?
WP Ultimate CSV Importer is a powerful WordPress plugin for importing and exporting data on WordPress and WooCommerce websites. It helps store owners and developers manage WooCommerce orders without needing custom scripts or technical setup. The plugin supports direct export of WooCommerce orders to Google Sheets, making data handling simple and efficient.
It is built to handle large order volumes smoothly, which is important for high-traffic stores. With features like advanced filtering, scheduled exports, and a guided workflow, WP Ultimate CSV Importer is suitable for beginners and advanced users who need precise control over their exports.
WP Ultimate CSV Importer Pro
Get Ultimate CSV/XML Importer to import data on WordPress faster, quicker and safer.
What Should We Do Before Exporting Orders
Before exporting WooCommerce orders, it is important to check that your store data is ready. Make sure orders exist, required fields are available, and access permissions are correctly set. This preparation helps avoid errors and ensures accurate exports to Google Sheets.
Step 1: Install and Activate the WP Ultimate CSV Importer Pro Plugin
First, visit the Smackcoders website and go to the My Account page. Log in to your account or create one if you are new. After logging in, purchase the WP Ultimate CSV Importer Pro version and download the plugin ZIP file.
Then, log in to your WordPress admin dashboard, upload the downloaded file from the Plugins section, install it, and activate the plugin. Once activated, the plugin will appear in your dashboard, confirming it is ready to use.
Step 2: Verify WooCommerce Order Settings
Before exporting, make sure your WooCommerce store has orders available. Open the Orders section in your WordPress dashboard and confirm that the order statuses you plan to export, such as Processing or Completed, are present. Also, ensure each order contains essential details like customer information, purchased products, and payment status. Verifying this in advance helps prevent empty exports, missing orders, and failed export processes.
Step 3: Configure Google OAuth Access for WP Ultimate CSV Importer
To export WooCommerce order data into Google Sheets, WP Ultimate CSV Importer needs secure authorization to interact with your Google account. This is done using Google OAuth, which allows the plugin to create and update spreadsheets without exposing your Google login credentials.
Create a New Google Cloud Project
Begin by signing in to the Google Cloud Console using the Google account you plan to connect with Google Sheets. At the top of the console, click Select a project and choose New Project.
Provide a project name and click Create.
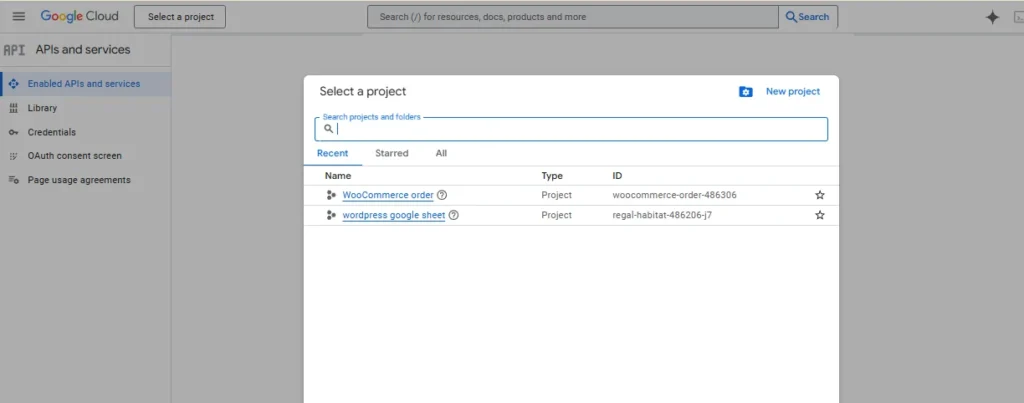
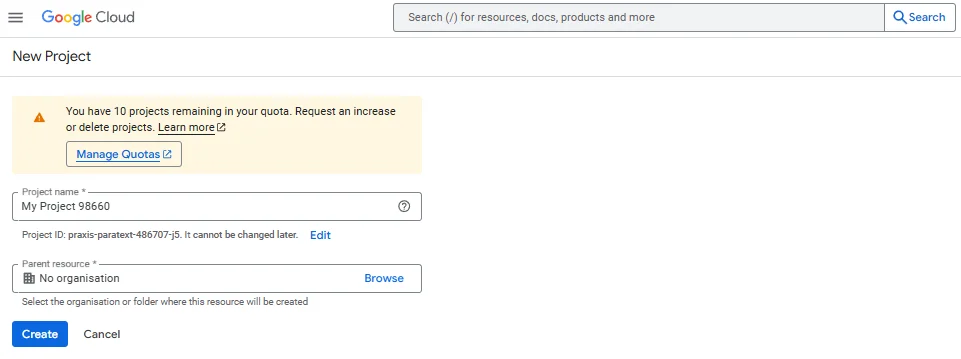
Once the project is created, ensure it is selected as the active project. This project will be used to generate the Client ID and Client Secret required by WP Ultimate CSV Importer.
Enable the Google Sheets API
With your project selected, open APIs & Services from the Google Cloud Console menu.
Navigate to Library, search for Google Sheets API, and enable it for your project.
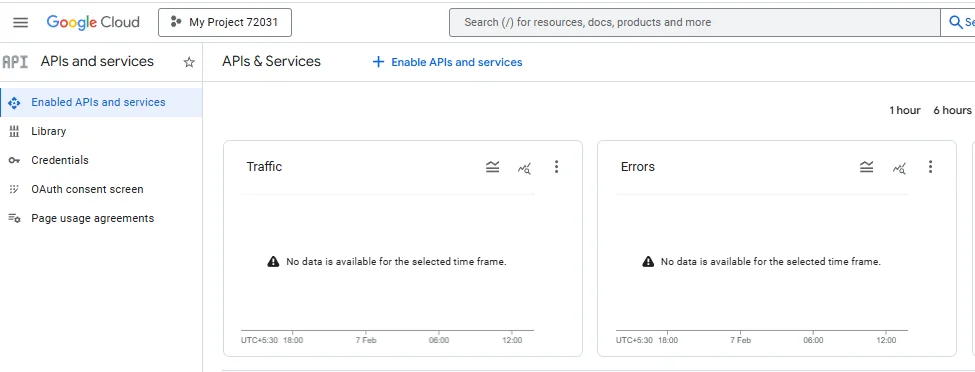
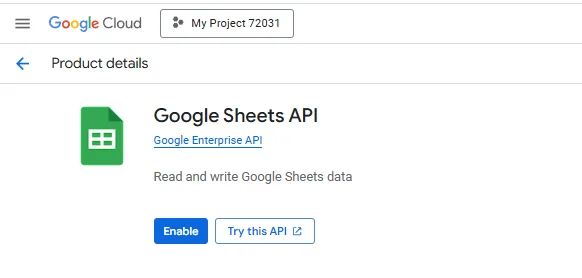
Enabling this API allows WP Ultimate CSV Importer to send WooCommerce order data directly to Google Sheets. Without it, the plugin will not be able to access or modify spreadsheets.
Set Up the OAuth Consent Screen
After enabling the API, go back to APIs & Services and open the OAuth consent screen.
Start by entering an application name. This name will be shown to you when Google asks for permission during authentication.

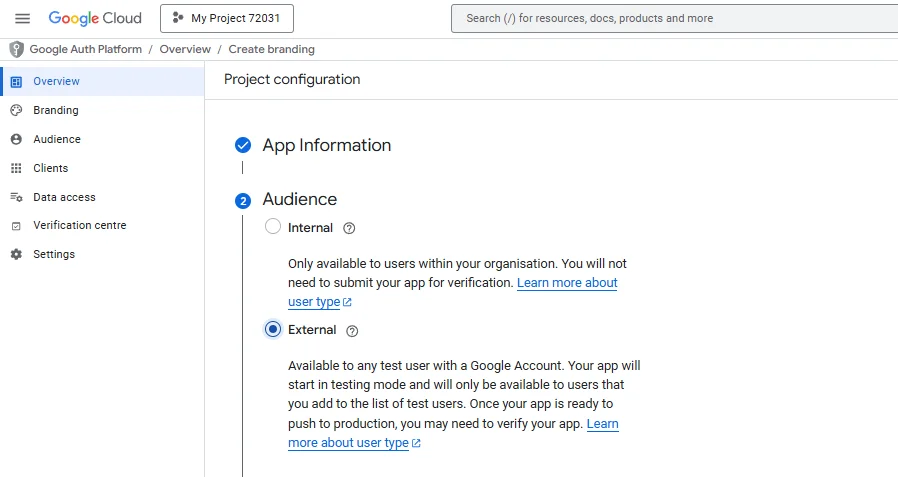
For User Type, select External, which allows the plugin to connect with your Google account.
Add your email address in the required fields, save the configuration, and continue to the next step.
Generate OAuth Client ID and Client Secret
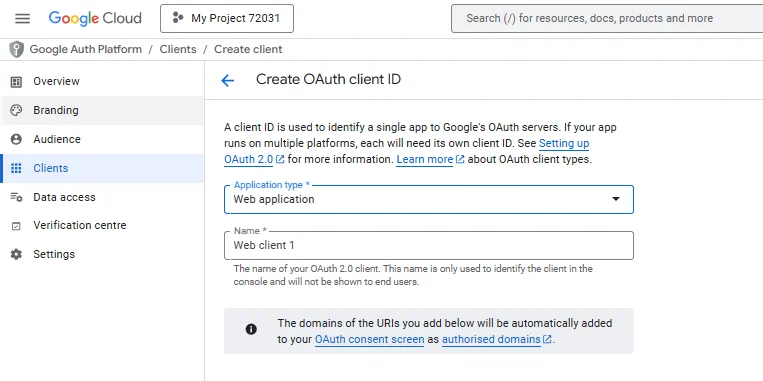
Next, open the Credentials section under APIs & Services and click Create Credentials → OAuth Client ID.
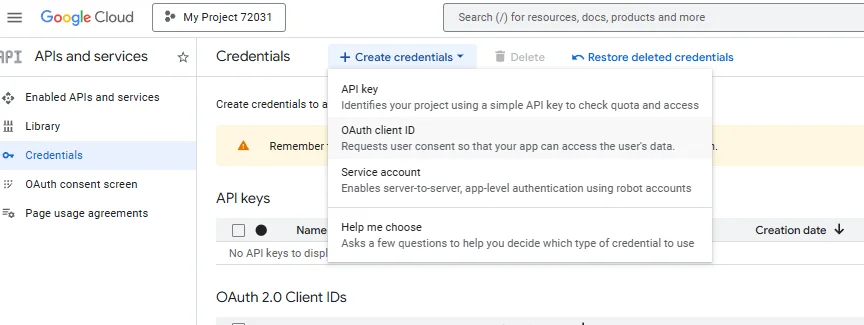
Choose Web application as the application type.
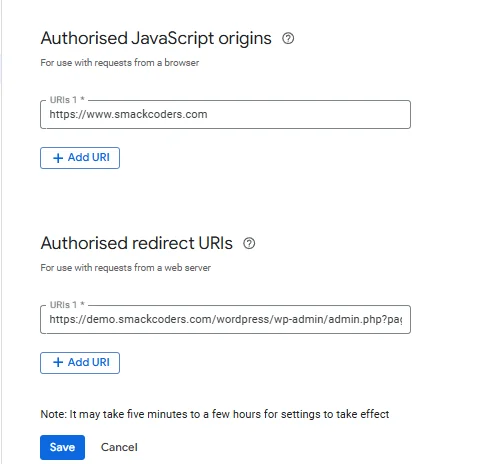
Add Authorized URLs
Scroll down to find the fields for authorized URLs:
- Authorized JavaScript origins
Enter your website’s base URL (for example, https://yourdomain.com). This tells Google which site is allowed to initiate authentication requests. - Authorized Redirect URLs
Open the WP Ultimate CSV Importer Settings page in your WordPress dashboard, copy the full page URL from the browser, and paste it into this field.
After saving, Google will generate a Client ID and Client Secret. Keep these details handy for the next step.
Connect Your Google Account in WP Ultimate CSV Importer
Return to your WordPress admin area and open the WP Ultimate CSV Importer → Settings page.
- Paste the Client ID and Client Secret into the corresponding fields.
- Add the authorized redirect URL if required, then save the settings.
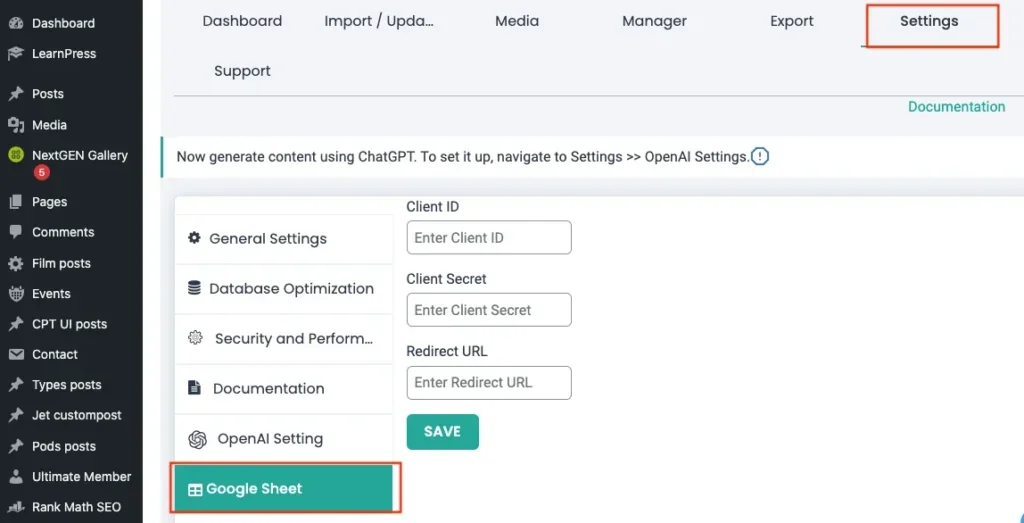
Click the option to connect your Google account. Once authentication is successful, you’ll see a confirmation message indicating that the plugin is now authorized to export WooCommerce orders to Google Sheets.
Step 4: Confirm Google Sheets Permissions
After connecting your account, Google will prompt you to grant access permissions. Make sure you allow access so the plugin can create and update spreadsheets.
If exported data does not appear in Google Sheets, double-check that:
- You approved access during the OAuth prompt
- The correct Google account was used during authentication
Permission issues often occur when access is denied or a different account is selected.
Step 5: Pre-Export Checklist for WooCommerce Orders
Before exporting, confirm that WP Ultimate CSV Importer is active and connected to your Google account. Make sure WooCommerce orders are available for export and Google Sheets permissions are approved. This quick check helps prevent export failures.
How to Export WooCommerce Orders to Google Sheets Using WP Ultimate CSV Importer
This section explains how to export WooCommerce orders to Google Sheets using WP Ultimate CSV Importer, from selecting the data to verifying the exported spreadsheet. Follow these steps to ensure accurate and successful exports.
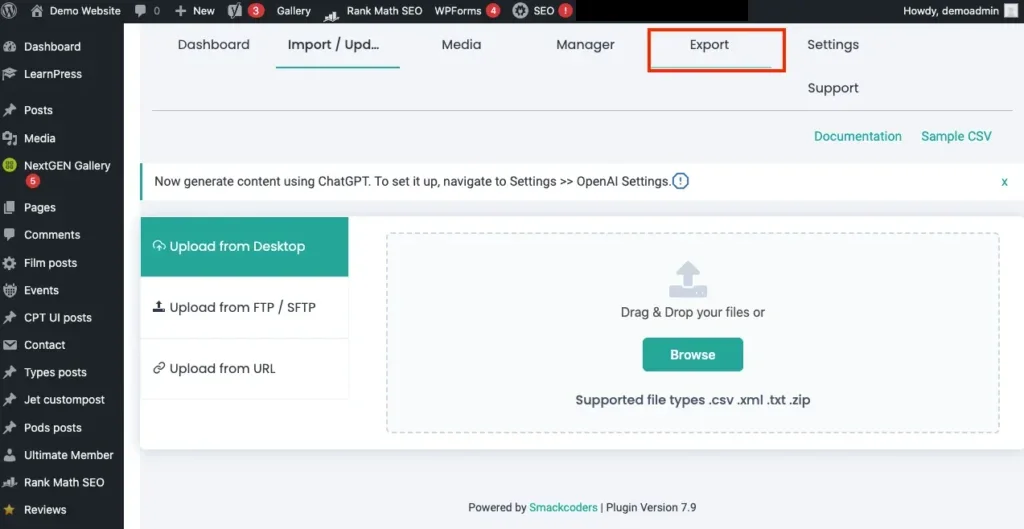
Open the Export Module
From your WordPress dashboard, open WP Ultimate CSV Importer and click on the Export option. This will take you to the export screen, where you can start exporting WooCommerce orders to Google Sheets.
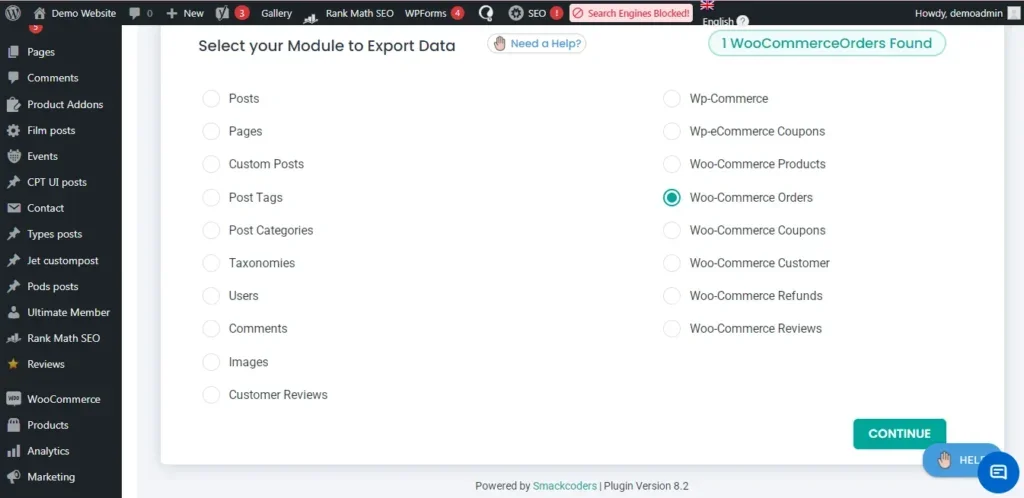
Select WooCommerce Orders
From the post type list, select WooCommerce Orders. When you choose this option, the total number of WooCommerce orders available on your WordPress site will be displayed next to it, helping you confirm how many orders will be exported.
WP Ultimate CSV Importer Pro
Get Ultimate CSV/XML Importer to import data on WordPress faster, quicker and safer.
Configure Basic Export Settings
At this stage, you can choose to use an existing mapping template or create a new one for your export. If you select Create New Mapping, you will be taken to the next screen to configure advanced settings and apply filters as needed.
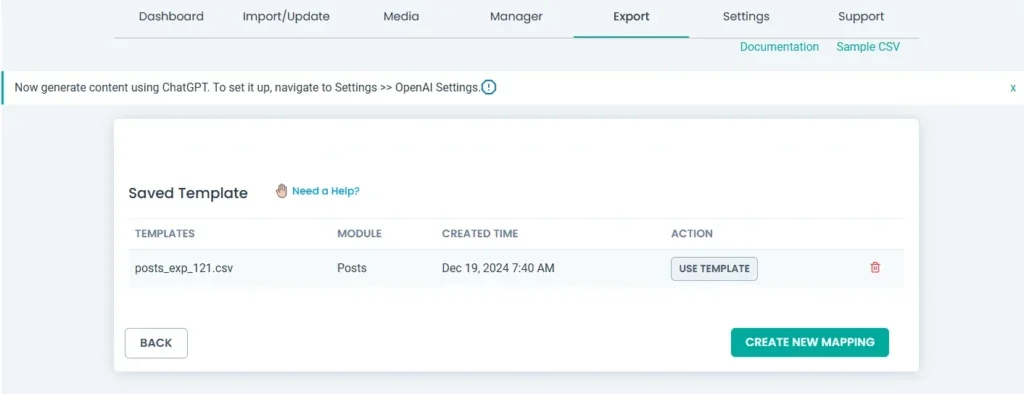
Enter a name for the export file and select the required file type from the Advanced Export Settings. For large WooCommerce order exports, enabling the split records option can help improve performance and prevent timeouts, or configure batch processing to completely avoid these errors.

Configure Advanced Export Filters
WP Ultimate CSV Importer provides several export options that help you control how WooCommerce orders are sent to Google Sheets.
- Export CSV data to Google Sheets allows you to export WooCommerce order data directly into Google Sheets. Enable this option to choose Google Sheets as the export destination.
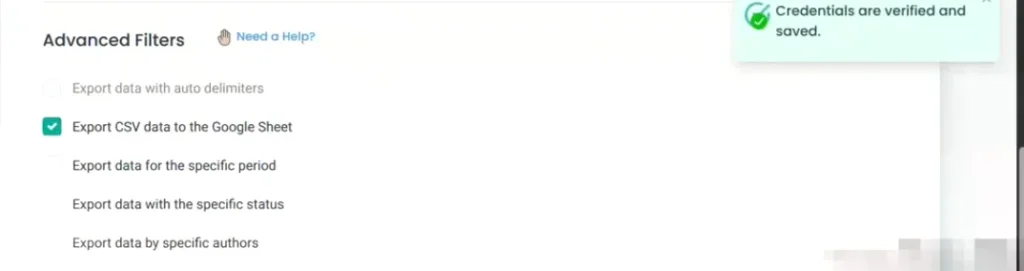
- Export data for a specific date range helps you export WooCommerce orders created within a selected time period. Enable this option and enter the From Date and To Date fields. Only orders placed between these two dates will be exported. For example, you can enter the first and last date of a month to generate a monthly sales report.

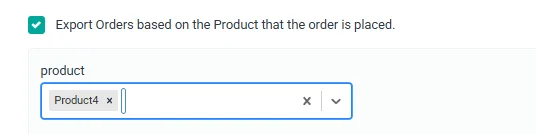
- Export data by product lets you export orders that include a specific product. Enable this filter and select the required product from the product list. Only WooCommerce orders that include the selected product will be exported to Google Sheets.
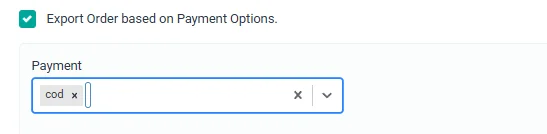
- Export data by payment method lets you export WooCommerce orders based on how customers paid for their orders. Enable this option and select the required payment method from the available options. This is useful when you want to review or reconcile payments made through a specific gateway.
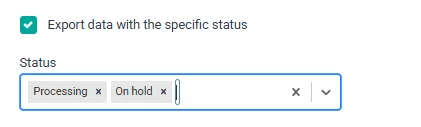
- Export data with a specific order status allows you to export WooCommerce orders based on their current status. Enable this filter, then select one or more order statuses, such as Pending Payment, Processing, On Hold, Completed, or Cancelled. Only orders matching the selected status will be included in the export.
By entering the correct values for each filter, you can export only the WooCommerce orders you need and keep your Google Sheets clean, accurate, and easy to manage.
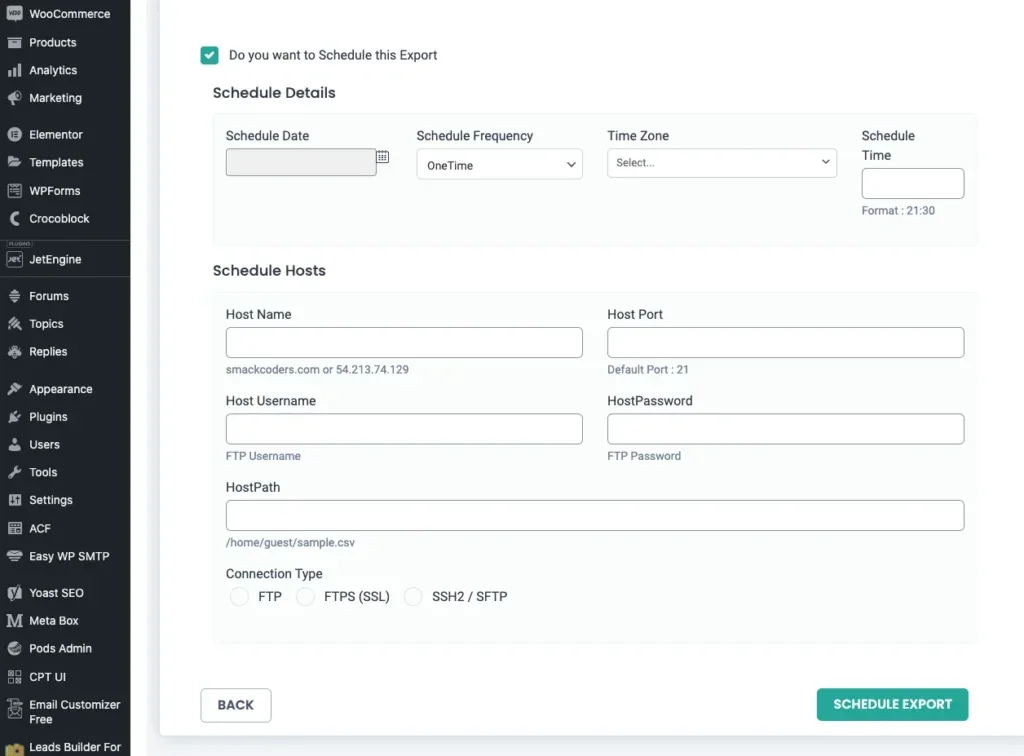
Schedule Automatic Exports to Google Sheets
WP Ultimate CSV Importer Pro allows you to automate WooCommerce order exports to Google Sheets. This feature helps keep your spreadsheet updated without running the export manually each time.
To enable scheduling, turn on the scheduled export option and choose how often the export should run, such as daily, weekly, or monthly. Set the preferred time and apply the required filters, like date range or order status. Once saved, the plugin will automatically export new or updated WooCommerce orders to Google Sheets based on the schedule.
Scheduled exports are useful for regular sales tracking, accounting updates, and team reporting, as your Google Sheets will always contain the latest order data.
Run the Export Process and Verify the Export
After configuring all export settings and filters, click the Export button to start the process. WP Ultimate CSV Importer Pro will export the selected WooCommerce orders to Google Sheets.
Once the export is completed, you will see Download and G-Sheets options. Click the G-SHEETS option to open the exported WooCommerce orders directly in Google Sheets. Review a few records to confirm that order details such as customer information, products, payment method, and order status are exported correctly.
This verification step ensures the export was completed successfully and the data is accurate.
WP Ultimate CSV Importer Pro
Get Ultimate CSV/XML Importer to import data on WordPress faster, quicker and safer.
Use Cases for Exporting WooCommerce Orders to Google Sheets
Exporting WooCommerce orders to Google Sheets is useful in many day-to-day business scenarios. Store owners often use Google Sheets to create sales reports by filtering orders based on date, product, or payment method. This makes it easier to track performance without logging into WordPress repeatedly.
For accounting and payment reconciliation, exported order data helps teams verify transactions, calculate totals, and share reports with accountants. Since Google Sheets updates in real time, finance teams can access the latest order data whenever needed.
Google Sheets is also helpful for inventory planning. By reviewing product-level order data, store owners can identify fast-selling items and plan stock replenishment accordingly.
Team collaboration becomes easier when WooCommerce orders are shared in Google Sheets. Customer support, sales, and management teams can access the same order data, add notes, and coordinate actions without exporting files manually.
Common Issues and Troubleshooting
While exporting WooCommerce orders to Google Sheets using WP Ultimate CSV Importer Pro is generally smooth, you may occasionally encounter issues. Most of these problems are easy to resolve with a few simple checks.
Common Problems and Solutions
| Issue | Possible Cause | Solution |
| Google authentication error | Client ID, Client Secret, or Redirect URL is incorrect | Recheck the credentials in Google Cloud and ensure the Redirect URL matches exactly |
| Google Sheets was not created | Google Sheets API not enabled | Go to Google Cloud Console and enable the Google Sheets API for the project |
| Orders are missing in the export | Filters applied incorrectly | Review date range, order status, product, or payment method filters |
| Permission denied error | Google account access not approved | Reconnect the Google account and allow all requested permissions |
| Export fails for large orders | Server timeout or memory limit | Enable the split records option or export data in iterations (batch export) |
Additional Tips
If issues persist, ensure that WP Ultimate CSV Importer and WooCommerce are updated to the latest versions. Clearing cache plugins and retrying the export can also help resolve temporary conflicts.
By following these troubleshooting steps, most export-related issues can be resolved quickly without technical expertise.
Wrap Up
Exporting WooCommerce orders to Google Sheets makes order management easier and more efficient. It helps store owners improve reporting, share data with teams, and avoid manual exports. Keeping order data in Google Sheets also ensures better organization and quick access when needed.
With WP Ultimate CSV Importer Pro, you can securely export WooCommerce orders, apply filters, and schedule automatic exports directly to Google Sheets. The plugin is built to handle large order volumes and supports both beginners and advanced WooCommerce users.
If you have any questions or need help during the setup, the Smackcoders support team is here to help. Feel free to contact them at support@smackcoders.com for expert assistance.
Frequently Asked Questions
1. How do I export bulk orders from WooCommerce?
You can export bulk orders from WooCommerce by using an export plugin like WP Ultimate CSV Importer Pro. It allows you to select all WooCommerce orders, apply filters if needed, and export them in bulk directly to Google Sheets or other file formats.
2. What is the best export plugin for WooCommerce orders?
WP Ultimate CSV Importer Pro is one of the best export plugins for WooCommerce orders. It supports large data volumes, advanced filtering, scheduled exports, and direct integration with Google Sheets, making it suitable for both beginners and advanced users.
3. How do I export all orders from WooCommerce?
To export all orders, select WooCommerce Orders in the export module and avoid applying any filters. WP Ultimate CSV Importer Pro will export all available orders from your store into your chosen destination, such as Google Sheets.
4. How do I export WooCommerce orders to Excel?
WP Ultimate CSV Importer Pro allows you to export WooCommerce orders in Excel-compatible formats such as CSV or XLS. You can then open these files directly in Microsoft Excel for further analysis.
5. How does WP Ultimate CSV Importer Pro handle large order exports?
WP Ultimate CSV Importer Pro is optimized for large datasets. It includes options like split records and scheduled exports, which help prevent server timeouts and ensure smooth exports even for stores with thousands of orders
How to Bulk Update WooCommerce Prices and Stocks Using CSV File
9 Feb 2026, 1:15 pm
Table of Contents
Maintaining accurate product prices and stock levels is a daily responsibility for WooCommerce store owners or maintainers. While this task may feel manageable in the early stages of a store, it becomes increasingly difficult as the number of products grows. Updating each product manually takes time, demands attention, and often leads to avoidable mistakes.
Bulk updating WooCommerce prices and stock using a CSV file offers a practical and scalable solution. Instead of editing products one by one, store owners can manage updates in a single file and apply changes across the entire catalog at once. This method is especially useful for stores handling frequent price adjustments or inventory changes.
This article explains how to bulk update WooCommerce prices and stocks using CSV files, with a focus on using WP Ultimate CSV Importer as a reliable solution. The goal is to help store owners, managers, and beginners understand both the process and the reasons why CSV-based updates are essential for efficient store management.
Key Takeaways
- Use CSV files to update WooCommerce prices and stock levels in bulk, rather than editing products individually, saving significant time and effort.
- Always include a reliable product identifier, such as SKU or Product ID, to ensure updates apply to the correct existing products without duplication.
- Review and structure your CSV carefully by keeping only necessary columns like regular price, sale price, stock quantity, and stock status for accurate updates.
- Use a trusted import tool – WP Ultimate CSV Importer with field mapping and update options to modify pricing and inventory without affecting other product data.
- Test imports with a small sample file and keep a complete backup before running full bulk updates to prevent large-scale errors and maintain data safety.
Common challenges in updating WooCommerce prices and stocks manually
Running a WooCommerce store involves constant monitoring of product prices and inventory levels. While manual updates may seem manageable in the early stages, they quickly become inefficient as your store grows. Many store owners struggle with accuracy, time management, and scalability when relying on manual methods. Understanding these challenges highlights why bulk updates using CSV files are a smarter alternative.
Manual Updates Consume Valuable Time
Updating prices and stock product by product through the WooCommerce dashboard is extremely time-intensive. For stores with large catalogs, even a simple price change can take hours. This repetitive work slows down daily operations and diverts attention from business-critical activities.
Increased Chances of Human Error
Manually entering numbers increases the risk of mistakes such as incorrect pricing, missing zeros, or wrong stock quantities. These errors can lead to overselling, underselling, or displaying inaccurate product information to customers.
Lack of Efficiency for Bulk Changes
Price updates due to supplier changes, discounts, or seasonal sales often affect multiple products at once. Handling these changes manually makes bulk updates impractical and exhausting, especially for stores with hundreds or thousands of items.
Inconsistent Product Data
When updates are done manually, it’s easy to forget to update either the price or the stock. This results in mismatched data where a product shows the correct price but incorrect availability, confusing customers and impacting conversions.
No Easy Rollback or Update History
If an error occurs during manual updates, reverting changes is difficult. WooCommerce does not offer a straightforward undo option for bulk manual edits, making recovery time-consuming and potentially risky.
Poor Scalability as the Store Grows
Manual price and stock management may work for small stores, but it does not scale. As the number of products increases, manual updates become unmanageable and prone to delays.
Reduced Focus on Business Growth
Spending hours on routine updates limits the time available for marketing, customer engagement, and strategic planning. This can slow overall business growth and reduce productivity.
Why CSV-Based Bulk Updates Are the Better Solution
Because of these challenges, many WooCommerce store owners switch to bulk updating prices and stock using CSV files. CSV-based updates allow you to modify hundreds or thousands of products at once, reduce errors, maintain consistency, and save valuable time making inventory and pricing management far more efficient.
Why CSV-based bulk updates save time and reduce errors
Updating WooCommerce prices and stock manually takes time and often leads to mistakes. Using CSV-based bulk updates with WP Ultimate CSV Importer Pro makes the process faster, more accurate, and easier to manage. Store owners can maintain all product data in a single CSV file and map fields like price and stock directly to WooCommerce products, ensuring correct updates every time. The plugin’s high-speed import feature allows thousands of products to be updated in one go, saving significant effort. Preview and validation options help identify issues before changes go live, reducing errors. Product matching through SKU prevents duplicates and keeps the database clean. If corrections are needed, the CSV can be edited and re-imported safely. Scheduled imports using Cron further automate regular updates, keeping inventory accurate without manual work. Overall, CSV-based bulk updates improve efficiency and allow store owners to focus more on business growth instead of repetitive product management tasks.
When Do You Need Bulk Price & Stock Updates?
Bulk price and stock updates are not occasional tasks for most WooCommerce stores. They are often required regularly due to changing business conditions and inventory movement. Stores with large catalogs or frequently changing products depend on bulk update methods to maintain accurate data. Without bulk updates, keeping prices and stock levels consistent becomes difficult.
Below are common situations where bulk updates are especially useful.
Seasonal sales & discounts
Seasonal promotions and sales events often require updating sale prices across many products within a short period. Making these changes manually increases the risk of missed or incorrect pricing.
Using CSV updates, discounts can be applied by adjusting values in one file. This ensures that all eligible products reflect the correct sale price quickly and consistently.
Supplier price changes
Supplier cost changes often affect multiple products at once. When costs increase or decrease, store owners must update retail prices to maintain profit margins.
CSV updates allow price adjustments to be applied in bulk, reducing delays and preventing outdated pricing from being displayed to customers.
Managing large product catalogs
Stores with hundreds or thousands of products cannot rely on manual updates. As catalog size increases, the risk of missing updates also increases.
Bulk update methods save time, reduce effort, and help maintain accurate product data across the entire store. CSV files offer a scalable long-term solution for catalog management.
WP Ultimate CSV Importer Pro
Get Ultimate CSV/XML Importer to import data on WordPress faster, quicker and safer.
CSV File Structure for Price & Stock Updates
A well-organized CSV file is the foundation for accurate WooCommerce product updates. Since WooCommerce relies on specific data fields to recognize products and apply modifications, maintaining the correct structure is extremely important. If the file is poorly formatted, the import process may fail or result in incorrect price changes and inventory inconsistencies. Issues such as missing columns, wrong product identifiers, or invalid values can cause serious update errors. Preparing and reviewing the CSV file carefully before starting the import helps ensure a smooth and reliable bulk update process.
Required Columns (Product ID / SKU, Regular Price, Sale Price, Stock Quantity, Stock Status)
Each column in the CSV serves a clear purpose during the update workflow.
- The Product ID or SKU is used to connect each CSV entry with the correct existing product in WooCommerce.
- The Regular Price column defines the standard selling price of the product.
- The Sale Price column allows you to apply discounts whenever needed.
- The Stock Quantity field updates the available inventory count.
- The Stock Status determines whether the product appears as in stock or out of stock in the store.
Using accurate Product IDs or SKUs is especially important because it ensures updates are applied to existing products without accidentally creating duplicate listings.
Example CSV explanation (no raw CSV dump, explain field purpose)
Each column in the CSV corresponds directly to a WooCommerce product field. The regular price column controls the base price, while the sale price column overrides it during discounts.
Stock quantity updates inventory counts, and stock status ensures an accurate display of availability. Together, these fields allow WooCommerce to reflect current pricing and inventory without manual edits.
Step-by-Step: Bulk Update WooCommerce Prices & Stock Using WP Ultimate CSV Importer
Managing prices and inventory manually inside WooCommerce becomes time-consuming as your product catalog grows. Instead of editing each product one by one, you can update hundreds or even thousands of products in minutes using WP Ultimate CSV Importer. By working with CSV files, store owners can easily export existing product data, make changes offline, and import updates back into WooCommerce without disrupting the store’s structure.
The following step-by-step process explains how to safely export your products, update price and stock information, and import the revised data back into your WooCommerce store.
Step 1: Access WP Ultimate CSV Importer Pro
To get started, log in to your WordPress admin dashboard. This is the central place where all store management tasks happen.
Before you update any prices or stock values, it’s important to export your existing product data first. Doing this gives you a safe backup and ensures you’re working with accurate, up-to-date information.
What you need to do:
- Navigate to Ultimate CSV Importer Pro → Export from the WordPress dashboard
- Use the export section to download your current WooCommerce product details
By exporting your products at the beginning, you create a reliable base file that you can edit confidently without worrying about data loss.
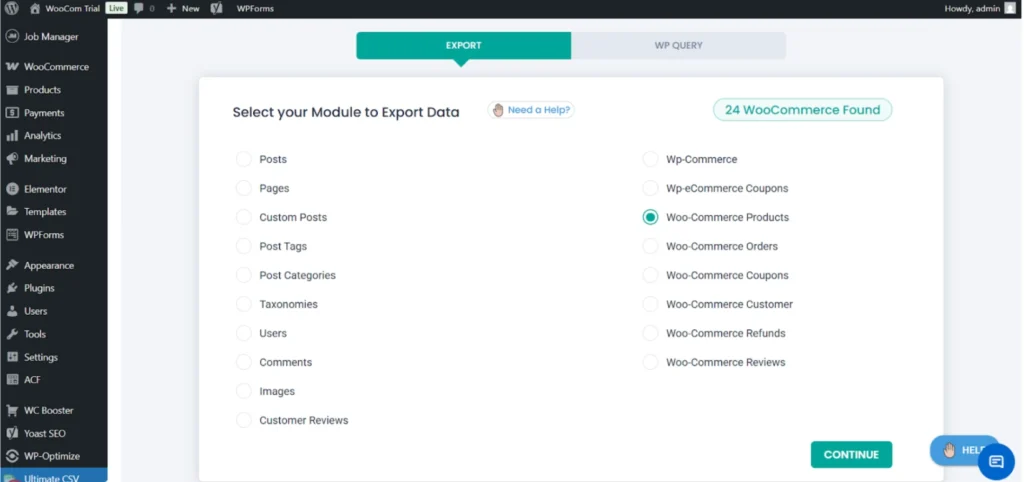
Step 2: Select WooCommerce Products for Export
Once you’re on the export page, you’ll notice multiple modules that allow you to export different types of data. At this stage, you need to specify exactly what information you want to download. Since the goal is to update product prices and stock, selecting the correct module is essential.
What you need to do:
- Choose Woo-Commerce Products from the list of available modules
- Confirm that the displayed product count matches the number of products in your store
- Click Continue to move forward
Selecting the WooCommerce Products module ensures that only product-related data is exported, keeping the CSV file clean and relevant for the update process.
Step 3: Export Products in CSV Format
After selecting the WooCommerce Products module, the next step is to choose how your product data should be exported. The file format you select here matters because it affects how easily you can edit and re-import the data later. CSV is the most practical option, as it works smoothly with tools like Excel and Google Sheets.
What you need to do:
- Select CSV as the export format
- Leave advanced filter options unchanged unless you need specific product conditions
- Click Export to start generating the file
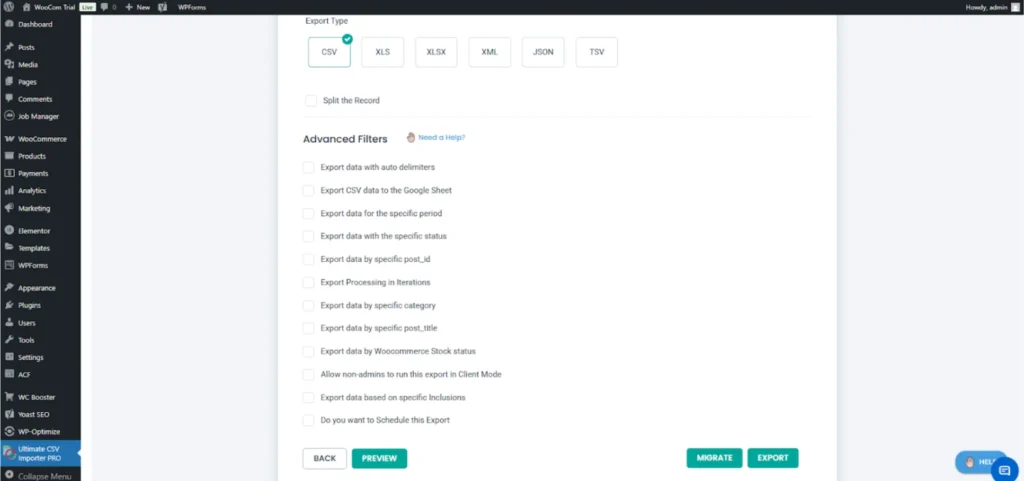
Exporting your products in CSV format makes it easier to edit prices and stock values while ensuring compatibility during the import process.
Step 4: Download the Exported CSV File
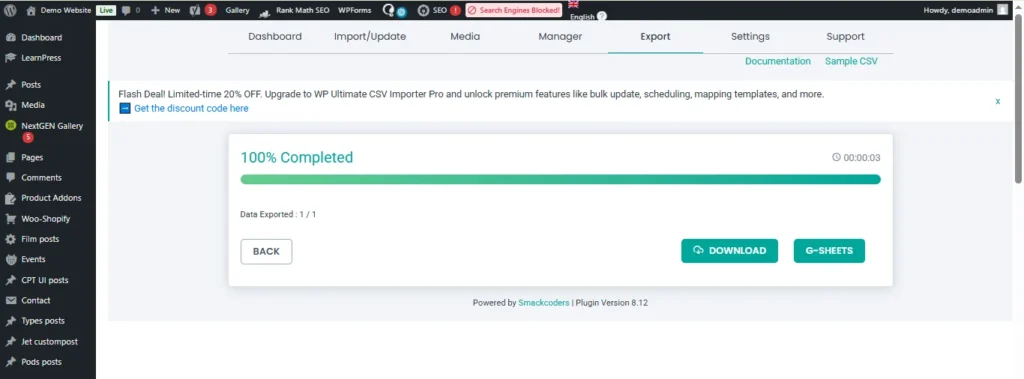
Once the export process begins, the system will generate your product file in the background. After the export reaches completion, you’ll be able to download the CSV file to your computer. This file plays an important role, as it serves both as your working file and a safety backup.
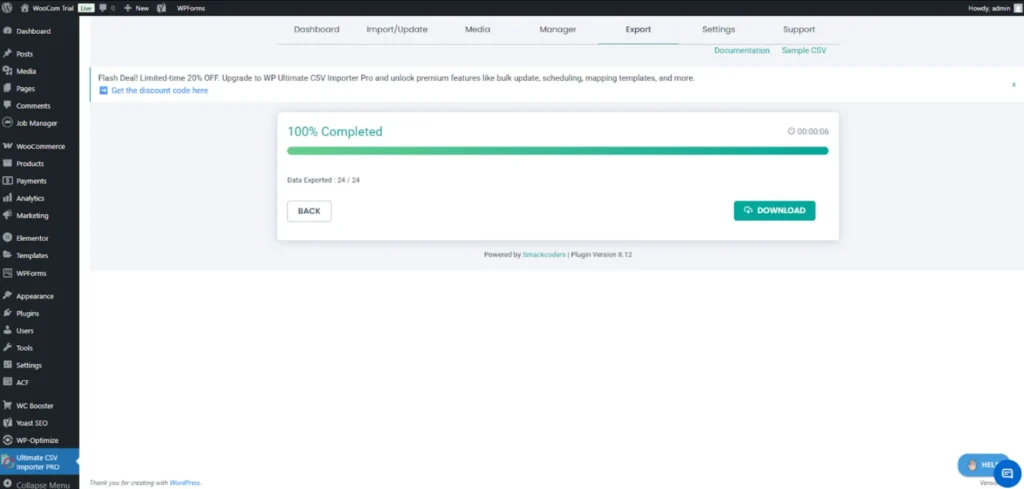
What you need to do:
- Wait until the export status shows 100% completed
- Click the Download button to save the file
- Store the file securely on your system before making any edits
Keeping this original CSV file unchanged gives you a reliable backup, allowing you to restore your product data if needed.
Step 5: Open the CSV File in Excel or Google Sheets
After downloading the CSV file, the next step is to open it using a spreadsheet tool such as Excel or Google Sheets. This is where you’ll review and prepare the data for updates. At first glance, the file may look overwhelming because it contains many columns, but you only need to focus on a few key fields.
What you need to do:
- Open the downloaded CSV file in Excel or Google Sheets
- Review the columns, including product name, SKU, price, stock quantity, and stock status
- Take a moment to understand the file structure before making any changes.
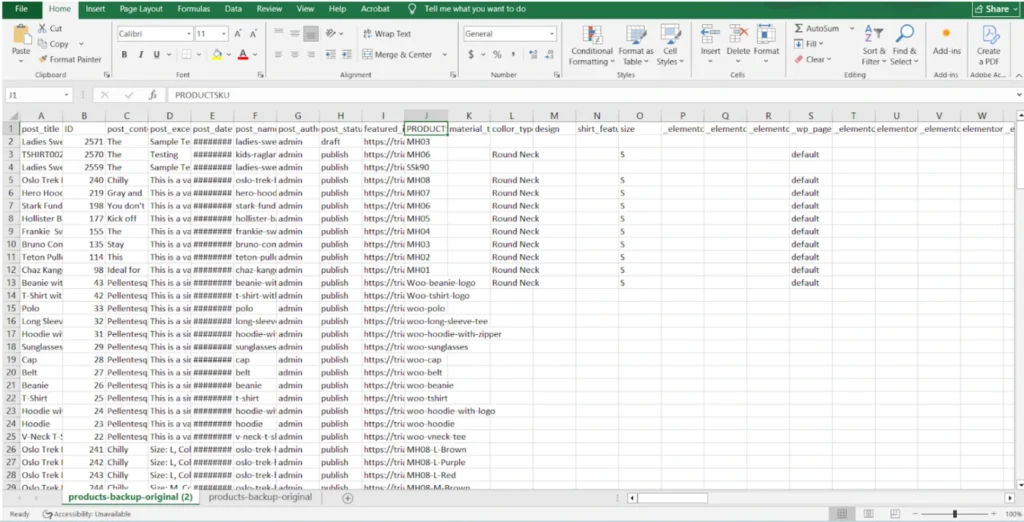
Familiarizing yourself with the CSV layout helps prevent mistakes and makes the editing process much smoother.
Step 6: Edit Prices and Stock Values Carefully
This is the most important part of the entire process, because this is where your actual product updates happen. Inside the CSV file, you can now adjust pricing and inventory details directly. While editing, it’s best to focus only on the fields you really need to change and avoid touching unnecessary columns.
What you need to do:
- Update the regular price if you want to change the main product price
- Modify the sale price if the product is on discount
- Adjust the stock quantity based on available inventory
- Update the stock status if needed (in stock or out of stock)
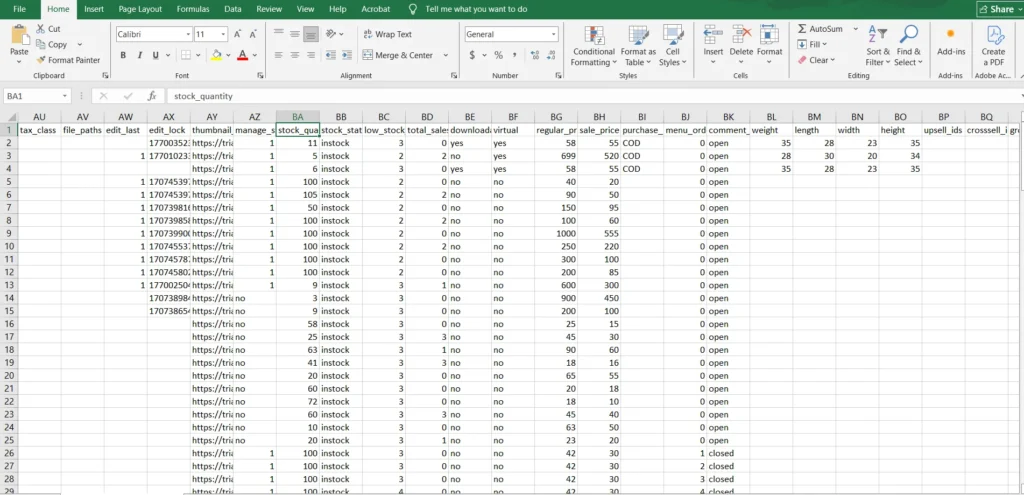
One critical thing to remember here is not to change the SKU values. WooCommerce uses SKUs to identify products, so keeping them unchanged ensures the correct products get updated during import.
Step 7: Save the Updated File as CSV
Once you’ve finished editing prices and stock values, the next step is to save the file correctly. Saving the file in the proper format is important because it ensures the importer can read and process the data without errors.
What you need to do:
- Click Save As in your spreadsheet tool
- Choose CSV as the file format
- Give the file a clear and recognizable name
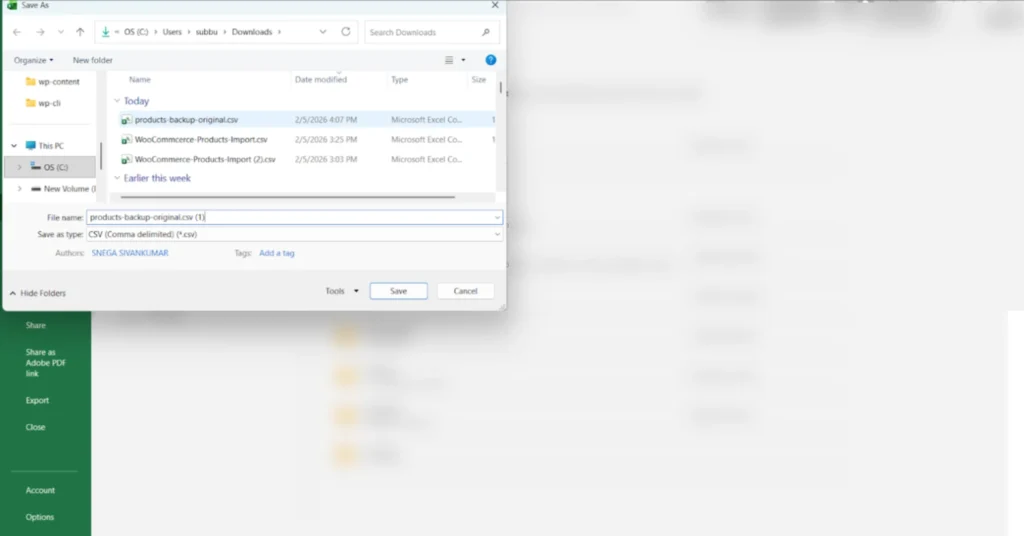
Saving the file in CSV format keeps it compatible with the import process and helps avoid upload issues later.
WP Ultimate CSV Importer Pro
Get Ultimate CSV/XML Importer to import data on WordPress faster, quicker and safer.
Step 8: Upload the Updated CSV File
Now that your CSV file is ready, it’s time to upload it back into WordPress. This step brings your edited data back into the system so the updates can be applied.
What you need to do:
- Go to Ultimate CSV Importer Pro → Import / Update
- Select Upload from Desktop
- Choose your edited CSV file and upload it
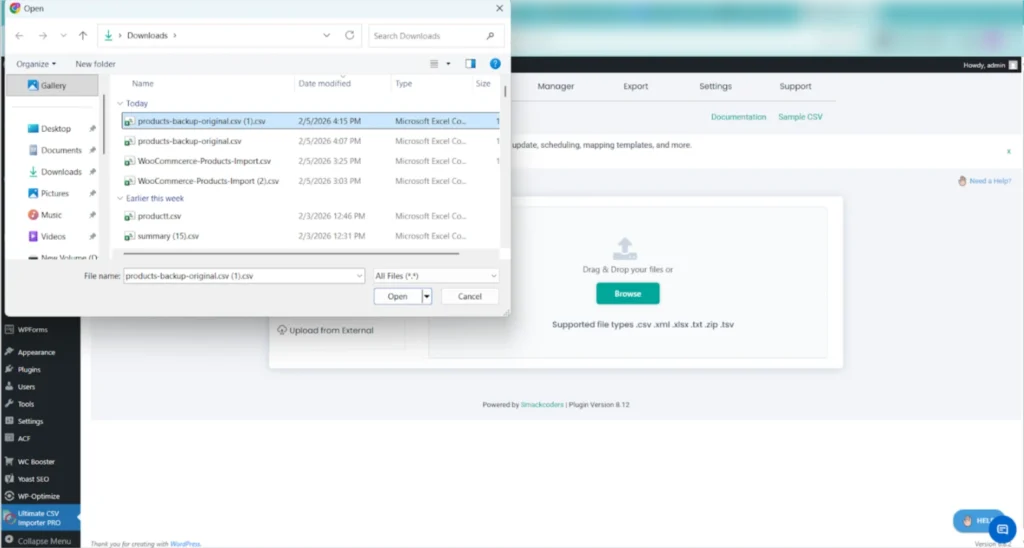
Uploading the correct file ensures the importer works with your latest changes.
Step 9: Select Update Content Mode
After uploading the CSV, you’ll be asked how the data should be processed. This step is crucial because it determines whether products are updated or duplicated.
What you need to do:
- Select Update Content
- Set the record type as WooCommerce Product
- Click Continue to proceed
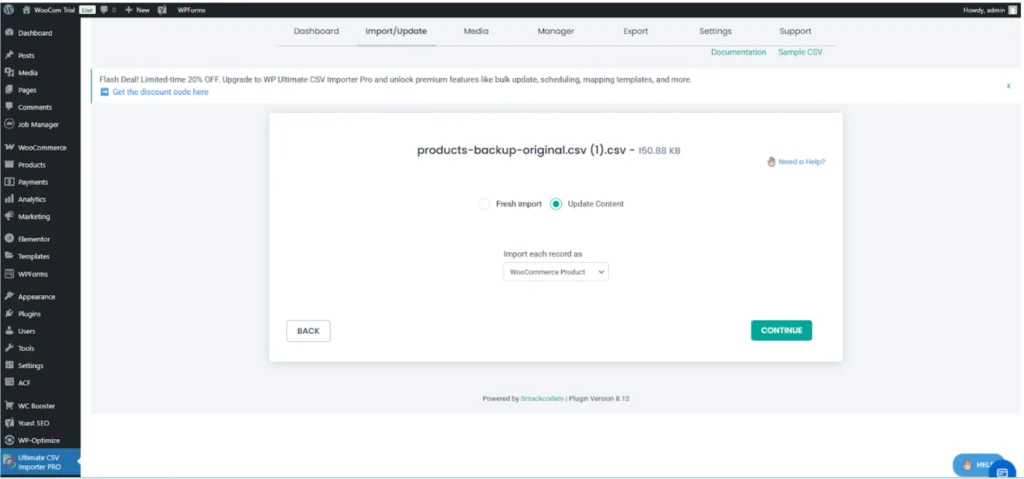
Choosing Update Content tells the system to modify existing products instead of creating new ones.
Step 10: Match CSV Columns with WooCommerce Fields
Next, you’ll see the field-mapping screen. While this may look technical at first, most mappings are handled automatically. Still, it’s important to review them carefully.
What you need to check:
- Product title mapping
- Product ID mapping
- Description and short description
- SKU field mapping
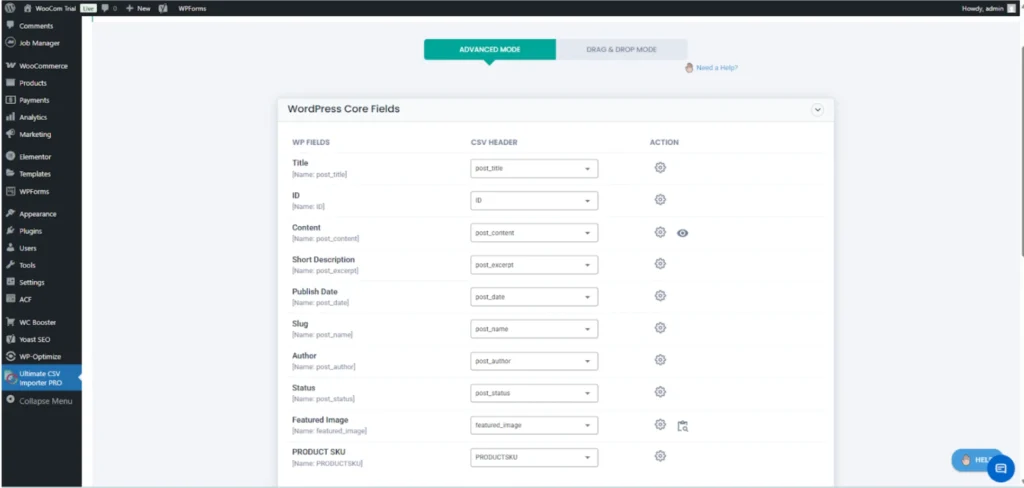
Taking a moment to verify these mappings helps ensure data is updated correctly.
Step 11: Map Stock and Pricing Fields
This is where WooCommerce receives updated stock and price values from your CSV file.
Make sure the following fields are mapped correctly:
- Stock quantity
- Stock status
- Regular price
- Sale price
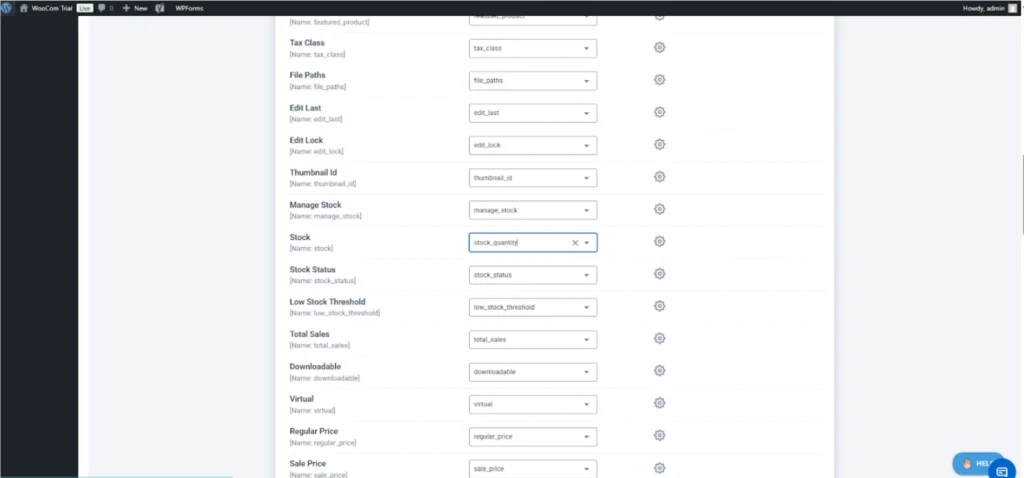
Correct mapping here ensures your store reflects accurate pricing and inventory levels.
Step 12: Review Optional Sections and Continue
You may notice additional sections related to SEO fields, product attributes, or page builder data. These sections are optional and only need attention if your CSV includes related information.
What you should do:
- Leave these sections unchanged if they are not relevant
- Review to ensure nothing is misconfigured
- Click Continue to move forward
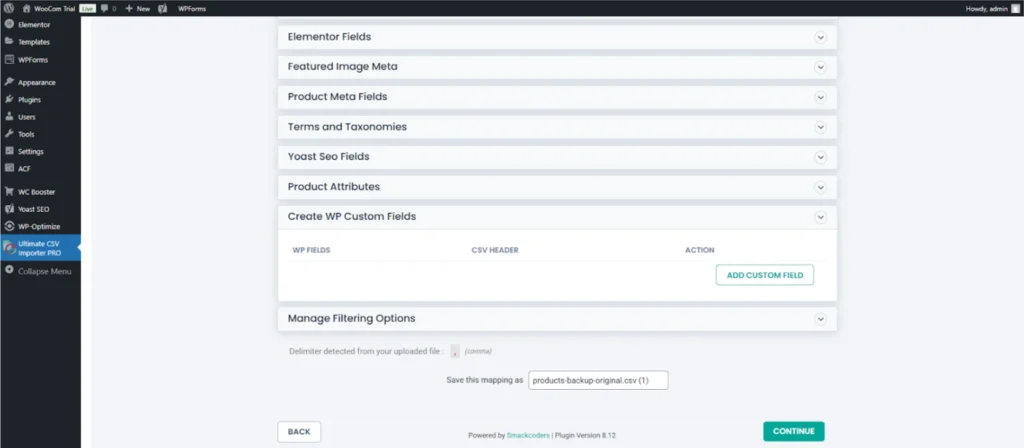
Skipping unnecessary fields helps keep the import clean and focused.
Step 13: Configure Import Rules Using SKU
In the import configuration screen, you’ll define how records should be matched and updated. This step ensures accuracy during the update process.
What you need to do:
- Enable handling duplicate records
- Choose Update records based on → PRODUCTSKU
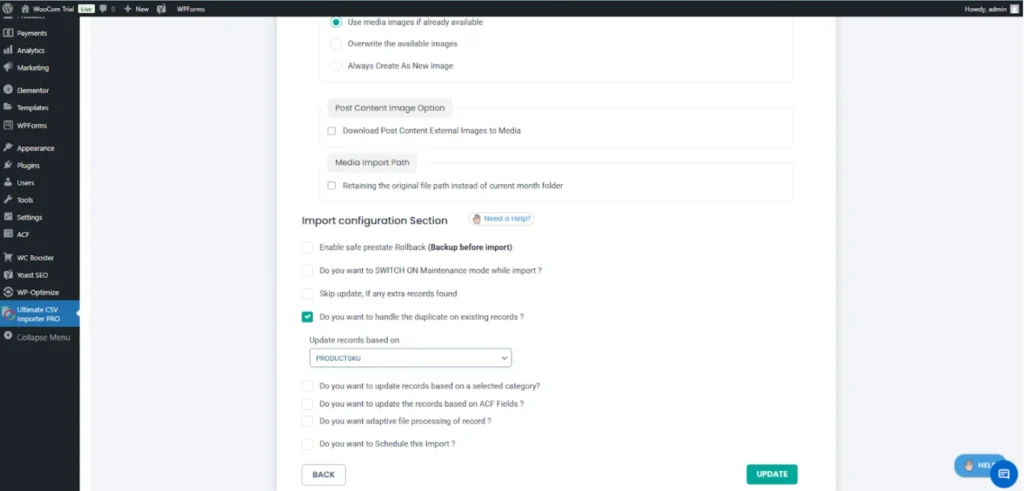
Using SKU as the matching key ensures each product is updated correctly.
Step 14: Run the Import Process
Once all settings are confirmed, you’re ready to run the import. The system will now process each product from the CSV file.
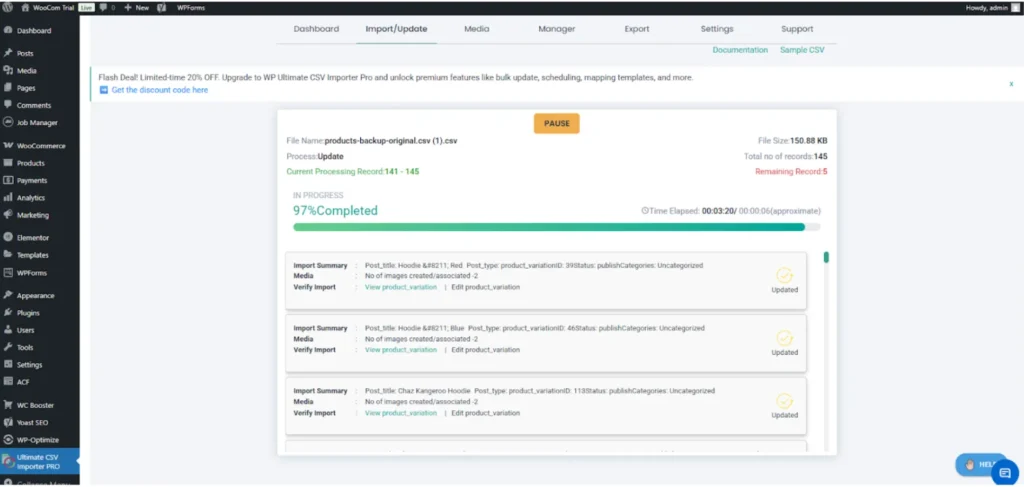
What you’ll notice:
- A progress bar showing real-time import status
- Automatic processing of product updates
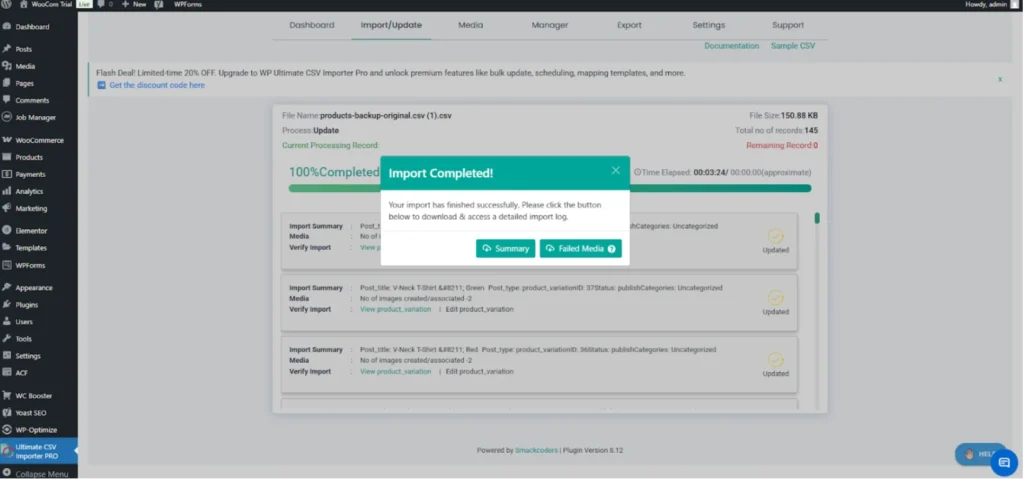
When the import completes, you’ll see a confirmation message indicating success.
Step 15: Review the Import Summary
After the import finishes, it’s a good idea to review the summary for confirmation and clarity.
The import summary shows:
- Number of products successfully updated
- Any failed images or records
- Overall import status
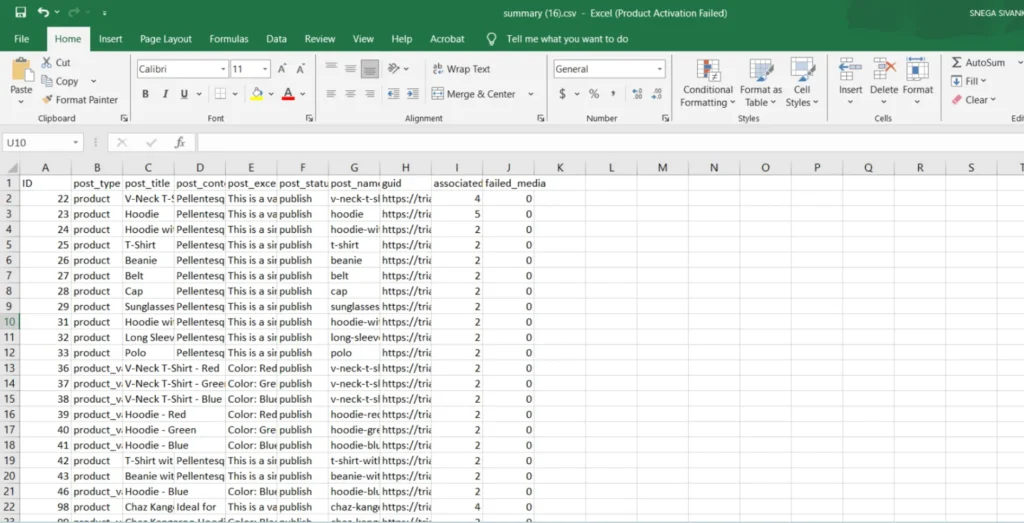
This step helps you quickly verify whether everything worked as expected.
Step 16: Verify Changes in WooCommerce
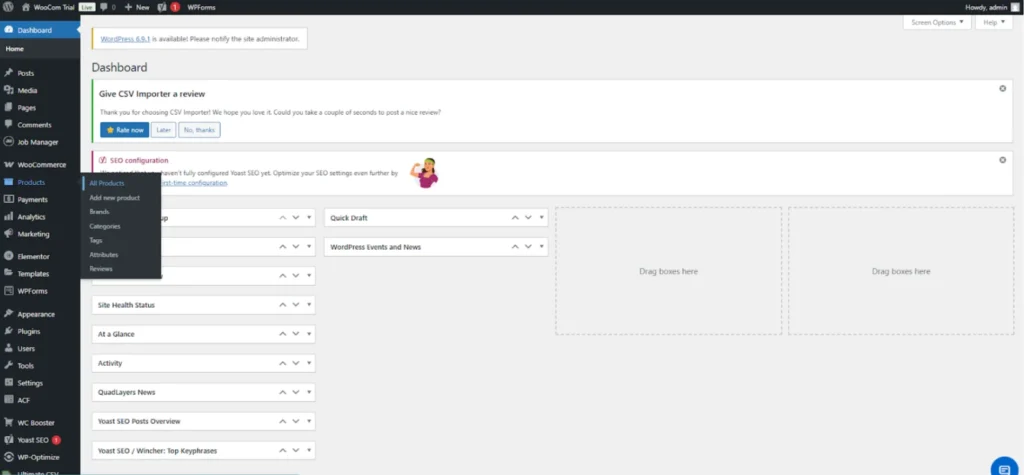
As a final check, head over to WooCommerce → Products → All Products and review a few items manually.
Make sure to confirm:
- Prices are updated correctly
- Stock quantities match the CSV values
- Products remain published and visible

Once everything looks correct, your bulk update process is complete
WP Ultimate CSV Importer Pro
Get Ultimate CSV/XML Importer to import data on WordPress faster, quicker and safer.
Best Practices for Successful Bulk Updates
To maintain data integrity and avoid mistakes, always keep a backup of your original CSV file. Use SKU values consistently to identify products, and consider testing the import with a small number of products before updating your entire catalog. Avoid altering product IDs manually, and ensure that all price and stock values are entered in a clean numeric format.
Important Import Settings to Avoid Mistakes
Choosing the right configuration during a bulk import plays a major role in keeping your WooCommerce store data accurate. Incorrect options can unintentionally change product details, create duplicate listings, or update stock information wrongly. Taking a moment to review and understand the available settings helps ensure the import runs smoothly and updates remain fully under your control.
Updating only selected fields
Configure the importer so that it modifies only the necessary fields, such as pricing and inventory values. Limiting the update scope protects other product elements like descriptions, images, categories, and attributes from being changed during the process.
Preventing product duplication
Duplicate entries usually appear when the system cannot properly identify existing products from the CSV file. Using consistent identifiers like SKU or Product ID allows WooCommerce to match records accurately and apply updates to the correct items without creating extra products.
Handling out-of-stock products correctly
Make sure that stock status settings correspond with the inventory quantities provided in the CSV. When the quantity reaches zero, products should automatically be marked as out of stock. Proper stock handling keeps availability information accurate and helps customers clearly understand which items are currently available.
Essential Practices for Safe and Accurate WooCommerce Bulk Updates
Applying proven methods during bulk updates helps minimize risks and ensures your WooCommerce data stays accurate and consistent. Careful preparation and smart workflow habits make the update process smoother and reduce the chances of unexpected issues.
Always test with a small CSV first
Start by running a trial import using a small WooCommerce Products sample file before updating the full product catalog. This allows you to verify field mapping, review settings, and confirm that the updates work as intended. Testing on a smaller scale helps detect problems early and prevents large-scale errors.
Use SKU instead of Product ID when possible
Whenever available, rely on SKU values for product matching instead of internal product IDs. SKUs remain more consistent across different websites, migrations, or staging environments, which helps maintain accurate product identification and reduces matching errors.
Backup before bulk updates
Create a complete backup of your website or product database before performing any large import. Having a backup ensures that you can quickly restore previous data if pricing or inventory updates do not produce the expected results, giving you an extra layer of protection.
Why Use WP Ultimate CSV Importer for WooCommerce Updates
WP Ultimate CSV Importer is designed to make large-scale WooCommerce product updates faster and more manageable. With advanced field mapping options, precise update controls, and the ability to process large CSV files, it helps store owners update pricing and inventory efficiently while maintaining data accuracy.
Supports large product catalogs
The plugin is built to manage bulk updates across extensive product databases, including stores with thousands of items. Automating updates through CSV files, it significantly reduces manual workload and speeds up product catalog maintenance.
Safe update without overwriting unwanted data
Flexible update settings allow you to choose exactly which product fields should be modified during the import process. This ensures that essential content, such as descriptions, images, and categories remain untouched unless intentionally updated.
Works with variable products and stock status
WooCommerce variable products often include multiple variations and complex stock details. The plugin supports accurate handling of variation pricing and inventory levels, ensuring that both product options and stock availability are updated correctly.
Conclusion
Bulk updating WooCommerce prices and stock using CSV is the most practical approach for managing large or growing product catalogs. CSV-based updates save time, reduce errors, and improve consistency across the store.
Using WP Ultimate CSV Importer streamlines the entire process, from file upload to safe and accurate updates. By following best practices, testing before full imports, and reviewing results carefully, store owners can manage WooCommerce pricing and inventory with confidence.
Don’t let manual product edits slow down your WooCommerce growth. Start simplifying your workflow today, prepare a structured CSV file, use reliable bulk import tools, and keep your prices and stock updated in minutes instead of hours.
If this guide helped you manage WooCommerce updates more efficiently, feel free to reference it in your blog or share your feedback with us at support@smackcoders.com. We’re always happy to collaborate and support better WooCommerce workflows.
If your WooCommerce store experiences frequent pricing or inventory changes, adopt CSV-based bulk updates using WP Ultimate CSV Importer or a similar structured workflow to improve efficiency, accuracy, and scalability
FAQ – Bulk Update Prices and Stocks in WooCommerce
1. Can I bulk update WooCommerce prices and stock without editing products manually?
Yes. WooCommerce allows bulk updates using CSV files, which let you modify prices and stock quantities for multiple products at once. This approach eliminates the need to open and edit each product individually, making it ideal for stores with large catalogs or frequent price changes.
2. What is the safest way to bulk update prices and stocks in WooCommerce?
The safest method is using a structured CSV file with a reliable import tool that supports update-only mode. This ensures that only selected fields—such as prices and stock—are updated without affecting other product data like descriptions, images, or categories.
3. Should I use Product ID or SKU for WooCommerce CSV updates?
Using SKU is generally recommended because it remains consistent across environments and imports. Product IDs can change between sites or during migrations, while SKUs provide a more reliable way to match existing WooCommerce products during bulk updates.
4. Can I update stock status along with stock quantity using a CSV file?
Yes. Along with stock quantity, you can also update stock status (in stock, out of stock, or backorder) through CSV-based imports. Correctly mapping both fields ensures accurate inventory visibility and prevents customers from purchasing unavailable products.
5. Will bulk CSV updates overwrite my existing WooCommerce product data?
Bulk updates will only overwrite the fields you choose to update. If your import is configured to update prices and stock only, other product data, such as titles, images, and attributes, will remain unchanged. This makes CSV updates a controlled and low-risk process.
6. Is it possible to bulk update prices for variable products in WooCommerce?
Yes. Variable products can be updated via CSV by targeting individual variations using their unique identifiers. Prices and stock levels can be adjusted per variation, making CSV imports suitable for complex WooCommerce product structures.
7. What precautions should I take before running a bulk update?
Before performing a bulk update, always back up your site and test the import with a small CSV file. This helps identify mapping issues early and prevents large-scale errors when updating your full product catalog.
8. How can I update bulk prices in WooCommerce?
Bulk price updates can be completed by preparing a CSV file that contains product identifiers, such as SKU or Product ID, along with updated pricing details. After editing the file in a spreadsheet, you can import it into WooCommerce using a bulk import plugin like WP Ultimate CSV Importer and map the price fields correctly. This method allows you to modify large numbers of products at once without editing each item individually.
9. How to bulk update stock in WooCommerce?
To update inventory in bulk, create a CSV file that includes the product identifier and stock quantity fields. Upload the file through a WooCommerce-compatible import tool and connect the stock columns to the correct inventory fields during mapping. Once the import is completed, WooCommerce automatically adjusts product availability and stock levels based on the data provided.
10. Can I import 10,000+ products in WooCommerce?
Yes, WooCommerce can manage very large product imports when supported by a reliable CSV importer plugin and proper server resources. Tools such as WP Ultimate CSV Importer are designed to handle high-volume data and allow you to upload thousands of products in a single or segmented import process. Using a clean and well-organized CSV file helps ensure the import runs smoothly without performance issues.
WP Ultimate CSV Importer Pro 8.12 — Easy Digital Downloads Plugin Support & Minor Bug Fixes
10 Jan 2026, 11:53 am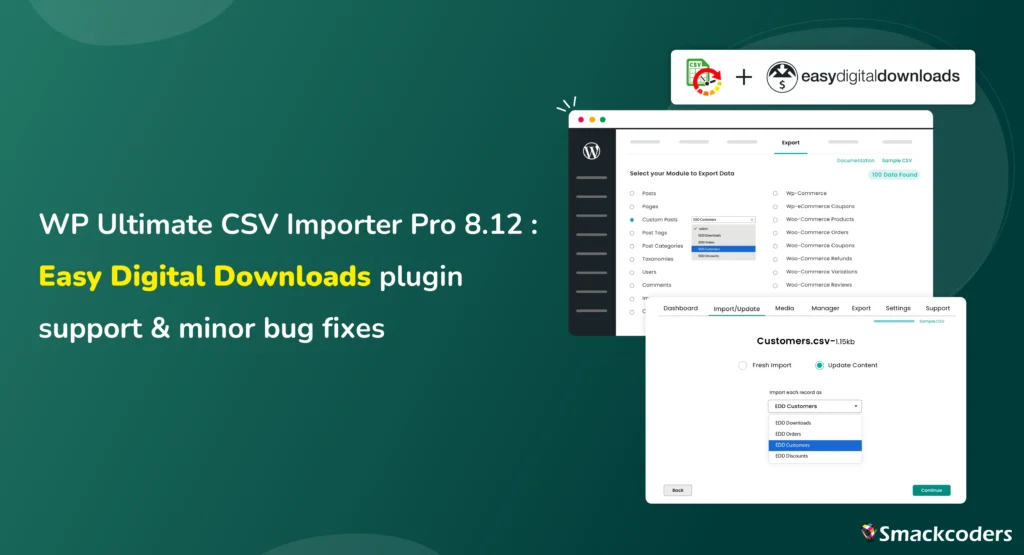
Table of Contents
Hi, Our Beloved User Community! WP Ultimate CSV Importer Pro 8.12 is now live. This release introduces support for Easy Digital Downloads (EDD) along with a set of important bug fixes and security improvements that make everyday import and export workflows more stable and reliable.
Version 8.12 focuses on two things that matter most to growing WordPress sites:
- Expanding support for real-world eCommerce use cases
- Improving reliability across commonly used features and integrations
If you work with digital products, recurring updates, or large datasets, and EDD is your go-to plugin, this release is designed to fit seamlessly into your existing workflow.
What’s New in WP Ultimate CSV Importer Pro 8.12
Easy Digital Downloads (EDD) Import & Export Support
With version 8.12, WP Ultimate CSV Importer officially adds support for Easy Digital Downloads, one of the most widely used solutions for selling digital products on WordPress.
This is a full integration, built on the same core import and export engine that existing users rely on for WooCommerce and other data types. There are no special workflows or reduced capabilities; EDD data follows the same structured, predictable process.
Easy Digital Downloads Support — Built for Digital Product Stores
Easy Digital Downloads powers thousands of businesses selling ebooks, plugins, licenses, and other downloadable products. Managing that data at scale often requires more than manual edits or one-off scripts.
With WP Ultimate CSV Importer, EDD users can now confidently import and export their store data using structured CSV workflows.
What You Can Import and Export with EDD Integration
The EDD integration supports key store data, including:
- Downloads (Digital Products)
Import or export product details such as pricing, variable pricing, downloadable files, categories, tags, featured images, limits, expiration rules, and custom metadata. - Orders (Payments)
Manage payment records with customer information, billing details, order totals, taxes, discounts, gateways, transaction IDs, and line items. - Customers
Import and export customer profiles with purchase history, lifetime value, addresses, and notes. - Discounts
Handle discount codes with usage limits, date restrictions, product or category rules, and status.
WP Ultimate CSV Importer Pro
Get Ultimate CSV/XML Importer to import data on WordPress faster, quicker and safer.
Why This Matters for EDD Users
For many Easy Digital Downloads store owners, bulk data management is still time-consuming and error-prone. Version 8.12 removes that friction.
With WP Ultimate CSV Importer Pro, you can:
- Migrate an entire EDD store between environments
- Bulk update product pricing, files, or categories without touching the database
- Rebuild stores safely using export → modify → re-import workflows
- Generate structured data exports for reporting or analysis
- Maintain backups of critical store data
All of this works within the same familiar import steps and field mapping system, no new learning curve required.
Bug Fixes & Stability Improvements
This release also includes several important fixes that improve stability, security, and usability across the plugin:
- Fixed the UK language (lang-UK) issue
- Fixed the Google Sheet URL file upload issue
- Fixed the Manage Media uploads button issue
- Fixed File Manager “Delete All Records” button not working issue
- Fixed the jQuery vulnerability issue
- Fixed WooCommerce product export issue
These fixes address commonly reported edge cases and ensure smoother operation for both new and existing users.
Who Benefits Most from This Release
Store Owners
If you run an Easy Digital Downloads store, this release gives you structured, repeatable control over your store data, without manual edits or risky database changes.
Agencies & Freelancers
For teams handling EDD migrations, rebuilds, or client onboarding, version 8.12 simplifies bulk data handling using a single, reliable tool.
Developers
Developers working with structured eCommerce data will benefit from consistent import behavior, improved attribute handling, and cleaner exports.
Operations & Content Teams
Teams managing pricing updates, product files, discounts, or customer records can now do this in bulk with fewer errors and less effort.
Familiar Workflow, No Disruption
One of the key goals of version 8.12 was consistency. If you already use WP Ultimate CSV Importer Pro,
- The import steps remain unchanged
- Field mapping works exactly as before
- Filters, duplicate handling, logs, and scheduling behave the same
- The EDD modules appear automatically when the plugin is active
You can start using the new functionality immediately, with no retraining or setup overhead.
Documentation & Getting Started
Comprehensive documentation for the Easy Digital Downloads integration is now available, covering each module:
- Downloads Import Export
- Orders (Payments) Import Export
- Customers Import Export
- Discounts Import Export
These guides are designed to help users get started quickly, especially when working with large datasets.
How to Get WP Ultimate CSV Importer Pro 8.12
If you’re already using WP Ultimate CSV Importer Pro, visit your account on our website, log in, and download the pack. Delete the old one, install and activate the newer one on your website. Once updated, EDD options will appear automatically when the Easy Digital Downloads plugin is active.
Final Thoughts
WP Ultimate CSV Importer Pro 8.12 is a focused release to build and strengthen support for digital product businesses while improving overall stability and security. By adding Easy Digital Downloads support and addressing key issues, this version helps WordPress users manage their data with more confidence, whether they’re migrating stores, maintaining large catalogs, or handling ongoing updates. As always, your feedback continues to guide what we build next. Write to us at support@smackcoders.com, and we are all ears for your feedback.
Frequently Asked Questions
1. Does WP Ultimate CSV Importer Pro support Easy Digital Downloads?
Yes. From version 8.12 onwards, WP Ultimate CSV Importer Pro supports Easy Digital Downloads. This release introduces initial support for core EDD data, laying the foundation for broader compatibility.
2. What EDD data can I import and export using WP Ultimate CSV Importer?
You can import and export:
– Digital products (downloads)
– Orders and payment records
– Customers and purchase history
– Discount codes with rules and limits
All data follows the same mapping and validation process used across the plugin.
3. Can I migrate an entire Easy Digital Downloads store using CSV Importer Pro?
Yes. You can migrate EDD products, customers, orders, and discounts between sites or environments using export → modify → import workflows, without directly touching the database.
4. Will this update affect my existing WooCommerce imports?
No. Existing WooCommerce functionality remains unchanged. Version 8.12 only adds EDD support and fixes specific issues without disrupting current workflows.
WooCommerce Variable Pricing Calculator – Sell by Area, Volume, or Length
3 Jan 2026, 5:06 am
Table of Contents
Ever tried selling something online that doesn’t fit standard sizes? Yeah. Think carpets, fabric, tiles, wood planks. Traditional WooCommerce pricing? Not built for this. Messy. Confusing. Customers get lost.
Enter the WooCommerce Variable Pricing Calculator. Simple. Powerful. Makes measurement-based pricing easy. Fast. Accurate. Customers love it.
We’ll break it down. Why it matters. How to use it. Even some SEO tips and GEO optimization for stores in Europe, North America, or anywhere else where units differ.
What is the WooCommerce Variable Pricing Calculator?
The plugin calculates prices based on customer measurements. Not fixed prices. Not vague ranges. Real numbers. Real-time. It’s perfect for items sold by area, volume, or length.
Main perks:
- Multiple Measurement Types: Length, area, volume, custom dimensions.
- Variation Control: Each product can have unique rules.
- Pricing Rules: Minimums, maximums, increments, discounts, tables.
- Stock Management: Auto-reduces stock based on actual quantity.
- Easy Setup: No coding. No formulas. Simple menus.
Think of it as your silent assistant. Behind the scenes, doing the math. So, you don’t have to.
Why You Need This Plugin
Selling measurement-based products online is tricky. Here’s why:
- Accuracy Matters
Customers want exact pricing. Not guesses. Not approximations. A customer buying 15.5 sq m of tiles wants that price now. Not tomorrow. - Speed and Transparency
Shoppers hate waiting. With this plugin, prices update instantly. They see what they’ll pay. No support tickets. No emails. - Better Sales
Flexible pricing encourages purchases. Customers buy exactly what they need. Big orders, small orders—it works. - Reduce Errors
Manual math is messy. Mistakes happen. This plugin handles calculations automatically. Stock is accurate. Prices are right. Always. - SEO Advantage
Serving multiple countries? Metric, imperial, or both. Customers see units they understand. Makes shopping easier. Converts better.
WP Ultimate CSV Importer Pro
Get Ultimate CSV/XML Importer to import data on WordPress faster, quicker and safer.
How the Plugin Works: Step-by-Step Guide
Let’s make this practical. Step by step.
1. Install and Activate
- Go to WooCommerce → Plugins → Add New.
- Search for “WooCommerce Variable Pricing Calculator.”
- Install. Activate. Done.
A new Pricing Calculator tab appears in product pages. Easy.
2. Configure Measurement Types
- Open your product.
- Select measurement type: length, area, volume, custom.
- Pick units: meters, feet, square meters, square feet, cubic meters, cubic feet.
Tip: For SEO-targeted stores, show metric in EU, imperial in US. Simple.
3. Set Pricing Rules
- Minimum and Maximum Measurements: Avoid weird orders.
- Increment Steps: Sell in chunks (0.5m, 1 sq ft, etc.)
- Pricing Tables: Bulk discounts. Starting rates. Dynamic pricing.
- Limit Quantity: Keep stock in check.
Pricing rules feel alive. Not rigid. Customers see fair prices every time.
4. Manage Stock
- Automatic stock reduction. Real quantities, not units.
- Example: 3.7 cubic meters of gravel? Stock drops exactly that. No rounding errors.
Stock stays clean. You stay sane.
5. Optimize Product Pages
- Only show necessary fields: width, height, length, area, volume.
- Real-time price updates. Customers love it.
- Clean, simple design. No formulas, no clutter.
Trust me. Customers convert faster when it’s easy.
6. Test Before Launch
- Add sample products.
- Try different measurements.
- Check stock reduction.
- Test metric and imperial units.
Small step, huge difference.
Real-Life Use Cases
Here’s where this plugin shines:
- Tiles: Sell by area (sq m or sq ft). Customer measures their floor. Plugin calculates price instantly. No confusion.
- Carpets & Fabric: Sell by length. One customer wants 3.2 meters. Another wants 5.5 meters. All handled automatically.
- Wood Planks & Metal Rods: Linear measurement. Cut lengths vary. Pricing changes instantly. Stock reduces precisely.
- Soil, Gravel, Foam Blocks: Volume-based pricing. Cubic meters or cubic feet. Customers order exact quantities. Less waste.
- Glass or Countertops: Custom width × height. Perfect for builders, renovators, and DIYers.
SEO tip: Show local units and format decimals based on region. Customers notice. They appreciate it.
WP Ultimate CSV Importer Pro
Get Ultimate CSV/XML Importer to import data on WordPress faster, quicker and safer.
Case Studies
Case 1:
A German store sells kitchen tiles. Customers input room dimensions in meters. Plugin calculates square meters, converts to boxes, and applies a bulk discount. Customer sees exact cost instantly. Sales spike. Support tickets drop.
Case 2:
A US store sells custom curtains. Customers choose length in feet. Plugin updates price live. Minimum order rules prevent tiny scraps. Result? Less wasted material, happier customers, repeat orders.
Case 3:
Landscape supplier sells gravel by cubic meter. Orders can be large. Plugin automatically adjusts stock. Shipping rules apply based on volume. Store owner saves hours weekly. Customers get precise prices fast.
Advanced SEO Optimization Tips
- Units by Location
Metric in Europe, imperial in US/UK. WooCommerce geolocation helps. Customers see what makes sense. - Currency Formatting
Dynamic pricing in local currency: EUR, USD, CAD, GBP. Keeps it consistent. - SEO Keywords
- “Buy tiles by square meter in Germany”
- “Order wood planks by linear feet in the US”
- “Shop fabric by yard in Canada”
- Shipping Calculations
Combine measurement-based pricing with region-specific shipping rules. Gravel and large items need this.
Benefits of Using the WooCommerce Variable Pricing Calculator
- Boost Customer Trust
Instant, accurate pricing. Customers feel in control. They see what they pay. No surprises. GEO-targeted units and currencies build trust.
- Save Time
Manual quotes? Gone. Math errors? Gone. Focus on other tasks. Marketing, customer service, expanding your store. Plugin handles the math.
- Increase Sales
Flexible pricing makes exact orders easier. Bigger orders. Smaller orders. Customers happy. More conversions. Repeat sales.
- SEO-Friendly
Metric or imperial units. Currency formatting. Localized shopping experience. Customers feel comfortable. Google notices.
- Reduced Errors & Simplified Management
Automatic validation. Stock updated in real-time. Pricing rules applied consistently. Less headaches. Smooth operations.
- Scalable for Growing Stores
One product or 1,000, it scales. Each variation has unique rules. GEO targeting is easy. Expand to new regions smoothly.
- Better Customer Experience
Instant pricing. Accurate calculations. Flexible order sizes. Customers feel understood without talking to support. Loyalty grows. Repeat orders happen.
Troubleshooting & Tips
- Price Not Updating? Check measurement type and units. Plugin might be set to default variation.
- Stock Misalignment? Make sure stock is defined per variation, not globally.
- Complex Formulas Needed? Use the pricing table option. No coding required.
- Multiple Units? Enable both metric and imperial in plugin settings. GEO-targeting automatically shows the right one.
These small fixes prevent most headaches.
Conclusion
Selling products by area, volume, or length? Hard without the right tool. The WooCommerce Variable Pricing Calculator fixes it. Instantly. Accurately. Automatically. It:
- Handles variations.
- Applies rules.
- Manages stock.
- Updates prices in real-time.
SEO-optimized stores win. Customers trust the numbers. They return. Repeat sales happen. Small plugin. Big impact. Selling complex measurements? Done. Easy. Whether you sell tiles in Germany, wood planks in the US, or fabric in Canada, the plugin ensures your customers get exactly what they need, instantly and accurately.
WordPress Security Best Practices for Data-Heavy Sites
14 Dec 2025, 6:43 pm
Table of Contents
Your WordPress website isn’t just a digital presence; it’s the foundation of your brand’s operations. It stores customer details, payment records, and critical content assets that drive your business every day. As your database grows and your site traffic increases, so does your exposure to potential security threats.
From malware attacks and brute-force logins to database breaches and downtime, a single vulnerability can compromise sensitive information and damage your credibility. For high-traffic or data-driven WordPress sites, even minor oversights such as outdated plugins or weak credentials can create major security gaps.
Investing in proper security isn’t optional anymore. It’s the difference between a stable, scalable business and one that risks costly disruptions.
In this complete guide, you’ll learn how to secure, monitor, and optimize large-scale WordPress environments using proven strategies, trusted tools, and actionable best practices that align with security standards.
How to Secure Data-Heavy WordPress Sites | WordPress Security Best Practices
1. Start with a Secure Hosting Foundation
Your hosting environment forms the backbone of your website’s security. For data-heavy WordPress sites, shared hosting simply isn’t enough; you need a server optimized for high performance, uptime, and proactive protection.
A secure WordPress hosting setup ensures that threats are mitigated at the server level, long before they reach your website. Managed WordPress hosting solutions come with built-in security layers, automatic updates, and real-time monitoring, giving you both speed and safety.
Best Practices
Choose Managed WordPress Hosting
Go for a reliable managed WordPress host that provides built-in SSL certificates, automatic daily backups, and real-time malware scans. Hosting platforms like WP Engine, Kinsta, and Cloudways ensure your site stays fast, stable, and protected even during heavy traffic.
Enable DDoS Protection and Firewalls
Add an extra layer of security with DDoS protection and Web Application Firewalls (WAF). These tools stop harmful traffic before it hits your server, keeping your data and users safe. Services like Cloudflare and Sucuri Firewall make setup simple and effective.
Keep PHP Updated
Always use the latest PHP version supported by WordPress. Updated PHP improves speed, fixes bugs, and seals known vulnerabilities. You can check or update PHP easily through your hosting control panel.
Use a Staging Site for Safe Testing
Never test changes directly on your live website. Instead, use a staging environment to try out updates, plugins, or new features safely. Once confirmed, push them to your live site without any risk of downtime.
Monitor Server Health Regularly
Keep an eye on your server’s performance and security logs. Regular monitoring helps spot unusual activity or slowdowns early. Tools like New Relic or Query Monitor can help maintain consistent performance.
Recommended Tools and Hosts
- WP Engine – Enterprise-grade managed hosting with built-in caching and malware scanning.
- Kinsta – Secure Google Cloud-based hosting optimized for scalability and uptime.
- Cloudways – Flexible managed hosting supporting advanced server configurations.
2. Keep WordPress Core, Plugins & Themes Updated
One of the most overlooked yet most critical aspects of WordPress security is keeping everything up to date. Outdated plugins, themes, or even the WordPress core often contain known vulnerabilities that hackers actively exploit.
Regular updates don’t just add new features; they patch security holes, improve performance, and maintain compatibility across your site. For large or data-heavy websites, ignoring these updates can lead to downtime, data loss, or unauthorized access.
Best Practices:
Enable Automatic Updates for Trusted Plugins
Turn on automatic updates for reliable plugins and minor WordPress core releases. This ensures your website stays protected against newly discovered vulnerabilities without requiring manual intervention.
Test Major Updates in a Staging Environment
Before applying big updates to your live site, always test them in a staging environment. This helps you catch compatibility issues early and prevent downtime or plugin conflicts.
Remove Unused or Abandoned Plugins and Themes
Delete any inactive or outdated plugins and themes that are no longer maintained by developers. These components can become easy targets for hackers and slow down your site.
Review Update Logs Regularly
Keep track of your update history to ensure every plugin, theme, and WordPress component remains current. Regular monitoring helps you identify skipped or failed updates before they cause issues.
Use Reliable Update Management Tools
Tools like ManageWP, MainWP, or WP-CLI simplify bulk updates across multiple sites, saving time while maintaining top-level security and performance
3. Use Strong Authentication & Access Controls
As your website scales, the number of contributors, developers, and administrators often increases, and so does your security risk. Without proper user access control, even a trusted user account can become an entry point for attackers.
Strong authentication practices ensure that only authorized users gain access to critical areas of your website. Combining two-factor authentication (2FA) with structured role management is one of the simplest yet most powerful ways to protect your WordPress admin panel.
Best Practices:
Enable Two-Factor Authentication (2FA)
Activate 2FA for all admin-level accounts to add an extra layer of security beyond just passwords. Even if credentials are stolen, unauthorized users can’t access your dashboard without the second verification step.
Apply Role-Based Permissions
Assign roles and permissions wisely, and give each user access only to what they need. For example, Editors can publish content, while Contributors can only submit drafts. This limits damage if an account is compromised.
Limit Login Attempts
Set a cap on failed login attempts to block brute-force bots from guessing passwords. Use plugins that automatically lock out or temporarily ban suspicious IPs after multiple failed logins.
Avoid Default Usernames and Weak Passwords
Never use “admin” as a username. Create very strong and unique passwords with a combination of letters, numbers, and symbols. Encourage all users to update passwords regularly.
Audit User Roles Regularly
Perform routine user audits to remove inactive accounts or adjust permissions. Keeping your user list clean reduces the number of potential entry points for attackers.
Recommended Tools and Plugins:
- Wordfence Login Security – Adds 2FA, CAPTCHA, and login attempt limits for enhanced protection.
- Google Authenticator – Provides app-based two-factor authentication for secure sign-ins.
- Limit Login Attempts Reloaded – Prevents repeated failed logins and locks out abusive IPs.
4. Backup and Disaster Recovery Plan
When managing a data-heavy WordPress website, backups aren’t optional; they’re your safety net. A single corrupted update, malware attack, or accidental deletion can wipe out months of data. Having a solid backup and disaster recovery plan ensures you can restore your site quickly with minimal downtime.
Consider backups as your silent guardian, always ready to reverse any unexpected trouble. A proactive approach means automating backups, storing them securely offsite, and verifying that your restore process actually works when needed.
Best Practices
Automate Daily Incremental Backups
Set up automated daily incremental backups to save only the files and data that have changed. This approach keeps your server performance stable while ensuring your latest updates are always protected.
Store Backups on Secure Cloud Storage
Always store backups remotely. Cloud platforms such as Google Drive, Amazon S3, and Dropbox offer dependable, secure locations to store your files. Avoid keeping backups on the same server as your website to minimize data loss risk.
Schedule Weekly Full Backups
In addition to incremental backups, perform full weekly backups that include all your site files, databases, and configurations. This ensures you can completely restore your site in case of a major failure or hack.
Test Backup Restores Regularly
Each month, test your backups by restoring them in a staging environment. This ensures the backups work correctly and helps you catch any issues before a real emergency.
Encrypt Backups for Added Security
Before transferring or storing backups, encrypt your files to protect sensitive data such as user information or payment details. This extra step ensures your backups remain secure even if intercepted.
Recommended Plugins:
- UpdraftPlus – Automates cloud backups and allows one-click site restoration.
- BlogVault – Enterprise-level backup and migration tool with incremental backups and malware protection.
- JetBackup – Provides automated, off-site backups integrated with cPanel-based hosting.
5. Strengthen Database & File Permissions
The WordPress database is the heart of your website it stores user data, posts, and configurations. When managing data-heavy sites, securing your database and file permissions is essential to prevent data leaks or unauthorized access.
Even one misconfigured file permission can give hackers a way in. The goal is to minimize exposure by allowing only necessary access and isolating critical components.
Best Practices:
Change the Default Database Prefix
Update your database prefix from the default wp_ to something unique, like wp9x_. This simple step helps reduce the risk of SQL injection attacks that often target predictable database structures.
Use Strong Database Credentials
Create a unique database username and password. Never use generic names like “root” or “admin.” Strong credentials make it harder for attackers to gain unauthorized access.
Set Secure File Permissions
Assign correct file and directory permissions to prevent unauthorized access or editing:
- wp-config.php: 400 or 440
- Files: 644
- Directories: 755. These settings ensure that only essential users can view or modify critical files.
Disable File Editing in Dashboard
Block attackers (or even team members) from editing theme and plugin files directly in the dashboard. Add this line to your wp-config.php file:
define(‘DISALLOW_FILE_EDIT’, true);
This prevents unauthorized modifications within the WordPress admin area.
Optimize and Clean Your Database Regularly
Use security or performance plugins to remove unnecessary data such as post revisions, spam comments, and transients. A clean database improves both speed and security.
Enable Database-Level Encryption
If your site handles sensitive user or payment information, use database encryption to protect stored data. This ensures that even if data is compromised, it remains unreadable to attackers.
Recommended Tools and Plugins:
- WP-Optimize – Cleans and optimizes the WordPress database.
- iThemes Security – Helps restrict file permissions and disable file editing.
- WP-DBManager – Automates backups, repairs, and optimizations for large databases.
6. Implement Advanced Access Controls (User Roles & Authentication)
For data-heavy WordPress sites, controlling who can access what is just as crucial as securing your files. When multiple users, editors, or developers access your site, even one compromised account can open doors to attackers.
Implementing advanced access control ensures that every user only has permissions relevant to their role, reducing the chances of internal or external breaches.
Best Practices:
Use Proper WordPress User Roles
Assign permissions carefully based on the user’s responsibilities. For instance, grant “Editor” access for content updates instead of “Administrator.” This minimizes the risk of accidental or unauthorized changes to site settings.
Limit Login Attempts
Set a limit for failed login attempts to block brute-force attacks. After a certain number of failed tries, automatically block or temporarily lock suspicious IP addresses.
Rename Default Login URLs
Customize your WordPress login URL instead of using the default “/wp-admin” or “/wp-login.php” to reduce attack exposure. This hides your login page from bots and reduces automated attack attempts. Plugins like WPS Hide Login can make this simple.
Review User Activity Logs Regularly
Monitor activity logs to spot unusual behavior, such as repeated failed logins or unexpected admin actions. Quick detection can help prevent data breaches.
Recommended Tools and Plugins:
- Wordfence Security – Provides 2FA, login limits, and user monitoring.
- Limit Login Attempts Reloaded – Protects against brute-force attempts.
- WP Activity Log – Tracks user actions and changes in real-time.
- LoginPress – Customizes and hides login pages securely.
7. Encrypt Data & Use Secure Connections (SSL and TLS)
When your site handles large volumes of user data, protecting it in transit is non-negotiable. Every login, checkout, or form submission transmits sensitive information, and without encryption, it’s vulnerable to interception.
By implementing SSL and TLS encryption, you ensure all communication between your server and users remains private and tamper-proof.
Best Practices:
Install an SSL Certificate
Activate HTTPS to encrypt all communication between your server and visitors. Most managed WordPress hosts like Kinsta, WP Engine, or Cloudways provide free Let’s Encrypt SSL certificates that can be installed in one click.
Force HTTPS Redirection
Ensure every visitor lands on the secure version of your site by forcing HTTPS redirection. You can do this by updating your .htaccess file or using security plugins like Really Simple SSL to manage redirects automatically.
Enable HSTS (HTTP Strict Transport Security)
Add a layer of defense by enabling HSTS, which instructs browsers to connect only through HTTPS. This prevents protocol downgrade attacks and helps maintain consistent encryption.
Encrypt Sensitive Data
If your site handles user details, payment data, or login credentials, encrypt this information using strong hashing algorithms like bcrypt or Argon2. Avoid storing plain-text passwords under any circumstances.
Regularly Test Your SSL Strength
Use tools like Qualys SSL Labs or SSL Checker to identify weak cipher suites, expired certificates, or configuration issues. Regular testing ensures ongoing compliance with security standards.
Recommended Tools and Plugins:
- Really Simple SSL – Automates HTTPS redirection and mixed-content fixes.
- WP Force SSL – Quickly forces all URLs to use secure HTTPS.
- Let’s Encrypt via your hosting panel – For free, automatic certificate renewals.
- Cloudflare SSL and TLS settings – Manage encryption at CDN and origin levels.
8. Use a Web Application Firewall (WAF) & Malware Scanner
When your WordPress site handles massive data like customer records, orders, or financial details, a firewall is your first line of defense. A Web Application Firewall (WAF) filters and blocks malicious traffic before it ever reaches your server, safeguarding your site against hacking attempts, brute-force logins, and data breaches.
Best Practices
Activate a trusted WAF solution:
Choose a reputable firewall that inspects every HTTP request and blocks common exploits like SQL injections, XSS attacks, and XML-RPC abuse.
Enable malware scanning and auto-cleanup
Schedule weekly scans to detect hidden malware or injected scripts. Some premium tools even remove threats automatically to keep your site clean without manual intervention.
Set up real-time alerts
Configure your security tools to send instant notifications for suspicious activity, unauthorized logins, or file changes.
Block bad bots and rate-limit requests
Many attacks originate from automated bots. Use WAF settings to block known malicious IPs and throttle excessive requests.
Combine WAF with CDN protection
Platforms like Cloudflare and Sucuri offer both security and performance benefits, distributing content globally while blocking threats closer to their source.
Recommended Tools and Plugins
- Sucuri Security – A complete firewall and malware removal service with cloud-based protection.
- Cloudflare WAF – Offers enterprise-grade firewall rules, bot management, and DDoS protection.
- Wordfence – Monitors live traffic, blocks brute-force attempts, and provides malware scanning.
- MalCare – Detects and removes malware in real time with zero downtime.
9. Optimize Performance for Security
When your WordPress site manages large amounts of data, speed and security go hand in hand. A slow website isn’t just bad for user experience; it also increases the risk of downtime and attacks. Hackers often target sluggish, overloaded servers because they’re easier to exploit.
By optimizing performance, you reduce server strain, enhance stability, and close performance-based security gaps.
Best Practices
Clean up your database regularly
Remove spam comments, post revisions, and transient data to lighten your database load. Use optimization tools to schedule automated cleanups safely.
Use caching and CDN services
A Content Delivery Network (CDN) and caching plugins help distribute resources globally and reduce server requests. This not only boosts page speed but also limits brute-force attacks by filtering traffic through multiple nodes.
Compress and lazy-load media
Large images and videos slow down your site. Use tools that optimize media files and enable lazy loading to reduce bandwidth consumption.
Enable GZIP compression
Compress your website’s files to minimize loading times and protect against packet sniffing vulnerabilities.
Monitor performance metrics
Use tools like GTmetrix, Pingdom, or Google PageSpeed Insights to identify bottlenecks and optimize critical assets like scripts and stylesheets.
Recommended Tools and Plugins:
- WP-Optimize – Cleans your database, compresses images, and manages caching.
- WP Rocket – Premium caching plugin with built-in CDN and lazy-loading options.
- LiteSpeed Cache – Server-level caching that delivers superior performance for data-heavy WordPress sites.
- Smush or Imagify – For image compression and optimization.
10. Enable Continuous Monitoring & Security Reporting
Security for data-heavy WordPress sites isn’t a one-time setup; it’s an ongoing process. Continuous monitoring helps you detect and stop threats before they escalate. For businesses handling large amounts of customer or transactional data, real-time visibility is crucial to maintaining uptime and compliance.
By tracking every change, login, and system event, you can prevent insider threats, detect malware early, and ensure accountability across your team.
Best Practices:
Set up an activity log:
Record every action: logins, plugin activations, content edits, and user role changes. This transparency helps identify suspicious or unauthorized activities.
Schedule automatic security scans:
Weekly or daily scans catch new vulnerabilities quickly. Choose a tool that alerts you via email or Slack when unusual activity occurs.
Monitor uptime and server load:
High-traffic websites depend on constant availability. Use uptime monitoring tools to detect downtime instantly and take corrective action before users are affected.
Generate and review reports:
Share monthly or quarterly reports to track trends, recurring attacks, and security improvements. These insights guide future updates and training.
Automate routine checks:
Automation ensures consistency even during peak business hours. Use centralized dashboards to manage multiple sites efficiently.
Recommended Tools and Plugins:
- WP Activity Log – Tracks all user and admin activities with detailed timestamps.
- MainWP Security – Centralized dashboard to monitor and maintain multiple WordPress sites.
- ManageWP – Automates backups, updates, and uptime checks across client or business sites.
- Sucuri – Offers server-level security monitoring, malware scanning, and alerts.
FAQs
1. How can I secure my large WordPress site with heavy data?
Start by using managed WordPress hosting that includes SSL encryption, daily backups, and built-in firewalls.
Keep your core, plugins, and themes updated to patch vulnerabilities quickly.
Add two-factor authentication (2FA) for all admin accounts and monitor your website using a Web Application Firewall (WAF) to block suspicious activity in real time.
2. Which security plugin is best for large WordPress sites?
For data-heavy or high-traffic sites, Wordfence and Sucuri are the most reliable options.
Wordfence offers a powerful endpoint firewall, malware scanner, and live traffic analysis.
Sucuri provides a cloud-based firewall and DDoS protection to stop attacks before they reach your server.
Both are designed for enterprise-grade WordPress security and ongoing protection.
3. How often should I back up my WordPress database?
If your website handles frequent updates or transactions, schedule daily incremental backups. Incremental backups capture only the changes made since the last backup, saving time and storage.
For e-commerce or membership websites, real-time backups are ideal to ensure minimal data loss.
4. Can too many plugins slow or weaken my site’s security?
Yes. Having too many or outdated plugins can increase security risks and slow performance. Each plugin introduces additional code that may contain vulnerabilities. Use only essential, trusted plugins that are regularly updated, and remove any inactive or duplicate ones.
Pro Tip: Perform a quarterly plugin audit using tools like ManageWP or WPScan to detect potential issues.
5. How can I check if my WordPress site is hacked?
Use malware scanners like Wordfence or Sucuri SiteCheck to detect infections or unauthorized changes. Look for unusual login attempts, sudden traffic drops, or unknown admin accounts. If a breach occurs, restore your latest backup, reset all passwords, and review your security logs for anomalies.
Secure Today, Scale Confidently Tomorrow
Securing a data-heavy WordPress site isn’t a one-time task; it’s an ongoing responsibility that protects your brand, your customers, and your hard work.
As your website grows in traffic, transactions, and data volume, so does its exposure to potential threats. That’s why building a solid security foundation from the start is critical.
From choosing managed WordPress hosting to setting up automated backups and real-time monitoring, every layer of protection matters. Regular updates, strong authentication, and proactive threat detection help ensure that your site runs safely and efficiently even under heavy data loads.
Security isn’t just about prevention; it’s about confidence and continuity. A secure website keeps your operations stable, your SEO rankings strong, and your customers’ trust intact.
If you’re ready to take your website’s protection to the next level, our experts are here to help.
Contact support@smackcoders.com and let’s build a faster, stronger, and more secure WordPress ecosystem together.
Managing WooCommerce Inventory: Best Practices for Scaling Stores
12 Dec 2025, 6:10 am
Table of Contents
Inventory Management in WooCommerce
Managing inventory in WooCommerce might sound simple when your store is small, just a few products, some orders a day, and manual tracking feels enough. But as your store scales, things change drastically. You start adding product variations, multiple suppliers, and sales from different channels such as Amazon or eBay. Suddenly, keeping your stock accurate becomes a full-time task.
WooCommerce provides built-in inventory features such as stock quantity control, low-stock notifications, and backorder management. While these work well for beginners, they fall short when you handle hundreds or thousands of SKUs. Without a proper system, you risk overselling, order delays, and disappointed customers, all of which can damage your brand reputation and revenue.
Effective inventory management is more than just tracking numbers; it’s about maintaining real-time accuracy across all channels, ensuring smooth order fulfillment, and reducing manual effort through automation.
In this blog, we’ll explore the best practices, smart tools, and scalable strategies to help you take full control of your WooCommerce inventory so your business grows without chaos.
How WooCommerce Handles Inventory
WooCommerce has a built-in inventory management system that gives store owners basic control over stock levels. It’s designed to help you monitor product availability, manage out-of-stock situations, and maintain a smooth shopping experience for customers. But to truly scale, you first need to understand how these native tools work behind the scenes.
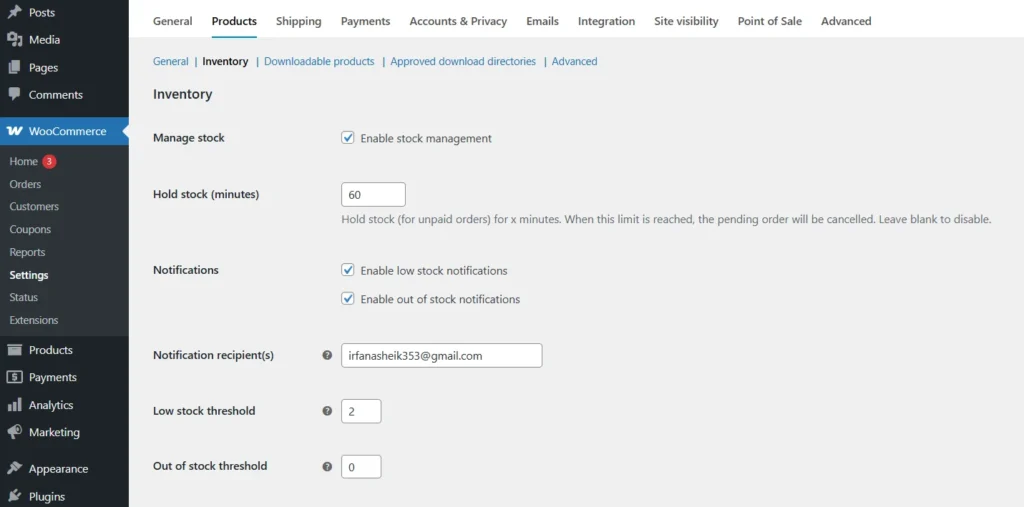
1. Product-Level Stock Management
Each product in WooCommerce can be assigned an individual stock quantity. When an order is placed, WooCommerce automatically reduces the product’s stock count. Once the stock reaches zero, the item is marked “Out of Stock”, and customers are unable to purchase it unless you choose otherwise. This automatic adjustment keeps your stock data synchronized without manual updates after every sale.
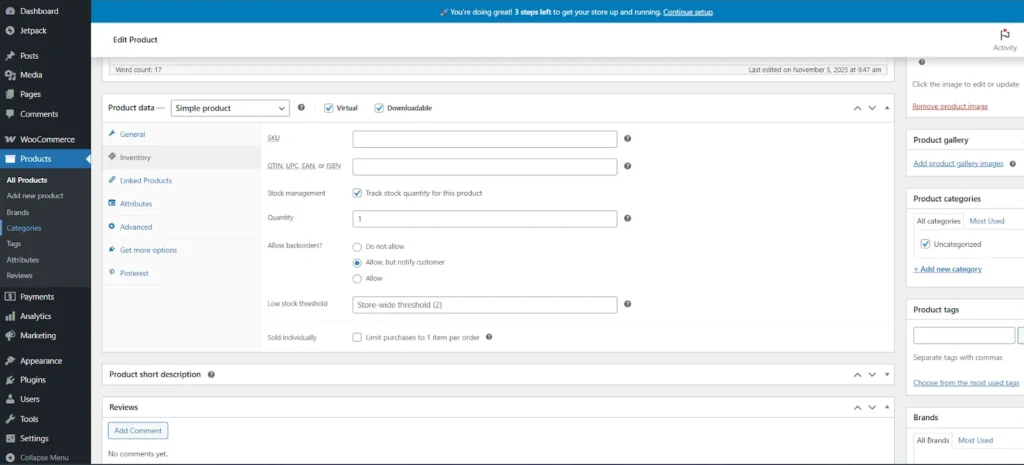
2. Low-Stock and Out-of-Stock Notifications
WooCommerce can alert you when certain items are running low. You can set a low-stock threshold and receive an email notification to restock in time. This feature helps prevent stockouts that can result in lost sales opportunities or unhappy customers.
3. Backorder Settings
For products that you plan to restock soon, WooCommerce allows backorders, letting customers place orders even when the product is temporarily unavailable.
You can choose one of three options:
- Do not allow backorders,
- Allow but notify customers, or
- Allow without notification.
The best practice is to keep customers informed by enabling notifications, which builds transparency and trust.
4. Global Inventory Options
You can configure global inventory settings in the WooCommerce admin panel by navigating to WooCommerce → Settings → Products → Inventory.
Here, you can define global preferences such as:
- Hold stock duration for unpaid orders,
- Enabling stock management globally,
- Setting default low-stock thresholds, and
- Enabling notifications for out-of-stock products.
These options provide the foundation of WooCommerce’s stock control system, ideal for small to medium-sized catalogs. However, once your product list grows into hundreds of variations or you start selling across multiple channels, these native settings alone may not be enough. That’s when automation, integration, and centralized systems become essential to maintain real-time accuracy.
Common Challenges When Scaling
As your WooCommerce store expands, managing inventory becomes more complex than simply tracking stock levels. What once took a few minutes now demands full-time attention. Scaling introduces multiple moving parts from bulk orders and product variations to warehouse logistics and third-party integrations.
Here are some of the most common challenges WooCommerce store owners face while scaling inventory management:
1. Tracking Thousands of SKUs
When your catalog grows to hundreds or thousands of products, manual tracking using spreadsheets or basic WooCommerce settings becomes impractical. Human error, duplicate entries, and missing updates can easily occur, leading to confusion about what’s actually in stock.
2. Multi-Channel Sales Complications
Many growing businesses expand beyond their WooCommerce store to platforms like Amazon, eBay, Etsy, or even offline stores using POS (Point of Sale) systems. Without proper synchronization, each platform maintains its own stock count, creating discrepancies. For instance, if one product sells on Amazon, it may still appear as “in stock” on WooCommerce, causing overselling and frustrated customers.
3. Slow or Inaccurate Stock Updates
As order volume increases, delays in stock updates can disrupt your fulfillment process. By the time WooCommerce registers a sale, another order may already have been placed, resulting in inaccurate availability data. This issue multiplies during flash sales or festive promotions when hundreds of orders arrive within minutes.
4. Overselling and Refund Issues
One of the most damaging consequences of poor inventory management is overselling, accepting more orders than available stock. Customers who don’t receive their products on time often request refunds or leave negative reviews, which can impact brand trust and long-term revenue.
5. Data Silos and Lack of Centralization
When your inventory is spread across different tools, your website, spreadsheets, supplier systems, and marketplaces, data silos form. This fragmentation makes it hard to get a clear picture of your actual stock and performance metrics, affecting decision-making.
To overcome these challenges, businesses need to shift from manual or semi-automated methods to centralized, automated inventory systems. These systems synchronize real-time data across every sales channel, eliminate redundancy, and give you full control of stock flow.
Best Practices for Managing and Scaling WooCommerce Inventory
1. Centralize Your Inventory System
When your WooCommerce store begins to grow, managing inventory across multiple channels becomes one of the biggest operational challenges.
If you sell products not just on your website but also through platforms like Amazon, eBay, or physical retail stores, keeping track of stock separately can lead to costly errors. This is where a centralized inventory system becomes essential.
A centralized system allows all your sales channels, WooCommerce, marketplaces, POS systems, and warehouses to pull data from a single inventory database. This ensures every product count, update, or sale is reflected everywhere in real time. For example, if a customer buys an item on Amazon, the stock on your WooCommerce store is automatically updated to prevent overselling.
Without such synchronization, your business risks inconsistent data, delayed order processing, and even lost revenue from canceled orders. Centralization also saves time by eliminating the need to log in to multiple dashboards for manual updates.
Technical Insight
Centralized inventory systems typically operate using APIs (Application Programming Interfaces) or middleware integration tools. These tools act as a bridge between WooCommerce and other platforms, automatically transferring data such as product quantities, order status, and fulfillment updates. For instance, if you receive a return on Amazon, the system can automatically restock the item in WooCommerce without any manual intervention.
Recommended Plugin
For WooCommerce stores, ATUM Inventory Management is one of the best tools for achieving centralized control. It provides:
- Detailed product-level insights
- Supplier and purchase order tracking
- Central dashboard for managing multiple warehouses
- Real-time stock and sales reports
ATUM integrates directly into the WooCommerce dashboard, offering advanced features without the need for external systems, making it ideal for medium to large online stores.
Result: Smarter, Smoother Operations
By centralizing your inventory, you eliminate duplication, reduce data errors, and gain a unified view of your entire stock ecosystem. It not only improves operational efficiency but also enhances your customer experience by ensuring accurate product availability at all times.
In short, centralization lays the foundation for scalability. Once your inventory system speaks the same language across all sales platforms, your business can handle growth confidently and efficiently.
2. Automate Stock Updates and Forecasting
As your WooCommerce store grows, manual inventory updates quickly become unsustainable. You might start your day by adjusting stock counts, only to find out later that your data is already outdated because of new orders, returns, or canceled transactions.
Automating stock updates ensures that every sale, return, or restock is instantly reflected across your system without human intervention. This real-time accuracy eliminates the most common causes of inventory-related issues: overselling, delayed order fulfillment, and inaccurate reporting.
For instance, when a customer places an order, your WooCommerce system should automatically:
- Reduce the product’s stock count.
- Notify the warehouse for packaging and shipping.
- Adjust stock levels if the order is canceled or refunded.
These actions happen within seconds, ensuring your data stays reliable no matter how quickly your store scales.
Predictive Demand Forecasting
Automation isn’t just about updating numbers; it’s also about anticipating demand. Using predictive analytics, your system can analyze sales history, seasonal trends, and product performance to forecast when you’ll run low on stock. This proactive approach helps you reorder products before shortages occur and prevents overstocking items that don’t sell fast.
For example:
- If a specific product consistently sells out in the first week of every month, the system can automatically alert you (or even create a purchase order) a few days in advance.
- During seasonal peaks like Black Friday, predictive forecasting can estimate required stock levels based on last year’s data and current sales velocity.
Recommended Tools
To automate stock updates and forecasting in WooCommerce, you can integrate tools like:
- Zoho Inventory – Excellent for real-time order syncing, demand forecasting, and automatic reordering.
- Cin7 – An advanced solution for large-scale operations that manages inventory across warehouses, online stores, and retail POS systems in one dashboard.
Both tools connect seamlessly with WooCommerce using APIs and handle everything from automated purchase orders to advanced analytics.
The Real Benefit
By automating your stock processes, you not only save hours of manual work but also make smarter business decisions based on data, not guesswork. The result?
- Fewer stockouts
- Reduced storage costs
- Smoother operations
- Happier customers
Automation is not a luxury; it’s a scaling necessity. It allows your WooCommerce store to function like a well-coordinated system, even as order volumes increase exponentially.
3. Organize SKUs and Product Variations Systematically
As your WooCommerce store grows, you’ll likely add multiple versions of the same product different colors, sizes, or packaging options. Without a clear system for organizing SKUs (Stock Keeping Units) and variations, managing inventory can quickly become chaotic. Proper SKU organization is the backbone of accurate reporting, faster fulfillment, and seamless integration with external systems like CRMs or accounting tools.
Think of SKUs as your inventory’s DNA; each one uniquely identifies a product. A well-structured SKU system allows you to instantly identify items by type, variant, or category without confusion. It also reduces the chances of shipping errors, duplicate listings, or mismatched products.
For example, instead of using random SKU codes like “1234” or “TSH01,” create meaningful and structured SKUs that tell you exactly what the product is.
Example:
TSHIRT-BLUE-M T-shirt, Blue color, Medium size
MUG-RED-12OZ Mug, Red color, 12-ounce capacity
This pattern is easy to understand, searchable, and scalable as your catalog grows.
How to Structure Your SKU System
When designing a SKU structure, keep these best practices in mind:
- Use consistent formatting. Stick to uppercase letters and hyphens for clarity.
- Include key attributes. Product type, color, and size should always be part of your SKU.
- Avoid special characters. Symbols like “/” or “#” can break integrations with other systems.
- Keep it short and readable. Long SKUs can be hard to manage and increase the chance of data entry errors.
If you manage multiple brands or warehouses, you can even include location or supplier codes in the SKU to make it more specific.
Example:
TSHIRT-BLUE-M-WH1 → Blue medium T-shirt from Warehouse 1
How It Helps at Scale
When your store reaches hundreds or thousands of products, a structured SKU system streamlines:
- Warehouse Management: Staff can quickly pick and pack the right items.
- Reporting: Easier to filter sales by product type or size.
- Bulk Uploads: CSV imports and exports become error-free and organized.
- Automation: Integration tools like ATUM or Zoho Inventory can easily read SKU formats for syncing and analytics.
WooCommerce Tip
WooCommerce allows you to set SKUs for each product and variation under the “Product Data → Inventory” section. Once defined, these SKUs appear in reports, orders, and integrations, making them essential for any scalable inventory setup.
4. Manage Backorders and Out-of-Stock Products Wisely
Running out of stock is one of the most frustrating experiences for both store owners and customers. On the other hand, offering backorders without a proper system can lead to confusion, delayed shipping, and unhappy buyers. Managing backorders and out-of-stock products wisely ensures that your store maintains trust, consistency, and a smooth shopping experience even when inventory fluctuates.
What Are Backorders?
Backorders allow customers to purchase an item that’s currently unavailable but will be restocked soon. It’s a great way to secure sales instead of losing customers who might otherwise go elsewhere. However, it requires transparency and accurate communication about restock timelines.
In WooCommerce, you can enable backorders for each product by navigating to:
Products → Edit Product → Inventory tab → Allow Backorders.
You’ll find three options:
- Do not allow – Prevents purchases when stock hits zero.
- Allow, but notify customer – Let customers order, but clearly inform them that the product will ship later.
- Allow – Let customers buy freely without notifications (not recommended for scaling stores).
The best practice is to enable backorders with customer notifications, as this maintains clarity and builds trust.
Best Practices for Managing Backorders
- Be Transparent with Delivery Timelines
If an item is on backorder, display a clear message such as: “Available on backorder, estimated delivery in 7–10 days.” This reassures customers that you’re aware of the delay and gives them realistic expectations.
- Prioritize Restocking High-Demand Items
Use your sales reports or forecasting tools to identify products that frequently go on backorder. Replenish these items first to avoid losing potential sales.
- Set Automated Notifications
Use plugins like ATUM or Back In Stock Notifier for WooCommerce to automatically alert customers when an item becomes available again. This re-engages interested buyers without manual follow-up. - Prevent Overselling
If you’re selling across multiple channels, make sure your backorder settings sync properly. Integrating your store with inventory management systems like Zoho Inventory or Cin7 ensures all sales channels reflect accurate stock levels and backorder statuses.
Handling Out-of-Stock Products
When an item is completely out of stock with no planned restock date, hiding it might be a better choice than showing “Sold Out.” WooCommerce allows you to:
- Automatically hide out-of-stock items under WooCommerce → Settings → Products → Inventory.
- Use filters or widgets to display “In Stock” items first.
If you prefer to keep them visible for SEO reasons, display an “Out of Stock” badge and a message like:
[“Currently unavailable. Check back soon or explore similar products below.”]
This approach keeps your product pages informative while preventing customer frustration.

[ The product page displays an “Available on backorder” status, keeping customers informed that the item will be restocked soon.]
The Takeaway
Smart backorder management is about balance; you don’t want to lose customers due to unavailability, but you also don’t want to oversell and break trust. By communicating clearly, automating restock notifications, and integrating your systems, you can maintain consistent customer satisfaction and operational control even during stock fluctuations.
5. Conduct Regular Inventory Audits
Even with automation and centralized systems, no inventory management strategy is complete without regular audits. Human errors, supplier mistakes, damaged goods, and software glitches can still lead to discrepancies between your WooCommerce data and your physical stock. Conducting consistent inventory audits ensures that your digital records always match real-world inventory, a crucial step for accuracy and financial integrity.
Inventory audits act as a health check for your WooCommerce store. They help you identify mismatches early, prevent revenue loss, and ensure your customers always see correct product availability online. For scaling businesses, small discrepancies multiplied over hundreds of SKUs can turn into significant financial setbacks.
Regular audits also help:
- Detect missing or misplaced products in warehouses.
- Catch errors in SKU labeling or barcode scanning.
- Confirm product counts after returns or damaged goods.
- Maintain accurate accounting and tax reporting.
How to Perform an Inventory Audit in WooCommerce
- Export Your Stock Report
Go to WooCommerce → Reports → Stock and export your inventory data as a CSV file. This file includes all product IDs, SKUs, stock quantities, and statuses. - Compare Digital vs. Physical Stock
Use warehouse or storage data to cross-check the exported numbers. Count items manually or use barcode scanners for faster validation. - Identify and Correct Discrepancies
If a product’s physical count doesn’t match WooCommerce records, update it immediately. Ensure that the cause of the mismatch, such as damaged stock or missed entries, is addressed. - Schedule Regular Audit Intervals
- Small Stores: Once every quarter.
- Medium Stores: Monthly.
- High-Volume Stores: A Weekly or even daily audit is good during high-traffic seasonal times like Black Friday.
This frequency depends on how fast your inventory moves and how complex your catalog is.
Pro Tip: Automate Reconciliation
To minimize manual effort, integrate your WooCommerce store with accounting systems like QuickBooks or Xero. These tools automatically sync your sales, purchases, and stock levels, allowing you to reconcile inventory against financial records seamlessly.
Additionally, plugins such as ATUM Inventory Management can generate advanced reports showing discrepancies, helping you fix them before they affect sales or customer satisfaction.
The Result: Accuracy, Trust, and Profitability
Regular audits don’t just prevent mistakes; they build confidence. Accurate data allows for better forecasting, more informed restocking decisions, and a smoother customer experience. It also helps maintain transparency across your team, suppliers, and accounting department.
By making inventory audits a consistent part of your WooCommerce routine, you create a foundation of accuracy that supports long-term scalability and financial stability.
Integrate Supply Chain and Automation
The true power of scalable inventory management lies in integration, connecting every element of your supply chain into one cohesive system.
Here’s how you can integrate key components of your WooCommerce store for maximum efficiency:
1. Supplier Integration
Connect your WooCommerce store with supplier systems or ERP tools. This enables automatic purchase orders when stock drops below a certain threshold. Instead of manually reaching out to suppliers, your system can reorder stock in advance, preventing last-minute shortages.
2. Shipping and Fulfillment Integration
Link your inventory tools with shipping providers like ShipStation, EasyPost, or ShipRocket. Once an order is fulfilled, the shipping integration automatically updates the inventory count in WooCommerce, keeping your data accurate across all channels.
3. POS and Retail Integration
If you also sell in physical stores, connect your WooCommerce inventory with Point of Sale (POS) systems such as Square or Lightspeed. Every in-store sale instantly reduces stock from your WooCommerce catalog, ensuring real-time accuracy and avoiding double-selling.
4. Multi-Warehouse Management
For larger businesses, tools like Cin7 and Zoho Inventory allow you to manage stock across multiple warehouses. You can track which items are stored where, view transfer histories, and optimize delivery routes based on the customer’s location.
The Value of Automation and Integration
By integrating all these systems, you create a seamless backend ecosystem. Orders, restocks, returns, and shipments all update automatically across your platforms without human involvement. This not only saves time but also ensures consistent accuracy and a better customer experience.
In short, advanced inventory tools and integrations transform WooCommerce from a single-channel store into a scalable, enterprise-ready eCommerce solution capable of handling growth efficiently.
Conclusion: Build a WooCommerce Store
Scaling a WooCommerce store is exciting, but it comes with growing pains. As order volumes rise, product variations expand, and new sales channels open up, managing your inventory effectively becomes the key to sustainable success. Without a strong system in place, even the most well-designed store can lose efficiency, customers, and profits.
The solution lies in accurate, automated, and centralized inventory management. By combining WooCommerce’s native tools with advanced integrations, you can ensure your store stays organized, responsive, and error-free no matter how fast it grows.
A WooCommerce store is built on three principles:
- Real-time accuracy – Instant stock updates across every sales channel.
- Automation – Systems that handle updates, forecasting, and order syncing without manual work.
- Centralization – A single source of truth that connects suppliers, warehouses, and your WooCommerce dashboard.
When these principles come together, your inventory stops being a challenge and becomes a competitive advantage. You’ll spend less time fixing errors and more time focusing on what really matters: growing your brand and delighting your customers.
Actionable Takeaways
- Audit your inventory regularly. Even automated systems need human validation.
- Implement automation tools early. Don’t wait until you’re overwhelmed; integrate solutions as soon as you start scaling.
- Use meaningful SKUs. A structured naming system saves hours of confusion later.
- Enable transparent backorder communication. Customers appreciate honesty more than silence.
- Centralize your data. Connect all your channels to prevent overselling and inconsistent reports.
These small but strategic steps can save you thousands in lost sales and operational inefficiencies.
Want to simplify your WooCommerce inventory management? Check out our import tool to bulk import inventory data to products. Get in touch with us at support@smackcoders.com. Let’s help you transform your WooCommerce store into a future-ready business engine.
FAQs: Managing WooCommerce Inventory
1. Can I manage a large inventory using WooCommerce alone?
Yes, WooCommerce can handle large inventories to a certain extent. It includes native features like product-level stock tracking, low-stock alerts, and backorder options. However, as your store grows beyond a few hundred products or starts selling across multiple platforms, WooCommerce’s default tools may not be enough. For larger catalogs (1,000+ SKUs), integrating tools helps automate updates, manage supplier data, and generate advanced reports for better control.
2. How do I prevent overselling in WooCommerce?
To prevent overselling, make sure “Manage Stock” is enabled for each product in your WooCommerce dashboard. Set a low-stock threshold to get alerts before an item runs out. If you sell on multiple platforms (like Amazon or physical stores), use centralized systems to sync your stock in real time. These integrations ensure all your channels reflect accurate availability instantly after every sale or return.
3. What’s the best way to forecast inventory needs for my WooCommerce store?
Forecasting inventory is all about using your past sales data to predict future demand. You can start by analyzing WooCommerce’s built-in sales reports to spot seasonal or trending products. For more accurate insights, use AI-driven forecasting tools, which automatically study buying patterns and recommend reorder points. This ensures you always have the right amount of stock, not too much, not too little.
4. How often should I perform inventory audits?
The frequency of audits depends on your store size and order volume:
Small Stores: Every 3–4 months.
Mid-Sized Stores: Once a month.
High-Volume Stores: Weekly or even daily during peak sales seasons.
Regular audits help catch errors from damaged goods, returns, or software mismatches before they affect your customer experience. Automated reconciliation tools can make this process faster and more accurate.
5. Which is better for scaling a plugin or a third-party inventory management tool?
If your business operates primarily within WooCommerce, a plugin like ATUM is often sufficient and cost-effective. But if you run multiple stores, warehouses, or channels, a third-party solution like Zoho Inventory or Cin7 offers more flexibility, reporting, and automation.
The ideal setup often combines both a WooCommerce plugin for product-level control and an external platform for centralized data management.
6. How can automation improve my WooCommerce inventory workflow?
Automation reduces manual workload by updating stock levels, sending supplier orders, managing backorders, and forecasting demand automatically. It eliminates human errors, speeds up fulfillment, and ensures you never oversell or overstock. In short, automation allows your WooCommerce store to scale without losing accuracy or customer satisfaction.
How to Prepare Your WooCommerce Store to Handle High Traffic
12 Dec 2025, 5:59 am
Table of Contents
Imagine your WooCommerce store as a hotel. A small hotel can handle a few guests efficiently, but when 100 people show up, the kitchen becomes chaotic, orders get delayed, and service quality drops.
Now imagine a large hotel with a spacious kitchen, trained staff, and enough resources. Even if a thousand guests arrive at once, everything runs smoothly.
Your WooCommerce store operates the same way. When only a few visitors browse, performance is fine. But when hundreds or thousands of users visit simultaneously, especially during a flash sale or festive campaign, your store’s server, database, and bandwidth are put to the test.
High traffic is a good thing. It means your marketing and SEO efforts are paying off. But if your store isn’t built to handle it, you risk slow loading speeds, cart failures, or even a complete crash, costing you sales and trust.
This guide will help you prepare WooCommerce for high traffic efficiently and securely, ensuring every visitor gets a smooth, lightning-fast shopping experience
Conditions Your WooCommerce Store Must Meet to Handle High Traffic
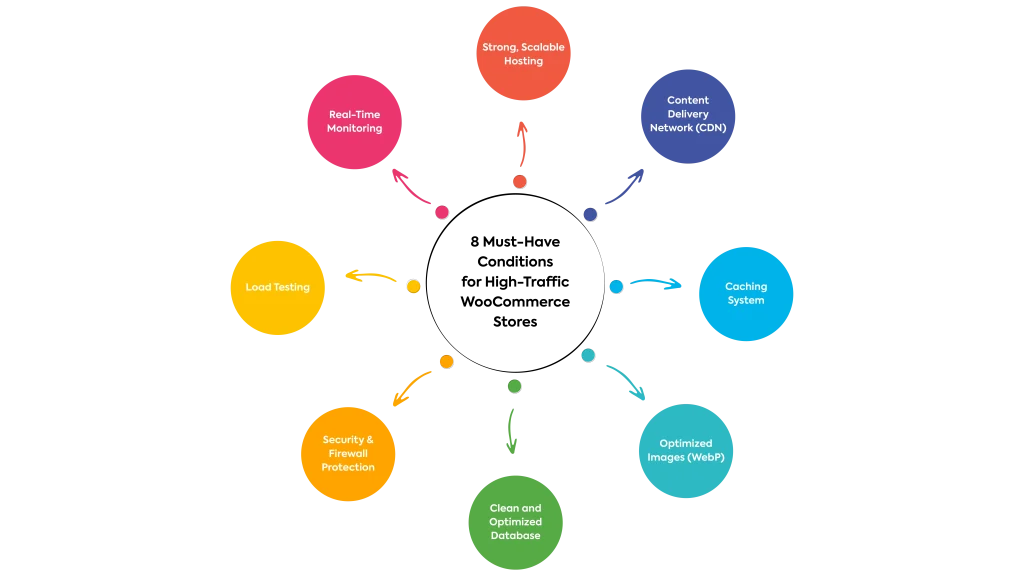
1. Use Strong, Scalable Hosting
Your hosting is the backbone of your WooCommerce store. Think of it like your store’s engine: the stronger it is, the more smoothly it can run under pressure. A weak or shared hosting plan is like running a hotel where ten chefs share a single kitchen. When traffic increases, everyone slows down, and chaos begins.
To handle high traffic efficiently, your WooCommerce store needs a powerful and scalable hosting setup. Managed or cloud hosting platforms like Kinsta, WP Engine, or Cloudways offer dedicated resources, faster response times, and automatic scaling options. These plans adjust your server capacity when traffic spikes, keeping your site stable even during peak shopping seasons.
Good hosting not only boosts speed but also strengthens your store’s reliability and security. When your website performs well, visitors stay longer, explore more products, and complete more purchases, the perfect combination for growth.
Kinsta is one of the top choices for high-performance WooCommerce stores. It’s built on Google Cloud Platform’s premium tier network, which ensures fast, secure, and scalable hosting. With features like auto-scaling, server-level caching, and dedicated resources, your store stays responsive even during flash sales or festive rushes.
Use WP Engine’s Performance Insights tool to analyze server response times and identify areas for improvement. It helps maintain consistency in speed, no matter how high your traffic goes.
Activate Cloudways’ Breeze plugin for built-in caching and combine it with Cloudflare Enterprise CDN to deliver blazing-fast performance globally.
2. Use a Content Delivery Network (CDN)
A Content Delivery Network, or CDN, acts like a team of mini-servers spread across the globe. Instead of loading your WooCommerce store from one main server, a CDN stores copies of your website on multiple servers worldwide. When a visitor opens your site, it loads from the nearest server location, making the experience faster and smoother.
Without a CDN, all your traffic hits a single server, causing delays, especially for international visitors. During heavy traffic, this can slow down checkout pages and product loading times. By using a CDN, you balance the load and keep your site quick even when hundreds of users browse at once.
Popular options like Cloudflare, BunnyCDN, or Jetpack CDN integrate easily with WooCommerce. They improve performance, reduce bandwidth usage, and even add an extra layer of security.
Enable Cloudflare APO (Automatic Platform Optimization) for WordPress; it caches both static and dynamic pages, giving WooCommerce stores a powerful performance boost even under heavy load.
BunnyCDN is known for its speed and affordability, perfect for small to mid-size stores that need a performance boost without high costs. It lets you optimize images and videos on the fly, ensuring smoother product pages and faster checkout.
Jetpack CDN (from WordPress.com) is beginner-friendly and integrates directly with WordPress to automatically serve your images and static files from their global network, no setup stress needed.
3. Enable Caching Plugins
Caching is like keeping a ready-to-serve version of your WooCommerce store. Instead of making your server rebuild every page each time a visitor arrives, caching stores preloaded copies, allowing your pages to load instantly.
During high traffic, this simple setup makes a big difference. Without caching, your server works overtime, rebuilding every image and product page repeatedly, which leads to slower load times and even timeouts. With caching, your store handles hundreds of visitors smoothly, using fewer resources.
Plugins like WP Rocket, LiteSpeed Cache, or W3 Total Cache are reliable choices for WooCommerce stores. They automatically store static versions of your site and clear them when updates occur. This ensures your customers always see the latest version of your store without delays.
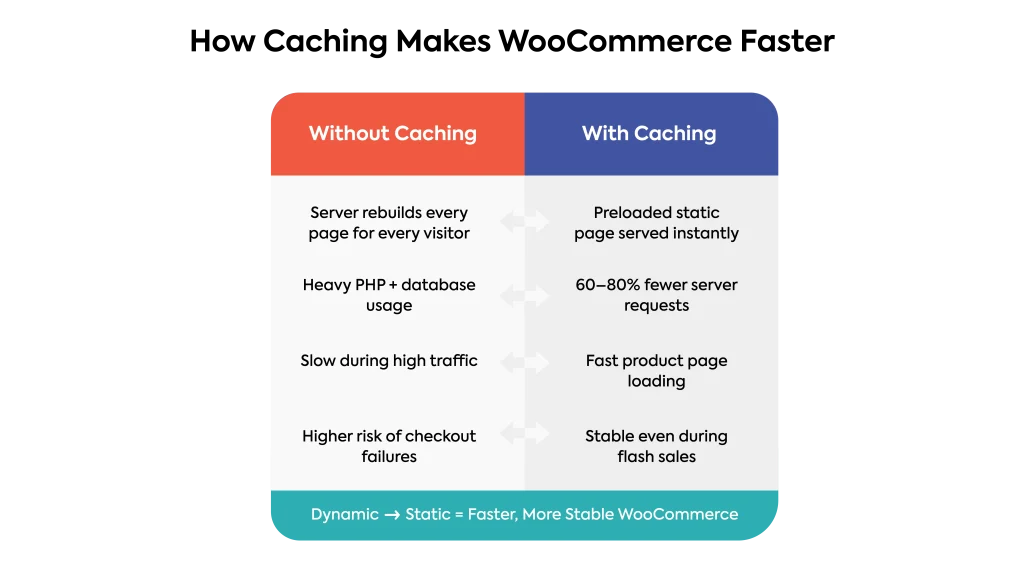
WP Rocket is a premium plugin that simplifies caching with just a few clicks. It automatically enables page caching, browser caching, and database optimization. Its “Delay JavaScript Execution” and “Preload Cache” features dramatically improve page speed scores, perfect for WooCommerce sites handling thousands of products.
LiteSpeed Cache is your perfect match if your hosting provider supports LiteSpeed servers. It delivers full-page caching, image optimization, and QUIC. cloud CDN integration for top-tier performance; all for free.
W3 Total Cache is a robust, developer-friendly option that offers advanced control over page, object, and database caching. It’s ideal if you want fine-tuned performance settings for large-scale stores.
4. Compress and Optimize Images
Images play a big role in attracting customers, but they can also slow your WooCommerce store if not optimized. Large image files increase loading time, especially during heavy traffic, causing delays at product pages and checkouts.
To keep your store fast, compress images without losing quality. Tools like ShortPixel, Smush, or Imagify automatically reduce image size and convert them into modern formats like WebP, which load much faster. Optimized images not only speed up your site but also improve user experience and SEO rankings.
Think of it this way: smaller, optimized images are like light luggage for your website. They make it easier to move quickly, even when many visitors browse at once.
ShortPixel automatically compresses new and existing images as soon as you upload them. It supports modern formats like WebP and even converts old files to reduce storage usage.
Smush is a WordPress favorite; it bulk-optimizes images, removes unnecessary metadata, and lazy-loads visuals, so they only load when users scroll to them. This saves both bandwidth and time.
Imagify, developed by the creators of WP Rocket, offers intelligent compression levels (Normal, Aggressive, and Ultra) and converts images to WebP format with a single click.
5. Optimize Store Products and Database
As your WooCommerce store grows, so does the amount of data on product listings, customer orders, reviews, and revisions. Over time, this buildup can slow down your database and affect performance, especially during high-traffic periods.
Regular optimization keeps your store running smoothly. You can use tools like WP-Optimize or Advanced Database Cleaner to remove old orders, transients, and unnecessary revisions. This helps your site respond faster to customer actions like searching products, adding to the cart, or checking out.
Also, review your product pages, compress product images, organize categories, and simplify filters. A clean and optimized store not only loads faster but also gives customers a seamless shopping experience.
WP-Optimize is an all-in-one solution that cleans up post revisions, spam comments, and transients with a single click. It also compresses images and caches pages, making it a powerful tool for improving both speed and stability.
Advanced Database Cleaner goes even deeper, allowing you to schedule automatic cleanups and remove unused tables or orphaned data left by deactivated plugins. This ensures your WooCommerce database remains clutter-free and optimized for fast queries.
6. Implement Security and Firewall Protection
When your WooCommerce store starts attracting high traffic, it also attracts unwanted attention from bots, hackers, and DDoS attacks. A sudden traffic spike isn’t always from real customers; sometimes, it’s automated requests trying to overload your server or steal data.
That’s why security is just as important as speed. Use trusted tools like Cloudflare Firewall, Wordfence, or Sucuri to block malicious traffic before it reaches your site. These firewalls filter harmful requests, protect your login pages, and keep your store safe even during heavy visitor activity.
Adding extra layers of protection, such as Two-Factor Authentication (2FA) and limited login attempts, strengthens your site further. A secure store doesn’t just handle high traffic; it protects your customers’ trust and keeps your business reputation intact.
Cloudflare Firewall acts as your first line of defense. It blocks malicious requests before they even reach your server, filtering bad bots and mitigating DDoS attacks in real time. Its analytics dashboard also gives you insights into threat patterns and suspicious activity.
Wordfence is a powerful WordPress-specific security plugin. It includes malware scanning, brute-force login protection, and a live traffic view so you can monitor every login attempt and block suspicious IPs instantly.
Sucuri provides a complete website security suite, including a Web Application Firewall (WAF), malware cleanup, and server-level protection. It also optimizes performance through caching and its global CDN network, so you get both speed and security.
7. Load Test Before Real Traffic Arrives
Before your big sale or marketing campaign goes live, it’s smart to test how much traffic your WooCommerce store can actually handle. Load testing helps you identify weak points like slow checkout pages or limited server capacity before real customers visit.
By using tools like Loader.io, k6.io, or GTmetrix, you can simulate hundreds of visitors accessing your store at the same time. The test results show where performance drops, so you can fix issues like slow database queries or unoptimized scripts early.
Regular load testing gives you confidence that your store can handle spikes in visitors without crashing. It ensures that when the big traffic day comes, everything runs smoothly from product views to payment completion.
Loader.io allows you to run simulated traffic tests by sending hundreds or thousands of virtual users to your store at once. You’ll see how your server responds under pressure, including response times and failure rates, so you can identify limits safely.
k6.io is a developer-friendly tool that provides deeper insights. It lets you run script-based load tests and monitor your site’s behavior under different traffic conditions. You can track metrics like request duration, error rates, and server latency, all crucial for WooCommerce stability.
GTmetrix, while not a load-testing tool in the traditional sense, is perfect for performance benchmarking. It analyzes page speed, waterfall loading, and Core Web Vitals, helping you fine-tune your site before high-traffic events.
8. Monitor Performance Regularly
Even after optimizing your WooCommerce store, continuous monitoring is essential to maintain stability during high traffic. Regular performance checks help you detect slowdowns, server strain, or plugin issues before they affect your customers.
Use tools like New Relic, UptimeRobot, or Jetpack Monitor to track uptime, server health, and response time. These tools send instant alerts when your website slows down or goes offline, allowing you to take quick action.
Monitoring also helps you understand visitor patterns, such as peak hours or pages that use the most resources. By analyzing this data, you can fine-tune your hosting plan, caching setup, and product pages for consistent performance.
New Relic is an advanced performance monitoring tool used by professionals to analyze server response, database queries, and slow-loading scripts. It gives a detailed breakdown of what’s causing lag, allowing developers to fine-tune your WooCommerce store for peak efficiency.
UptimeRobot focuses on uptime and downtime tracking. It checks your website every 5 minutes and immediately alerts you if your store goes offline, ensuring you never lose customers due to unexpected outages.
Jetpack Monitor offers a simple, integrated solution directly within WordPress. It automatically keeps an eye on your site’s uptime and sends instant email alerts if something goes wrong. Useful for beginners and small stores to easily monitor without any external dashboards.
Things to Avoid (Common Mistakes in High Traffic Situations)
When your WooCommerce store experiences high traffic, small mistakes can turn into big problems. Many store owners focus only on marketing but overlook technical readiness, leading to crashes, slow pages, and lost sales.
The first mistake is relying on weak or cheap hosting. Shared servers can’t handle sudden visitor spikes. When traffic increases, your site slows down or even goes offline, frustrating potential buyers. Always invest in hosting that can scale as your store grows.
Another common issue is skipping the caching or CDN setup. Without them, every visitor’s request hits your main server, overloading it. A caching and CDN combination keeps your store stable by distributing the load and speeding up content delivery.
Avoid using too many heavy plugins. Each plugin adds more scripts and database calls, which can make your store sluggish. Keep only essential plugins and remove the ones you don’t use.
Finally, don’t ignore image and database optimization. Large, uncompressed images and cluttered databases slow down your store’s response time. A quick monthly cleanup can make a big difference in performance. Read our guide on how to avoid common WooCommerce store mistakes to learn more.
Key Takeaway
High traffic is a sign that your WooCommerce business is growing, and that’s something to celebrate. But growth must come with preparation. Just like a large hotel needs a strong kitchen and trained staff to serve thousands of guests, your online store needs powerful hosting, caching, and optimization to handle increasing visitors smoothly.
A well-prepared WooCommerce store can welcome high traffic without slowing down, crashing, or losing customers. When you invest in the right hosting, optimize your database, and monitor performance regularly, you build a foundation ready for long-term success.
FAQs
1. How can I check if my WooCommerce store is ready for high traffic?
You can perform load testing with tools like Loader.io or k6.io to simulate real visitors and measure performance under stress. Monitor server response time, checkout speed, and database queries; if any of these lag, you may need optimization or better hosting.
2. What are the best ways to speed up WooCommerce during peak sales?
Use caching (Redis, Memcached, or WP Rocket), enable a CDN like Cloudflare, and compress images to reduce load times. Simplify your checkout process by removing unnecessary fields and enabling AJAX cart updates. Also, disable automatic updates or heavy plugins during big events like Black Friday to prevent crashes.
3. Do too many plugins affect WooCommerce performance?
Yes, every plugin adds scripts that can slow down your site. Keep only essential plugins and deactivate unused ones. Check performance impact using Query Monitor or GTmetrix waterfall. Instead of multiple optimization plugins, use one all-in-one tool like WP Rocket or Perfmatters to handle caching, minification, and database cleanup efficiently.
4. How does caching and CDN help manage high traffic?
Caching creates static versions of pages so the server doesn’t reload content for every visitor. A Content Delivery Network (CDN) stores copies of your site on global servers, speeding up access for international users and reducing server strain. Together, caching + CDN ensure fast loading times, especially during sudden traffic spikes.
5. How can I monitor and maintain performance during high traffic events?
Track your site in real time using New Relic, Jetpack Monitor, or Google Analytics. Before big sales, test checkout flow, optimize images, back up your site, and monitor uptime and slow queries. Avoid common mistakes like ignoring database cleanup or updating plugins mid-sale. Proper preparation keeps your WooCommerce store stable and conversion-ready.
Conclusion
A high-traffic WooCommerce store is every business owner’s dream; it means your brand is gaining attention and trust. But without proper preparation, that same success can turn into frustration. Slow loading pages, failed checkouts, or server crashes can cost valuable sales and customer confidence.
To keep your store strong under heavy load, focus on building a reliable foundation, start with powerful hosting, enable CDN and caching, compress images, and secure your site against traffic surges. Each of these steps ensures that when your visitors increase, your performance stays steady.
When your WooCommerce store is optimized for speed and scalability, you’re not just handling high traffic; you’re converting it into more sales and happier customers.
Building Dynamic WordPress Sites with Custom Post Types (Step-by-Step Guide)
11 Dec 2025, 12:25 pm
Table of Contents
What Makes a WordPress Site Dynamic?
If you’ve ever felt your WordPress site looks too “static,” you’re not alone. Most sites rely on Posts and Pages, which are fine for blogs or simple websites, but limiting when you need something more structured.
That’s where Custom Post Types (CPTs) come in. They allow you to organize content beyond the default setup. Want to showcase your projects, display team members, list real estate properties, or run a course library? All that becomes effortless once you use CPTs.
In short, Custom Post Types transform WordPress from a blogging platform into a true Content Management System (CMS). They help you manage different kinds of data independently, each with its own fields, taxonomies, and templates.
When you start using CPTs, you move from “just another website” to a dynamic WordPress site that’s organized, scalable, and easy to maintain.
Before we jump into the technical parts, here’s what this guide will walk you through step by step, in plain English. Whether you’re a developer or someone who just wants a more flexible website, you’ll find clear answers and practical examples.
By the end, you’ll know exactly how to build a dynamic WordPress site that’s flexible, scalable, and SEO-friendly.
How to Create a Custom Post Type in WordPress
Creating a Custom Post Type (CPT) in WordPress isn’t complicated; you just need the right approach for your skill level. There are proven methods, and both can deliver powerful results depending on how comfortable you are with code.
Creating Custom Post Types with Plugins (No-Code Method)
If you want to build a dynamic WordPress site without diving into code, you’re going to love this part. Plugins like JetEngine, Meta Box, and Advanced Custom Fields (ACF) can do all the heavy lifting; you just point, click, and create.
Think of it like adding new sections to your website’s “content library.” Instead of forcing everything into Posts or Pages, you can have a section just for Projects, Testimonials, or Courses. It’s cleaner, faster, and much easier to manage.
Let’s walk through it together step by step.
Step 1: Install and Activate the Plugin
For this instance, let’s use the Meta Box AIO plugin. This plugin lets you create and manage Custom Post Types through your WordPress dashboard, no coding, no confusion.
- In your WordPress, go to Plugins → Add New.
- Upload the Meta Box AIO plugin zip and hit Upload. Then install and activate.
- Once activated, a new menu item called “Meta Box” appears on your sidebar.
Creating a new custom post type ‘Projects’ using the Meta Box plugin, a simple, no-code approach to organize and display structured content in WordPress.
Step 2: Create Your First Custom Post Type
Now, let’s actually make your CPT.
- Go to Meta Box → Post Types → Add New Post Type.
- Fill in the key details like name, labels, advanced settings, taxonomies, etc.
- Click Publish.
- Select the link ‘Add custom fields to the post type’ from the notification bar or Meta Box → Custom Fields to create a new field group.
- Click ‘Add new field group’ and start to add new fields. Once created, assign it to the post type using the location fields and click Save.
- Your field group will be assigned to the custom post Projects.
You’ll instantly see a new Projects section in your sidebar, just like “Posts” or “Pages”.
Quick Check: If you click “Projects,” it opens a familiar editor where you can start adding new entries right away.
Creating Custom Post Types Without Plugins (Manual Dashboard Method)
If you’re someone who prefers a little more control but still wants to avoid plugins, this method is for you. You’ll be doing everything manually within your WordPress setup, lightweight, plugin-free, and ideal for performance-focused users.
This approach works great if you don’t want to rely on extra tools or if you’re developing client sites where fewer plugins mean fewer compatibility issues.
Let’s break it down step by step.
Step 1: Create a Small Custom Plugin for Your CPT
Instead of editing your theme’s functions.php file (which can break during updates), you’ll create a lightweight plugin just for your Custom Post Types.
- Open your WordPress installation folder via File Manager or FTP.
Navigate to:
wp-content → plugins
- Create a new folder called my-custom-post-types.
- Inside it, create a file named my-custom-post-types.php.
Add this starter code at the top:
| <?php /*** Plugin Name: My Custom Post Types * Description: Registers custom post types for your website. * Version: 1.0 * Author: [Your Name] */ |
- Save the file, go to Dashboard → Plugins, and activate My Custom Post Types.
You now have a clean foundation for your CPT’s future-proof and update-safe.
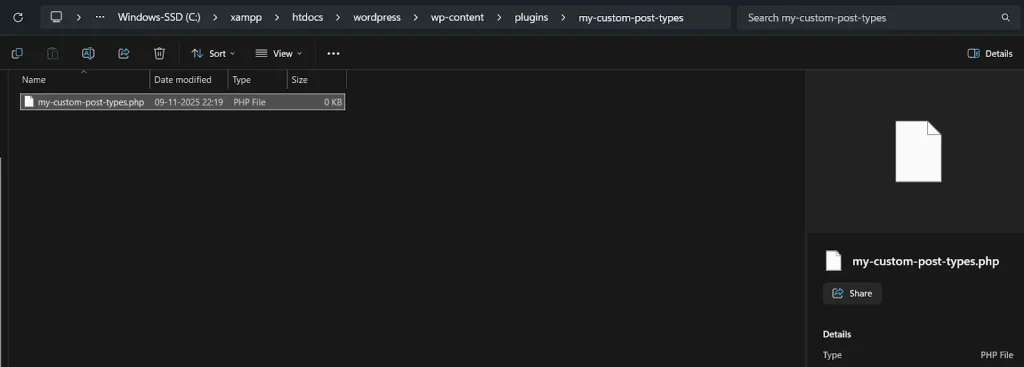
Custom plugin folder created inside wp-content/plugins containing the PHP file for registering custom post types in WordPress.
Step 2: Register Your Custom Post Type
Now, let’s add code to register your CPT (like “Projects”). Open your my-custom-post-types.php file again and paste this below the header:
| function create_project_post_type() { register_post_type(‘project’, array( ‘labels’ => array( ‘name’ => __(‘Projects’), ‘singular_name’ => __(‘Project’) ), ‘public’ => true, ‘has_archive’ => true, ‘show_in_rest’ => true, ‘menu_icon’ => ‘dashicons-portfolio’, ‘supports’ => array(‘title’, ‘editor’, ‘thumbnail’, ‘excerpt’), ‘rewrite’ => array(‘slug’ => ‘projects’), )); } add_action(‘init’, ‘create_project_post_type’); |
This function tells WordPress everything it needs to know about your new post type.
After saving, refresh your Dashboard, and you’ll see “Projects” appear in the sidebar!
Tip: Go to Settings → Permalinks → Save Changes once to flush rewrite rules. This ensures your new CPT’s URLs work properly.
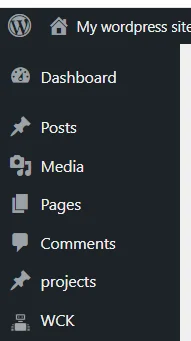
Step 3: Create Custom Taxonomies (Optional)
If you want categories or filters for your new CPT, register a taxonomy.
Add this below your CPT code:
| function create_project_taxonomy() { register_taxonomy(‘project-type’, ‘project’, array( ‘label’ => __(‘Project Type’), ‘hierarchical’ => true, ‘rewrite’ => array(‘slug’ => ‘project-type’), )); } add_action(‘init’, ‘create_project_taxonomy’); |
This adds a Project Type taxonomy under your CPT menu.
You can now group your projects by type (like Web Design, Branding, etc.).
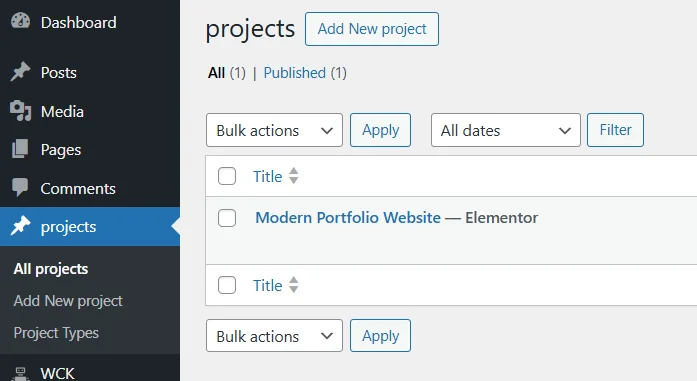
Step 4: Create Template Files to Display Your CPT
Finally, let’s make it visible on the front end.
Inside your active theme folder, create two files:
- single-project.php displays a single project post
- archive-project.php lists all your projects
In archive-project.php, you can start with:
| In archive-project.php, you can start with: <?php get_header(); ?> <h1>Our Projects</h1> <?php if ( have_posts() ) : while ( have_posts() ) : the_post(); the_title(‘<h2>’, ‘</h2>’); the_excerpt(); endwhile; endif; ?> <?php get_footer(); ?> |
Save and visit yourdomain.com/projects. Your new archive will appear automatically.
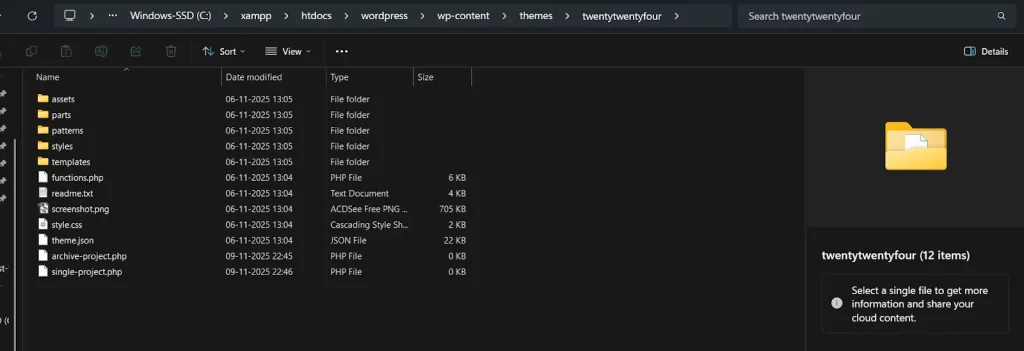
Active theme folder (Twenty Twenty-Four) showing custom template files, archive-project.php and single-project.php, added to display project archives and single project pages.”
Why Go Plugin-Free?
- No dependency on third-party plugins.
- Faster performance and fewer security risks.
- Easy to move between themes or servers.
This method is best for developers or agencies managing multiple WordPress projects, simple, clean, and efficient.
WP Ultimate CSV Importer Pro
Get Ultimate CSV/XML Importer to import data on WordPress faster, quicker and safer.
Creating Custom Post Types Programmatically (for Developers)
If you love full control over your WordPress environment, this one’s for you.
Creating Custom Post Types programmatically means writing your own code, registering post types, fields, and templates exactly how you want them. It’s cleaner, faster, and avoids plugin overhead.
This is the method professional WordPress developers prefer when performance, security, and flexibility matter most. Let’s walk through how to do it right.
Step 1: Register a Custom Post Type with Code
To create your own Custom Post Type, open your functions.php file (or your small plugin file, as explained earlier) and paste this code:
| function create_portfolio_post_type() { $labels = array( ‘name’ => ‘Portfolios’, ‘singular_name’ => ‘Portfolio’, ‘menu_name’ => ‘Portfolios’, ‘add_new’ => ‘Add New Portfolio’, ‘add_new_item’ => ‘Add New Portfolio’, ‘edit_item’ => ‘Edit Portfolio’, ‘new_item’ => ‘New Portfolio’, ‘view_item’ => ‘View Portfolio’, ‘search_items’ => ‘Search Portfolios’, ‘not_found’ => ‘No portfolios found’, ); $args = array( ‘labels’ => $labels, ‘public’ => true, ‘has_archive’ => true, ‘rewrite’ => array(‘slug’ => ‘portfolio’), ‘menu_icon’ => ‘dashicons-portfolio’, ‘show_in_rest’ => true, ‘supports’ => array(‘title’, ‘editor’, ‘thumbnail’, ‘excerpt’, ‘custom-fields’), ); register_post_type(‘portfolio’, $args); } add_action(‘init’, ‘create_portfolio_post_type’); |
This snippet does everything from naming your CPT to enabling Gutenberg and archives.
Once saved, refresh your WordPress Dashboard, and you’ll see a new menu item called Portfolios.
Tip: After adding new CPTs, always go to Settings → Permalinks → Save Changes to refresh URL structures.
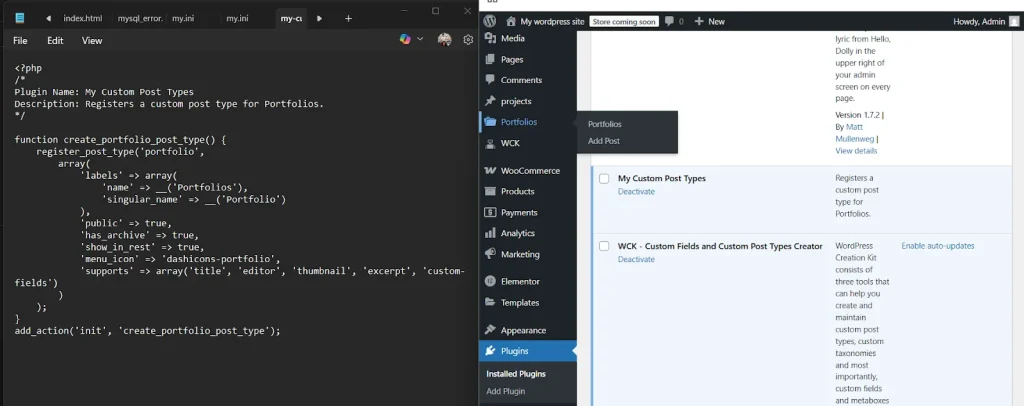
Step 2: Add Custom Taxonomies (Categories or Tags)
Custom taxonomies let you categorize your CPT items just like blog posts. Add this below your CPT registration code in the same file: my-custom-type.php
| function create_portfolio_taxonomy() {. register_taxonomy ( ‘portfolio-category’, ‘portfolio’, array ( ‘label’ => ‘Portfolio Categories’, ‘hierarchical’ => true, ‘rewrite’ => array (‘slug’ => ‘portfolio-category’), ‘show_in_rest’ => true, )); } add_action(‘init’, ‘create_portfolio_taxonomy’); |
Now your “Portfolios” will have categories, too, perfect for filtering or SEO-friendly content grouping.
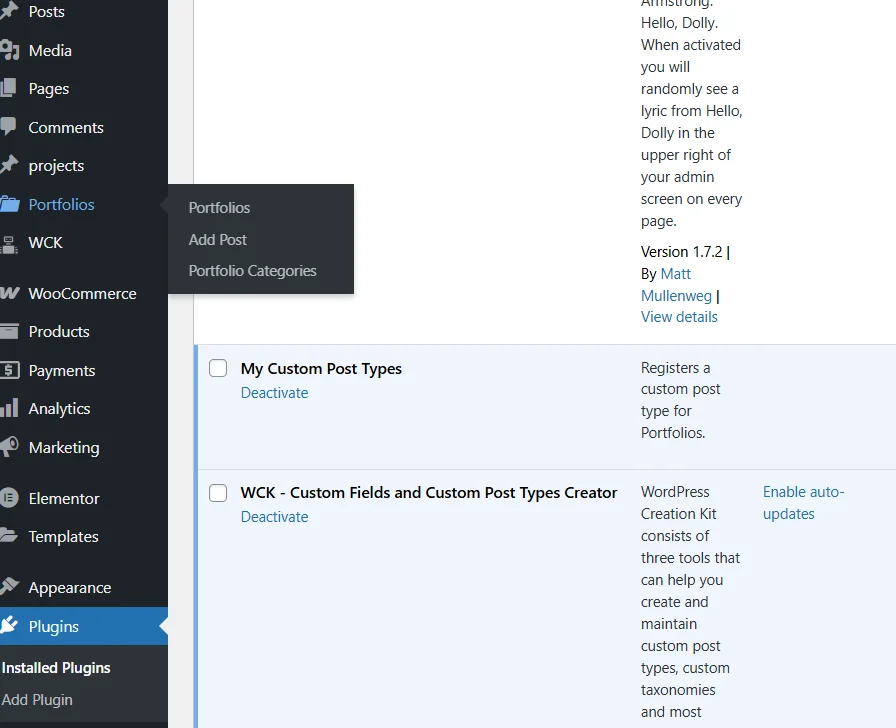
WordPress dashboard showing the custom ‘Portfolio Categories’ taxonomy listed under the Portfolios menu for organized content management.
Step 3: Add Custom Fields Programmatically (Optional)
For advanced users, you can register meta boxes or use custom field functions without plugins. Example:
| function portfolio_meta_box() { add_meta_box( ‘portfolio_details’, ‘Portfolio Details’, ‘portfolio_meta_callback’, ‘portfolio’, ‘normal’, ‘high’ ); } add_action(‘add_meta_boxes’, ‘portfolio_meta_box’); function portfolio_meta_callback($post) { $client = get_post_meta($post->ID, ‘client_name’, true); echo ‘<label>Client Name:</label>’; echo ‘<input type=”text” name=”client_name” value=”‘ . esc_attr($client) . ‘” class=”widefat”>’; } function save_portfolio_meta($post_id) { if (array_key_exists(‘client_name’, $_POST)) { update_post_meta($post_id, ‘client_name’, $_POST[‘client_name’]); } } add_action(‘save_post’, ‘save_portfolio_meta’); |
This adds a Client Name input box inside the Portfolio edit screen.
You can repeat this logic for other fields like “Project URL” or “Completion Date.”
WordPress Portfolio post editor showing a custom “Client Name” field added through Advanced Custom Fields for better project data management.
Step 4: Create Templates for Your CPT
Programmatic setup isn’t complete until you design how your CPT looks on the frontend.
In your active theme folder, create:
- single-portfolio.php → Displays single Portfolio posts
- archive-portfolio.php → Lists all portfolio entries
Add this to archive-portfolio.php as a starter:
| <?php get_header(); ?> <h1>Our Portfolio</h1> <?php if ( have_posts() ) : while ( have_posts() ) : the_post(); ?> <article> <h2><?php the_title(); ?></h2> <?php the_post_thumbnail(‘medium’); ?> <?php the_excerpt(); ?> </article> <?php endwhile; endif; ?> <?php get_footer(); ?> |
This template loops through all Portfolio posts and displays the title, image, and excerpt.
Step 5: Test and Refine
Now, head to your dashboard, create a few Portfolio entries, and test them on the frontend. Adjust your template and field display until it fits your site’s style.
When done right, your CPT will behave like any native part of WordPress, only more powerful.
Developer Insight: This method ensures zero plugin bloat and maximum performance. It’s how professional WordPress agencies handle custom content for high-traffic websites.
Why Go Programmatic?
- Speed: No unnecessary plugin overhead.
- Security: You control every line of code.
- Scalability: Perfect for large, custom WordPress builds.
Advanced Setup Custom Post Types with Categories, Tags, and Relationships
You’ve got your Custom Post Types up and running, great job.
Now it’s time to make them truly dynamic by connecting them with categories, tags, and relationships. This is where your site becomes structured, interactive, and scalable like a real content database instead of just a collection of posts.
Step 1: Add Categories or Tags to Your Custom Post Type
By default, your new CPTs don’t have Categories or Tags attached, but WordPress lets you add them easily.
If you registered your CPT via code, just modify your arguments and include this line inside the $args array:
‘taxonomies’ => array(‘category’, ‘post_tag’),
If you used Custom Post Type UI, open your post type and check “Attach existing taxonomies” → Category and Tag.
Now your custom post type will support all existing blog categories and tags, helping both users and search engines understand your content better.
Tip: For more control, create custom taxonomies (like “Project Type” or “Course Level”). They make your site organization cleaner and more SEO-friendly.
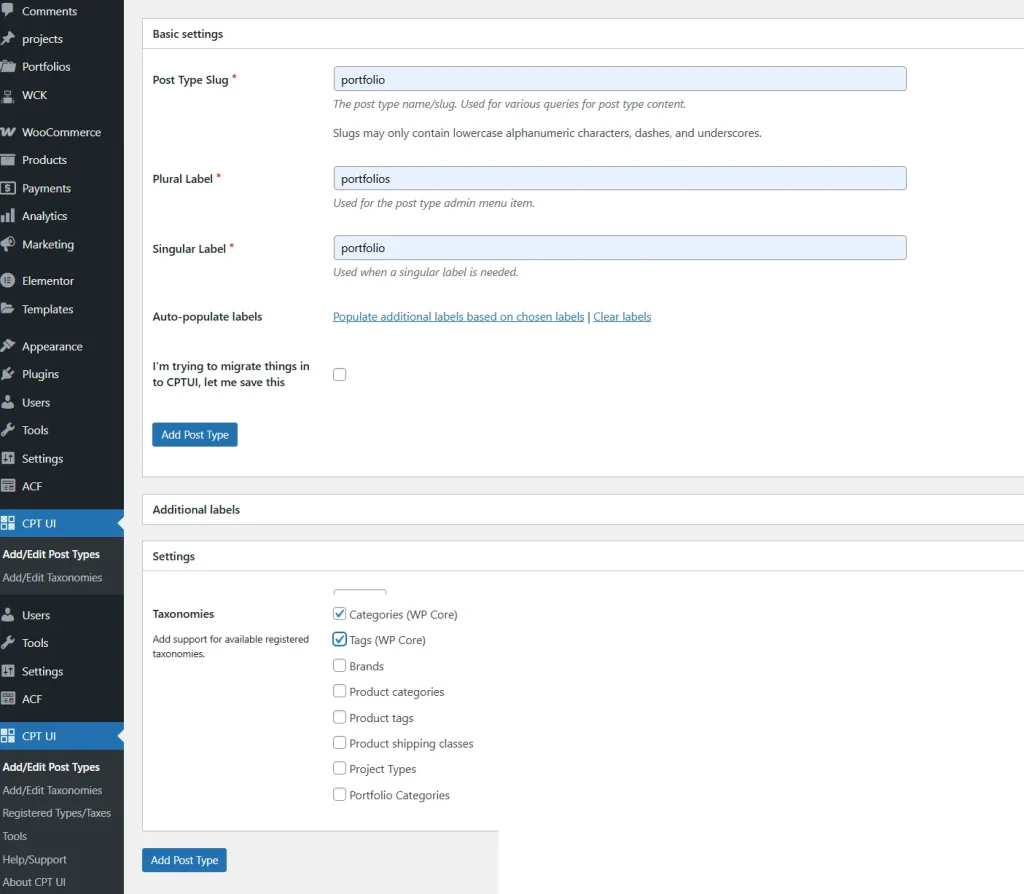
CPT UI Edit Post Type screen showing the Portfolio post type with default WordPress Categories and Tags enabled for flexible content organization.
Step 2: Create Custom Taxonomies for Your CPT
Custom taxonomies let you group content under domain-specific filters, not just generic ones like “Uncategorized.”
Example: You’re building a course website. You could create a taxonomy called Course Level with values like Beginner, Intermediate, and Advanced.
Here’s the code:
| function create_course_taxonomy() { register_taxonomy(‘course-level’, ‘course’, array( ‘label’ => __(‘Course Level’), ‘hierarchical’ => true, ‘rewrite’ => array(‘slug’ => ‘course-level’), ‘show_in_rest’ => true )); } add_action(‘init’, ‘create_course_taxonomy’); |
This gives you a new taxonomy section under your CPT menu in the dashboard.
When you edit a Course post, you’ll see a “Course Level” box where you can assign levels easily.

WordPress dashboard showing the custom “Course Level” taxonomy nested under the Courses post type for better course categorization.
Step 3: Connect Custom Post Types with Relationships
Relationships help link one CPT to another, for example:
- Events linked to Venues
- Courses linked to Instructors
- Projects linked to Clients
The simplest way is to use ACF Relationship Fields or the Meta Box plugin.
- Go to Custom Fields → Add New.
- Add a Relationship Field.
- Choose the target CPT (for example, connect Events → Venues).
- Save and assign it to your CPT.
Now, when editing an Event, you can select its Venue from a dropdown and display it on the frontend with a simple ACF template tag:
| <?php $related_venues = get_field(‘related_venues’); if ($related_venues) : foreach ($related_venues as $venue) : echo ‘<p>’ . get_the_title($venue->ID) . ‘</p>’; endforeach; endif; ?> |
Pro Tip: Relationships make your content smarter, they prevent duplication, improve SEO through contextual linking, and add depth to your user experience.
Step 4: Display Relationships on the Frontend
Once your CPTs are linked, you can show related items in templates or sidebars.
Example: On a Course page, display its Instructor info and related Courses. This can be done with ACF’s relationship functions or WP_Query loops.
Result: Visitors see structured connections boosting engagement and internal linking automatically.
Why Advanced Setup Matters
When your CPTs are linked through categories, tags, and relationships, your site transforms into a true content ecosystem.
- Easier navigation and filtering for visitors
- Stronger internal linking (SEO win)
- Smarter content management
It’s the difference between a flat website and a professional-grade CMS built on WordPress.
WP Ultimate CSV Importer Pro
Get Ultimate CSV/XML Importer to import data on WordPress faster, quicker and safer.
Best Plugins for Custom Post Types
Even though WordPress lets you create Custom Post Types manually, sometimes a plugin can save you time and headaches, especially when you’re managing multiple CPTs, fields, or relationships.
Here are the most reliable, developer-tested, and SEO-friendly plugins to supercharge your dynamic WordPress sites.
1. JetEngine
Best for: Elementor users who want dynamic content blocks and post listings.
JetEngine integrates with Elementor to display CPTs dynamically, perfect for portfolio, job, or listing sites.
It’s more design-oriented, giving you the creative control that developers get with code.
2. Meta Box
Best for: Developers who want more control and faster performance.
Meta Box is a lightweight alternative to ACF same features, less load. You can create custom fields, relationships, and settings pages, all with flexible code or UI.
Why Devs Love It: You can export your field groups as PHP code and integrate them directly into your theme or plugin.
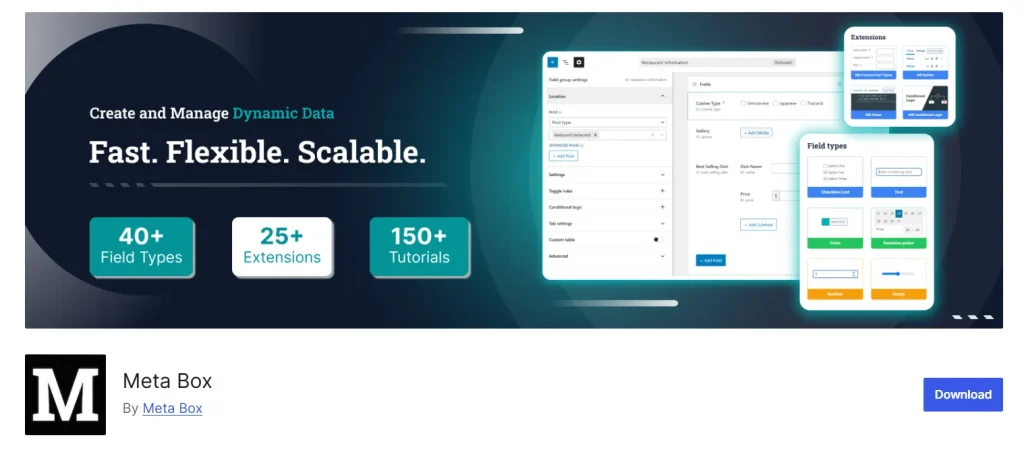
3. Advanced Custom Fields (ACF)
Best for: Adding custom fields, relationships, repeaters, and flexible layouts.
ACF gives you full control over the structure of your content. From text boxes to image uploads and repeater fields, it helps your CPTs collect any kind of data.
It’s also Gutenberg-compatible, meaning you can use fields directly in block editors.
Example: Add “Client Name” and “Project URL” fields to your “Projects” CPT in minutes, no PHP needed.
4. Pods Framework

Best for: Building complete dynamic websites with CPTs, taxonomies, and relationships all in one place.
Pods is a no-code powerhouse that lets you create CPTs, add fields, and even relate them together like connecting “Courses” to “Instructors.”
It’s intuitive for beginners yet powerful enough for developers.
Bonus: Pods supports REST API and custom templates, ideal for headless WordPress or complex builds.
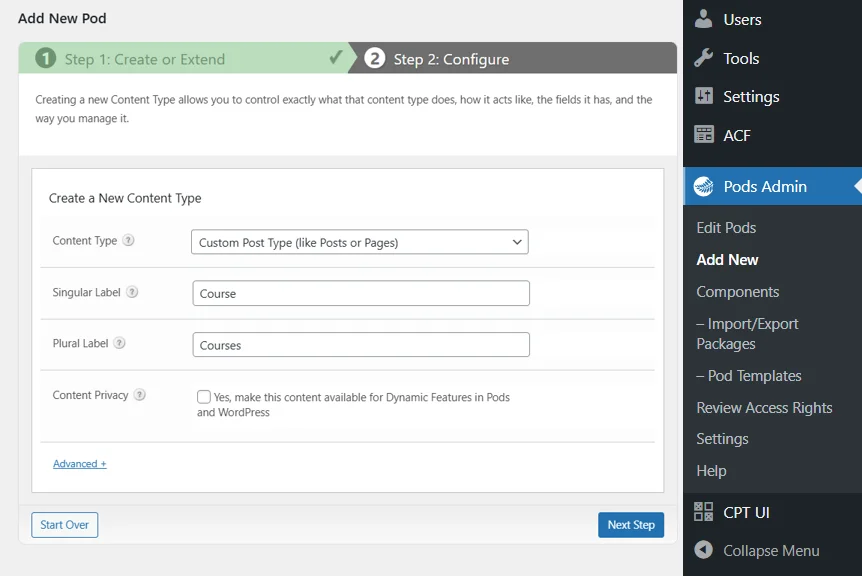
Pods Admin interface showing the creation of a new custom post type called “Courses” with simple, code-free setup steps.
5. Toolset Types
Best for: Users who want an all-in-one system to create, design, and display CPTs visually.
Toolset Types helps you create CPTs, taxonomies, and relationships while designing front-end templates using a drag-and-drop interface perfect for users who prefer building without code.
Use Case: Quickly build a directory, real estate site, or e-learning system without touching PHP files.

6. Custom Post Type UI (CPT UI)
Best for: Beginners and site owners who want a visual way to create post types and taxonomies.
This plugin is like your CPT control center. You can create new post types, attach existing taxonomies, and manage everything from the dashboard, no coding required.
Pair it with Advanced Custom Fields (ACF) to add custom fields and templates.
Pro Tip: Use CPT UI to register post types and ACF to design their data fields, a perfect combo for non-coders.
Final Verdict
If you’re a beginner, go for CPT UI + ACF.
If you’re a developer, use Meta Box or Pods.
If you’re a designer, using Elementor JetEngine will feel natural.
Each plugin has the same goal: to help you build structured, dynamic, and scalable WordPress sites without friction.
Conclusion: Turn WordPress into a Fully Dynamic CMS
When you step back and look at everything we’ve covered, one thing becomes crystal clear: Custom Post Types are what make WordPress truly limitless.
They’re the backbone of every professional-grade site you’ve ever admired, from e-learning platforms to real estate listings to agency portfolios. Without them, WordPress would still be just a blogging tool.
By now, you’ve learned how to:
- Build CPTs using plugins like CPT UI and ACF (perfect for beginners).
- Create CPTs manually or programmatically for full developer control.
- Use taxonomies, categories, and relationships to structure your content smartly.
- Choose the best plugins that fit your workflow and experience level.
When you combine all these, you turn WordPress into a dynamic content powerhouse, one that’s fast, organized, SEO-optimized, and built for growth.
Remember: Start small. Maybe just one CPT like “Projects” or “Courses.” Once you see how clean your content becomes, you’ll never go back to using regular posts for everything.
So, whether you’re a solo blogger, business owner, or web developer, this is your cue: “Start building smarter, not harder”.
Start Creating Your First Custom Post Type. Turn your WordPress site into a dynamic, scalable CMS today.
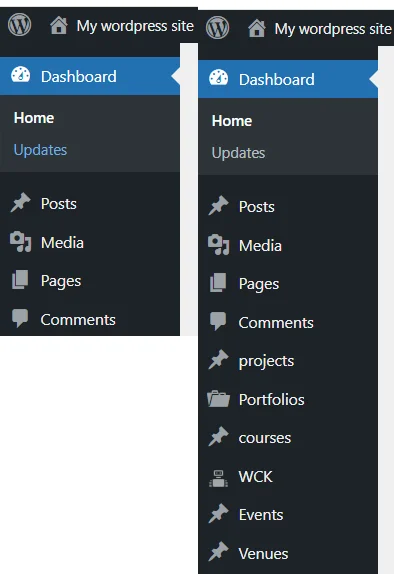
“Static WordPress site” (posts only) vs. a “Dynamic CMS site” (Posts + Projects + Events + Courses).
FAQs: Everything You Need to Know About WordPress Custom Post Types
1. What’s the relationship between Custom Post Types and WordPress?
Custom Post Types extend the core structure of WordPress. By default, you have “Posts” and “Pages.” CPTs let you define new content types like Projects, Courses, or Testimonials that behave just like posts but stay organized separately. In simple terms: Posts = blog content. CPTs = everything else your site needs.
2. How do I display my Custom Post Type content on the front end?
You can display CPT content in several ways:
Use Query Loop Block (block themes) for automatic listings.
Create archive-{cpt}.php and single-{cpt}.php templates for full control.
Or use page builders like Elementor or Gutenberg with dynamic widgets.
Example: Create archive-project.php to display a grid of all your Projects with featured images and links.
3. How do I add categories or tags to my Custom Post Type?
You can attach existing taxonomies or create new ones:
For existing categories/tags, just include this in your CPT arguments:
‘taxonomies’ => array(‘category’, ‘post_tag’).
Bonus Tip: Creating custom taxonomies like “Project Type” or “Course Level” gives your site a cleaner structure and better filtering options.
4. What’s the difference between Custom Post Types and Custom Fields?
CPTs define what kind of content you’re adding (like Projects or Courses), while Custom Fields define what details you’ll store (like “Client Name,” “Project Budget,” or “Duration”). They work hand-in-hand to structure and reuse your content.
5. Are Custom Post Types SEO-friendly?
Definitely, in fact, they help improve SEO when set up properly. By structuring your content and URLs (like /projects/ or /courses/), you give search engines a clearer understanding of your site’s architecture.
Just make sure to:
Enable “Has Archive” when registering your CPT.
Use SEO plugins like Rank Math or Yoast to optimize your CPTs.
6. Can I export or migrate my CPTs to another site?
Yes! The Tool WP Ultimate CSV Importer Pro can help you migrate CPT data, fields, and taxonomies safely. It’s perfect for agencies or developers managing multiple client sites.